Here is the Maiden Flight:
Specifications:
WIngspan: 75" w/ 12" chord & 3"x18" Ailerons
Fuselage length: 52"
Horizontal stabilizer: 26"x9" w/ 3" elevator
Motors: (2) Turnigy Park 480 850kv
ESC: (2) Turnigy 40A Plush
BEC: Turnigy DLUX 10A
Reciever: OrangeRX R800 8-Channel
Servos: (6) Corona DS238MG Metal Gear
Batteries: 2 Turnigy 2200mAh 3S LiPos
Background
Ever since I started scratch building my own planes I have wanted to do a twin engine cargo plane. When I finnally began to draw up plans for it I was just thinking of a plane with a 50-55" wingspan. For the electronics, I wanted to stay with my current power setup which is a Park 480 Motor and 2 1800mAh batteries. After doing a few calculations, I decided that it would be far too heavy with only a 55" wingspan. I figured out the maximum single wing I could get to fit in my car, which was around 75." I decided to make it much larger. With a 75" wingspan I was expecting it to weigh less than 1800g and have a very light wing loading. In the end it came out a little heavier, at 2300g, but it still flies great.
Here is a video on my initial designs:
As you can see in the video, I changed a lot of the dimensions before coming to the final design, But here is the last one I drew, and the picture I used while building the plane:

Build
Before I even ordered the parts I built a full size mockup to see how it would all fit together.

Once all the parts arrived I had to solder all of the connectors. There was a total of 34 Solder joints for this plane.


After soldering I started with the tail section. Then, I built the middle of the fuselage and finally the nose. Then glued them all together.


Next, I put in the ESCs, BEC and the Reciever. I also put in some velcro to hold down the batteries.

Next, I cut out and glued on the vertical stabilizer and put in the rudder servo and wires.


After that, I cut out the horizontal stabilizer, which is two pieces of foam thick, and also cut out the motor pods and glued them together. The horizontal stabilizer and the motor pods will both be removable and held on with rubber bands.


Next came the task of building the wing. I first layed out 3 pieces of foamboard, and trimmed the 2 outer pieces so they would all equal 75". I Built up 5 pieces of foamboard for the main spar and to give the wing an airfoil. Then I put in 2 wooden spars on each side of the foam spar. This was all glued in with gorilla glue and hot glue. Later on after the maiden flight, I added one more wooden spar to keep the wing extra strong. I also put in the 2 aileron and 2 flap servos and glued in all the extension wire. I put in the extensions for the motor wires as well.


I hooked up all of the servo pushrod, and put in the 2 wooden dowels that the rubber bands that hold the wing on are attached to.
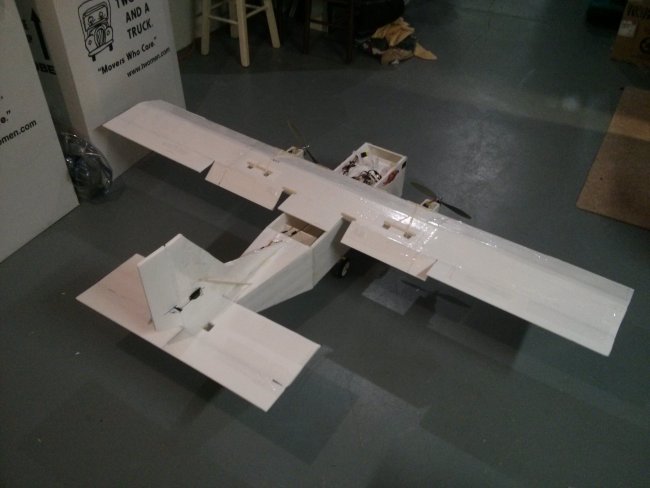


I gave it a paint job with some duck tape that was inspired by the US Coast Guard Plane's paint scheme. I also changed from tricycle landing gear to taildragger because it was to wobbly and not sturdy. Here it is all put together.


Post Maiden Flight
It flew remarkably well the first time, all that was needed is to angle the motors down and move the cg back a bit. Later on I cut a hole in the side so I could put one of my old cell phones onboard and get some aerial footage. Here are a couple videos of that:
If you have any questions or want further info on the plane, please leave a message and I will reply as soon as possible.
Thanks for reading and Watching!
-Brock
www.youtube.com/aplanerc


Log In to reply
Log In to reply
Log In to reply
Log In to reply
I figured that with the weight of the electronics I was using, the wing would need to be 70+ inches to keep that Wing Cube Loading in the "Glider-Trainer" range. To figure that out, I added up all of the weights for each part,(motors, batteries, ESC, servos etc), then entered that into the calculator and adjusted the wingspan until the Wing cubed loading was in the "glider category." I already knew the chord had to be 12 inches, since anything bigger woyld bot fit in my car. I knew that the plane would most likely be about 500g heavier with all of the glue and tape, so the actually WCL is in the "trainer" category. I generally keep all of my planes in the "trainer" category so they are slower and have a low stall speed.
Log In to reply
Log In to reply
Log In to reply
Skyvan cargo dropper: https://www.youtube.com/watch?v=CKC6rnTX16E
RC-69 Cargo Dropper: https://www.youtube.com/watch?v=HGsfiAiWt78
For his RC-69, he kept the ESC's on the inside of the plane. To cool his electronics, he had an opening in the cockpit to allow air to enter the fuselage. He created a channel between he two batteries that would allow the air to pass through the fuselage and he put the ESC's inside of that channel. Another thing that he did was he created a shelf or false ceiling in the cargo area. This allowed the wiring from his servos to stay inside the fuselage but above the cargo area, so he wouldn't have to worry about the cargo snagging on the wires.
On his Skyvan, he had an interesting mechanism for dropping things. The cargo area had a number of rare earth magnets glued to the floor. He also created removable pallets to hold the cargo in place with a velcro strap. The pallets also had magnets on the bottom side. When he wanted to load cargo, he would pull a pallet out of the plane, fasten the cargo to the pallet with the velcro strap and reinsert the pallet into the cargo area. Removable pallets would probably make it easier to load and secure the cargo and adjust the CG. The items that would be dropped were attached to parachutes that were held in place with a rubber band and a servo. When the rubber band was released, the parachute would fall out the back of the plane. When the parachute caught the air, it would pull the velcro loose and pull the cargo out the back of the plane and the magnets would keep the pallet inside the plane. If the velcro release failed, I am not sure if the entire pallet could be pulled free of the magnets or not... but it would be a nice safety feature to prevent a snagged parachute from crashing your plane..
Ed also made videos explaining how he made the parachutes and the release mechanism.
Log In to reply
Log In to reply