After a couple crashes (and one small fire) it was time to retire the Lisam Keel-270. I fully expected the arms or PDB to break, but instead what finally did it in was a screw. The thumbscrew that holds the top down in the rear stripped out the hole, so now the top is all floppy. I could use a zip tie to hold it down, but eh... TIME FOR A NEW FRAME!
So there's some mixed feelings out there about clone frames, where a high-end manufacturer releases a new frame and suddenly there are (sometimes) exact copies available on Ebay within months at a third of their normal price. Obviously this hurts the designers and the hobby as a whole, but you know... cheap frame. You need to be careful though, because many of these frames use lesser grade materials and/or inaccurate dimensions.
So with that in mind I felt, like, super guilty you guys, and totally ordered a clone of the Lumineer QAV210 from Ebay.

It's not 100% accurate, but it's legit carbon fiber and it's surprisingly well made! There are some holes that differ on the bottom plate, but for the most part it is spot on. This frame didn't include the rubber feet on the landing gear nor the rubber grommets for the battery lead. I later decided to remove the landing gear for now and I ordered the grommets separately. It did include a PDB with a 5v and 12v BEC, but I didn't use it as I opted for something else I'll get into in a moment.
I pulled the motors from the Keel-270, which are Lisam 2204 2400KV. Good luck finding any data on them, but they run well with DAL 5045 Bluntnose V2 props. For the ESC's I used the DYS XM20A's sans-wires and direct soldered them to the motors. The ESCs come with BLHELI installed and support OneShot, active breaking, and all that fun stuff. I ended up soldering the signal and ground wires directly to the FC, which was fun in the way that advanced tooth decay is an attractive quality in a mate.
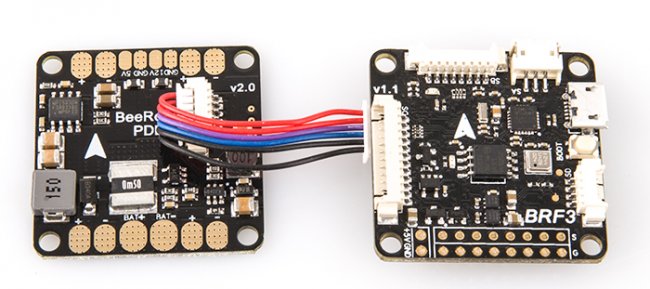
For the flight controller and power distribution I used a really neat combo offered by RCTimer.com called the BeeRotor F3 and BR-PDB V2. If you're looking to save space and weight on your build, not to mention simplify wiring, this combo is for you. The PDB has 5V and 12V BECs built in, as well as voltage and current monitoring. The PDB connects to the BeeRotor flight controller via an included cable that provides the monitoring data as well as powers the board. No need for a separate BEC! The flight controller itself features an F3 processor for plenty of power, and an integrated OSD that uses the popular Scarab/MWOSD firmware. Unlike other FC/OSD combos, this board does not have a dip switch for programming the OSD. Instead, a wire harness is included to connect to an FTDI programmer (not included) for programming the OSD. Being that the OSD uses UART1, same as the USB port on the FC, so you only need to connect to this wire harness to program the OSD - do not connect to USB or battery. There is a pull request in Betaflight that may someday allow the OSD to be configured directly, similar to BLHELI, but it's not a problem to connect the wire harness as it is on the same side as the USB, which you will most likely orient in the frame to have access anyway.

I found this sweet 3d printed receiver mount for an FRSKY D4R-II on Ebay which completes my stack. The result is a clean looking build with very little wiring! Thanks to the integrated OSD you only need to connect video in from your camera, out to the video transmitter, and grounds. (opposite side of the FC from the photo). The PDB has a filtered 12V BEC, so I am powering the VTX through that, which in turn powers my camera. I could power the camera off of the 5V BEC, but I've found that many VTX's aid in filtering the power from interference so I usually wire this way. The foam between the top layers is to cover the barometer for more accurate readings. I don't use the barometer for altitude hold, but I like to know how high I'm flying.
My camera choice wasn't so much a choice as what I had access to, but it worked out well. I didn't have the right camera for this frame, so I bought one off a buddy of mine. I am using this little Foxeer 600TVL camera that is also IR sensitive, which is neat.
I covered the ESCs and power lead with braided wire sleeves to insulate them from the carbon, and also because it looks hella clean. I'm really proud of this build, it's the cleanest I've ever done. I have shaky hands, so soldering the ESC signal/ground wires was a PITA, but I got it done and nothing fried! The build weighs 318g with FPV gear, and 468g with a Turnigy Multistar 1400mah LiPo. I've only lightly tested the frame so far, hovering it in my back yard and a few small circles, but expect a full maiden soon!
Parts list:
- QAV210 3k carbon clone frame from Ebay
- Lumenier Replacement Silicone Grommets
- 4x Lisam 2204 2400KV motors
- 4x DYS XM20A V1 (no wires)
- BeeRotor F3 Flight Controller with integrated OSD
- BeeRotor PDB V2 with Integrated 5v and 12v BEC, Filtering, and Voltage/Current Sensors
- Foxeer XAT600M DC5V-22V 600tvl Sony Super HAD CCD FPV Camera
- Foxeer TM200 200mW 5.8G 40CH Mini Race Band VTX
- FRSKY D4R-II RX
- This sweet 3D printed FRSKY RX mount from Ebay


Log In to reply
Log In to reply