1 INTRO:
In a previous article, I describe a low cost GPS data logger for rc aircraft, but without telemetry.
The telemetry is very important in aeromodelling for controlling battery level, altitude and more.
This project describes a very low cost data logger for rc aircraft with real telemetry on the transmitter for put in in a radio controlled plane.
More, the power for arduino be made by the receiver of the plane to have less weight on the plane and with a small size.

2 CHOICE OF MATERIAL :
For the microcontroller : Arduino nano generic
For the GPS : UBLOX NEO-6M V2
For the sd card reader/writer : generic but the less weight as posssible
For the box : ABS box
I made this choice so as to have the smallest components possible (I did not choose the arduino micro for lack of memory) and with the least weight.

3 ASSEMBLING :
The wiring must be done with the minimum length of wire and without the connectors on the electronic cards so as to lighten the final assembly to the maximum.
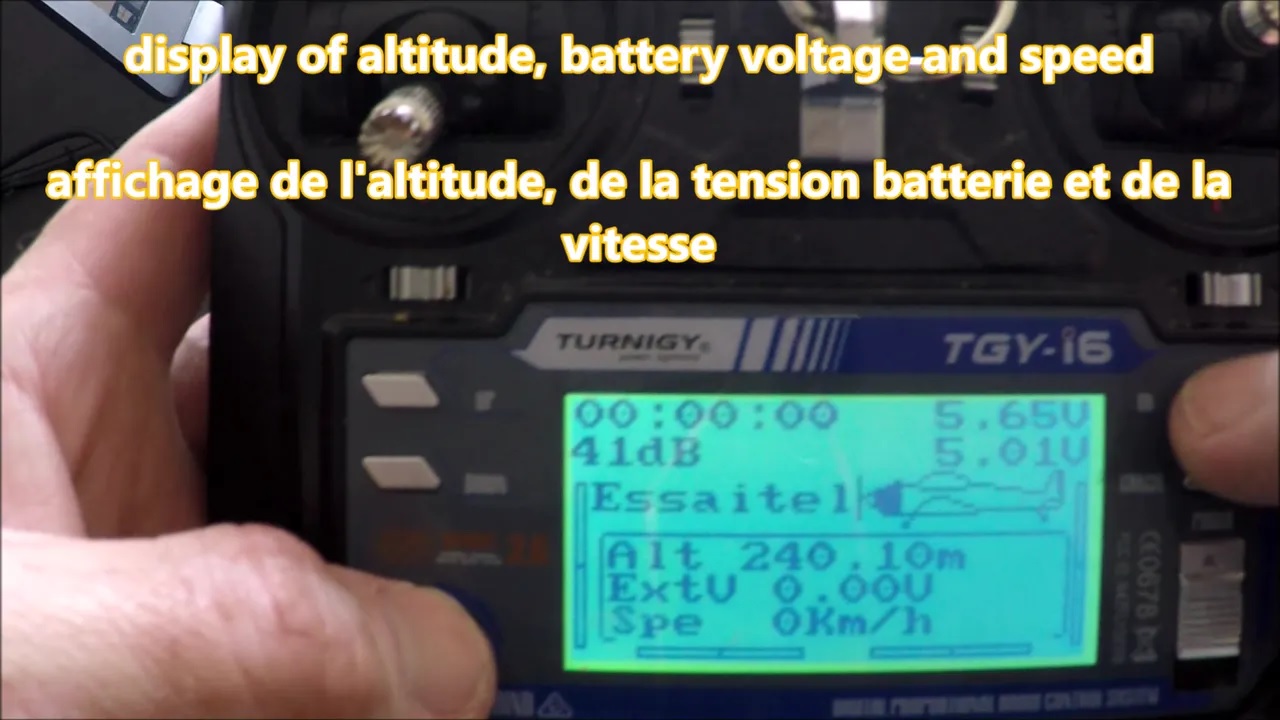
4 DISPLAYING:
The data is displayed on the transmitter by selecting the sensors and setting the alarm
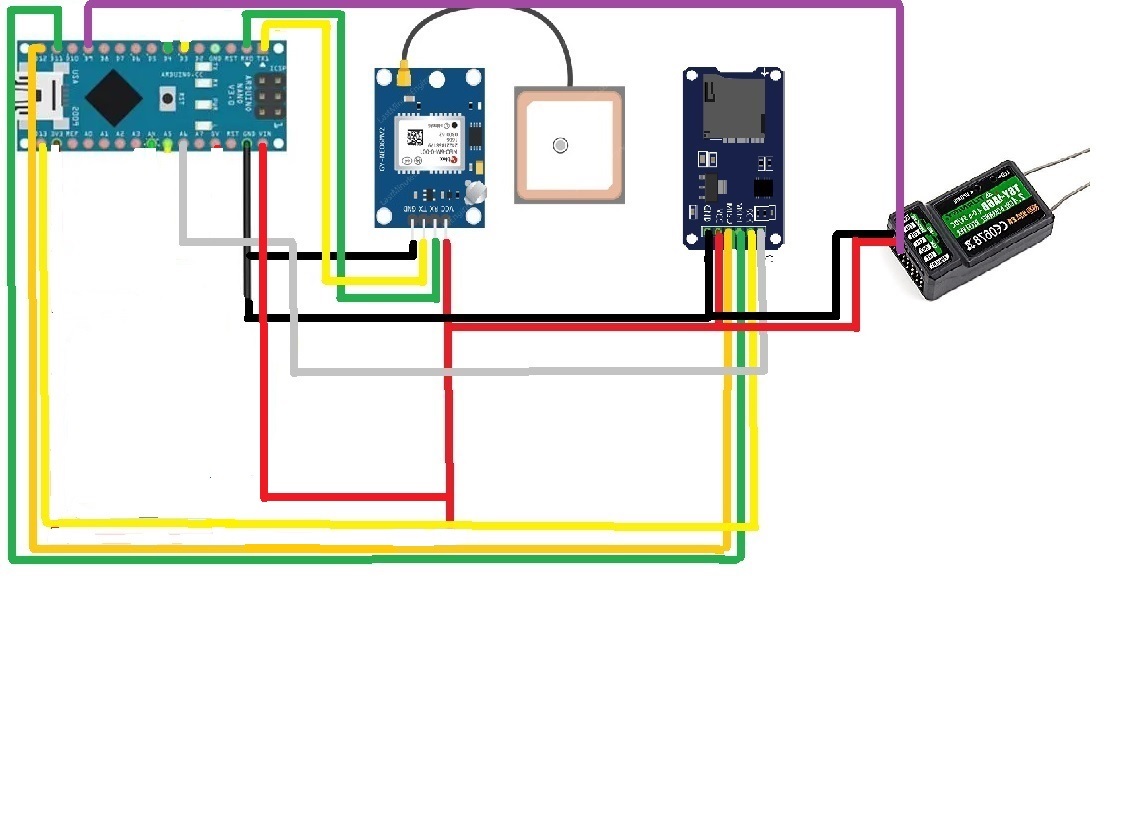
5 Schematics:
6 Code :
#include <iBUSTelemetry.h> //https://github.com/adis1313/iBUSTelemetry-Arduino
#include <Wire.h>
#include <TinyGPS++.h>
#include <SPI.h>
#include <SD.h>
//pin pour carte SD
const int cs_sd=2;
TinyGPSPlus gps;
#define UPDATE_INTERVAL 500
// pin voltage
#define dP A0
iBUSTelemetry telemetry(9); // arduino pin pour donnes iBUS
uint32_t prevMillis =0; // neessaire pour updateValues()
//LED
const int verte = 3;
const int rouge = 4;
float maxspeed = 0, speed1 = 0;
int maxhigh = 0, high1 = 0;
int maxsatelite = 0, satelite1 = 0;
float meters ;
float voltage=0.0;
void setup()
{
Serial.begin(9600);
pinMode(rouge, OUTPUT);
pinMode(verte, OUTPUT);
//Condition vrifiant si la carte SD est prsente dans l'appareil
if(!SD.begin(cs_sd))
{
digitalWrite(rouge, HIGH);//absence SD
return;
}
digitalWrite(rouge, LOW);// carte SD absente
File data = SD.open("donnees.txt",FILE_WRITE); // Ouvre le fichier "donnees.txt"
data.println(""); data.println("Demarrage acquisition ibus"); // Ecrit dans ce fichier
data.println(""); data.println("date heure latitude longitude altitude vitesse");
data.close();
Wire.begin();
telemetry.begin();
// definition capteurs
telemetry.addSensor(IBUS_MEAS_TYPE_ALT); //altitude
telemetry.addSensor(IBUS_MEAS_TYPE_EXTV); //batterie
telemetry.addSensor(IBUS_MEAS_TYPE_SPE); //vitesse km/h
telemetry.addSensor(IBUS_MEAS_TYPE_GPS_LAT); // latitude
telemetry.addSensor(IBUS_MEAS_TYPE_GPS_LON); // longitde
}
void loop()
{
updateValues();
telemetry.run();
}
void updateValues()
{
// lecture donnes Gps et allumage LED si OK
if (Serial.available()) {
digitalWrite(verte, HIGH);//donnes Gps OK
gps.encode(Serial.read());
}
float meters = (gps.altitude.meters());
voltage=float(analogRead(dP))*(20/1023.00);
float airSpeed = (gps.speed.kmph());
// definition vitesse max
speed1 = (gps.speed.kmph());
if ( speed1 > maxspeed) {
maxspeed = speed1;
}
// recuperation date et heure du GPS pour datalogging
String Temps=String(gps.time.hour()+1)+(":")+(gps.time.minute())+(":")+(gps.time.second());
String Date=String(gps.date.day())+("/")+(gps.date.month())+("/")+(gps.date.year());
// Temporisation
uint32_t currMillis = millis();
if (currMillis - prevMillis >= UPDATE_INTERVAL) { // Code in the middle of these brackets will be performed every 500ms.
prevMillis = currMillis;
// affichage donnes capteur sur radiocommande
telemetry.setSensorValue(1, (meters )*100.0 ); // altitude
telemetry.setSensorValue(2, voltage*100 );
telemetry.setSensorValue(3, speed1 );
telemetry.setSensorValue(4, (gps.location.lat()*10000000));
telemetry.setSensorValue(5, (gps.location.lng()*10000000)) ;
// Ecriture des donnes dans le fichier texte
File data=SD.open("donnees.txt",FILE_WRITE);
data.println(Date + " " + Temps + " " + String(gps.location.lat(), 6)+" "+String(gps.location.lng(), 6)+(" ")+String(gps.altitude.meters(),0)+(" ")+String(speed1)+(" ")+String(maxspeed));
data.close();
}
}
Download the ibus library here
7 RESULT :
In the next video you can see the result.
The data can be import in google earth for visualisation of the trajectory of the plane.


As a pcb supplier, I am very sensitive when you PCBs. pcbpartner is an affordable PCB manufacturer in China. You can quote PCB prototypes online. Come to realize your PCB prototypes now.(https://www.pcbpartner.com/)
Log In to reply