
The Ercoupe is a two seat single prop plane used for civil aviation. It was designed in the late 1930s by Fred Weick for the Engineering Research Corporation - ERCO, hence the name. Weick designed the Ercoupe to be as safe and easy to fly as the state of the art would permit. It had an H-tail to mitigate prop slipstream effects, and a system whereby the rudders were tied to the ailerons for auto-coordination of turns. Trailing link tricycle landing gear allowed the Ercoupe to be landed in crosswinds even without separate rudder control, at a time when most planes had tricky tailwheel landing gear. It was designed to be very difficult to stall and was certified as characteristically incapable of spinning. The construction of the fuselage was all aluminium, with fabric-covered aluminium wings. Overall it was an incredibly advanced yet simple plane and very much ahead of its time. For all these reasons I chose it as a perfect subject for my first attempt at an "FT master"-style plane design, using the more advanced foam and posterboard curving techniques to achieve the streamline shapes of this classic.
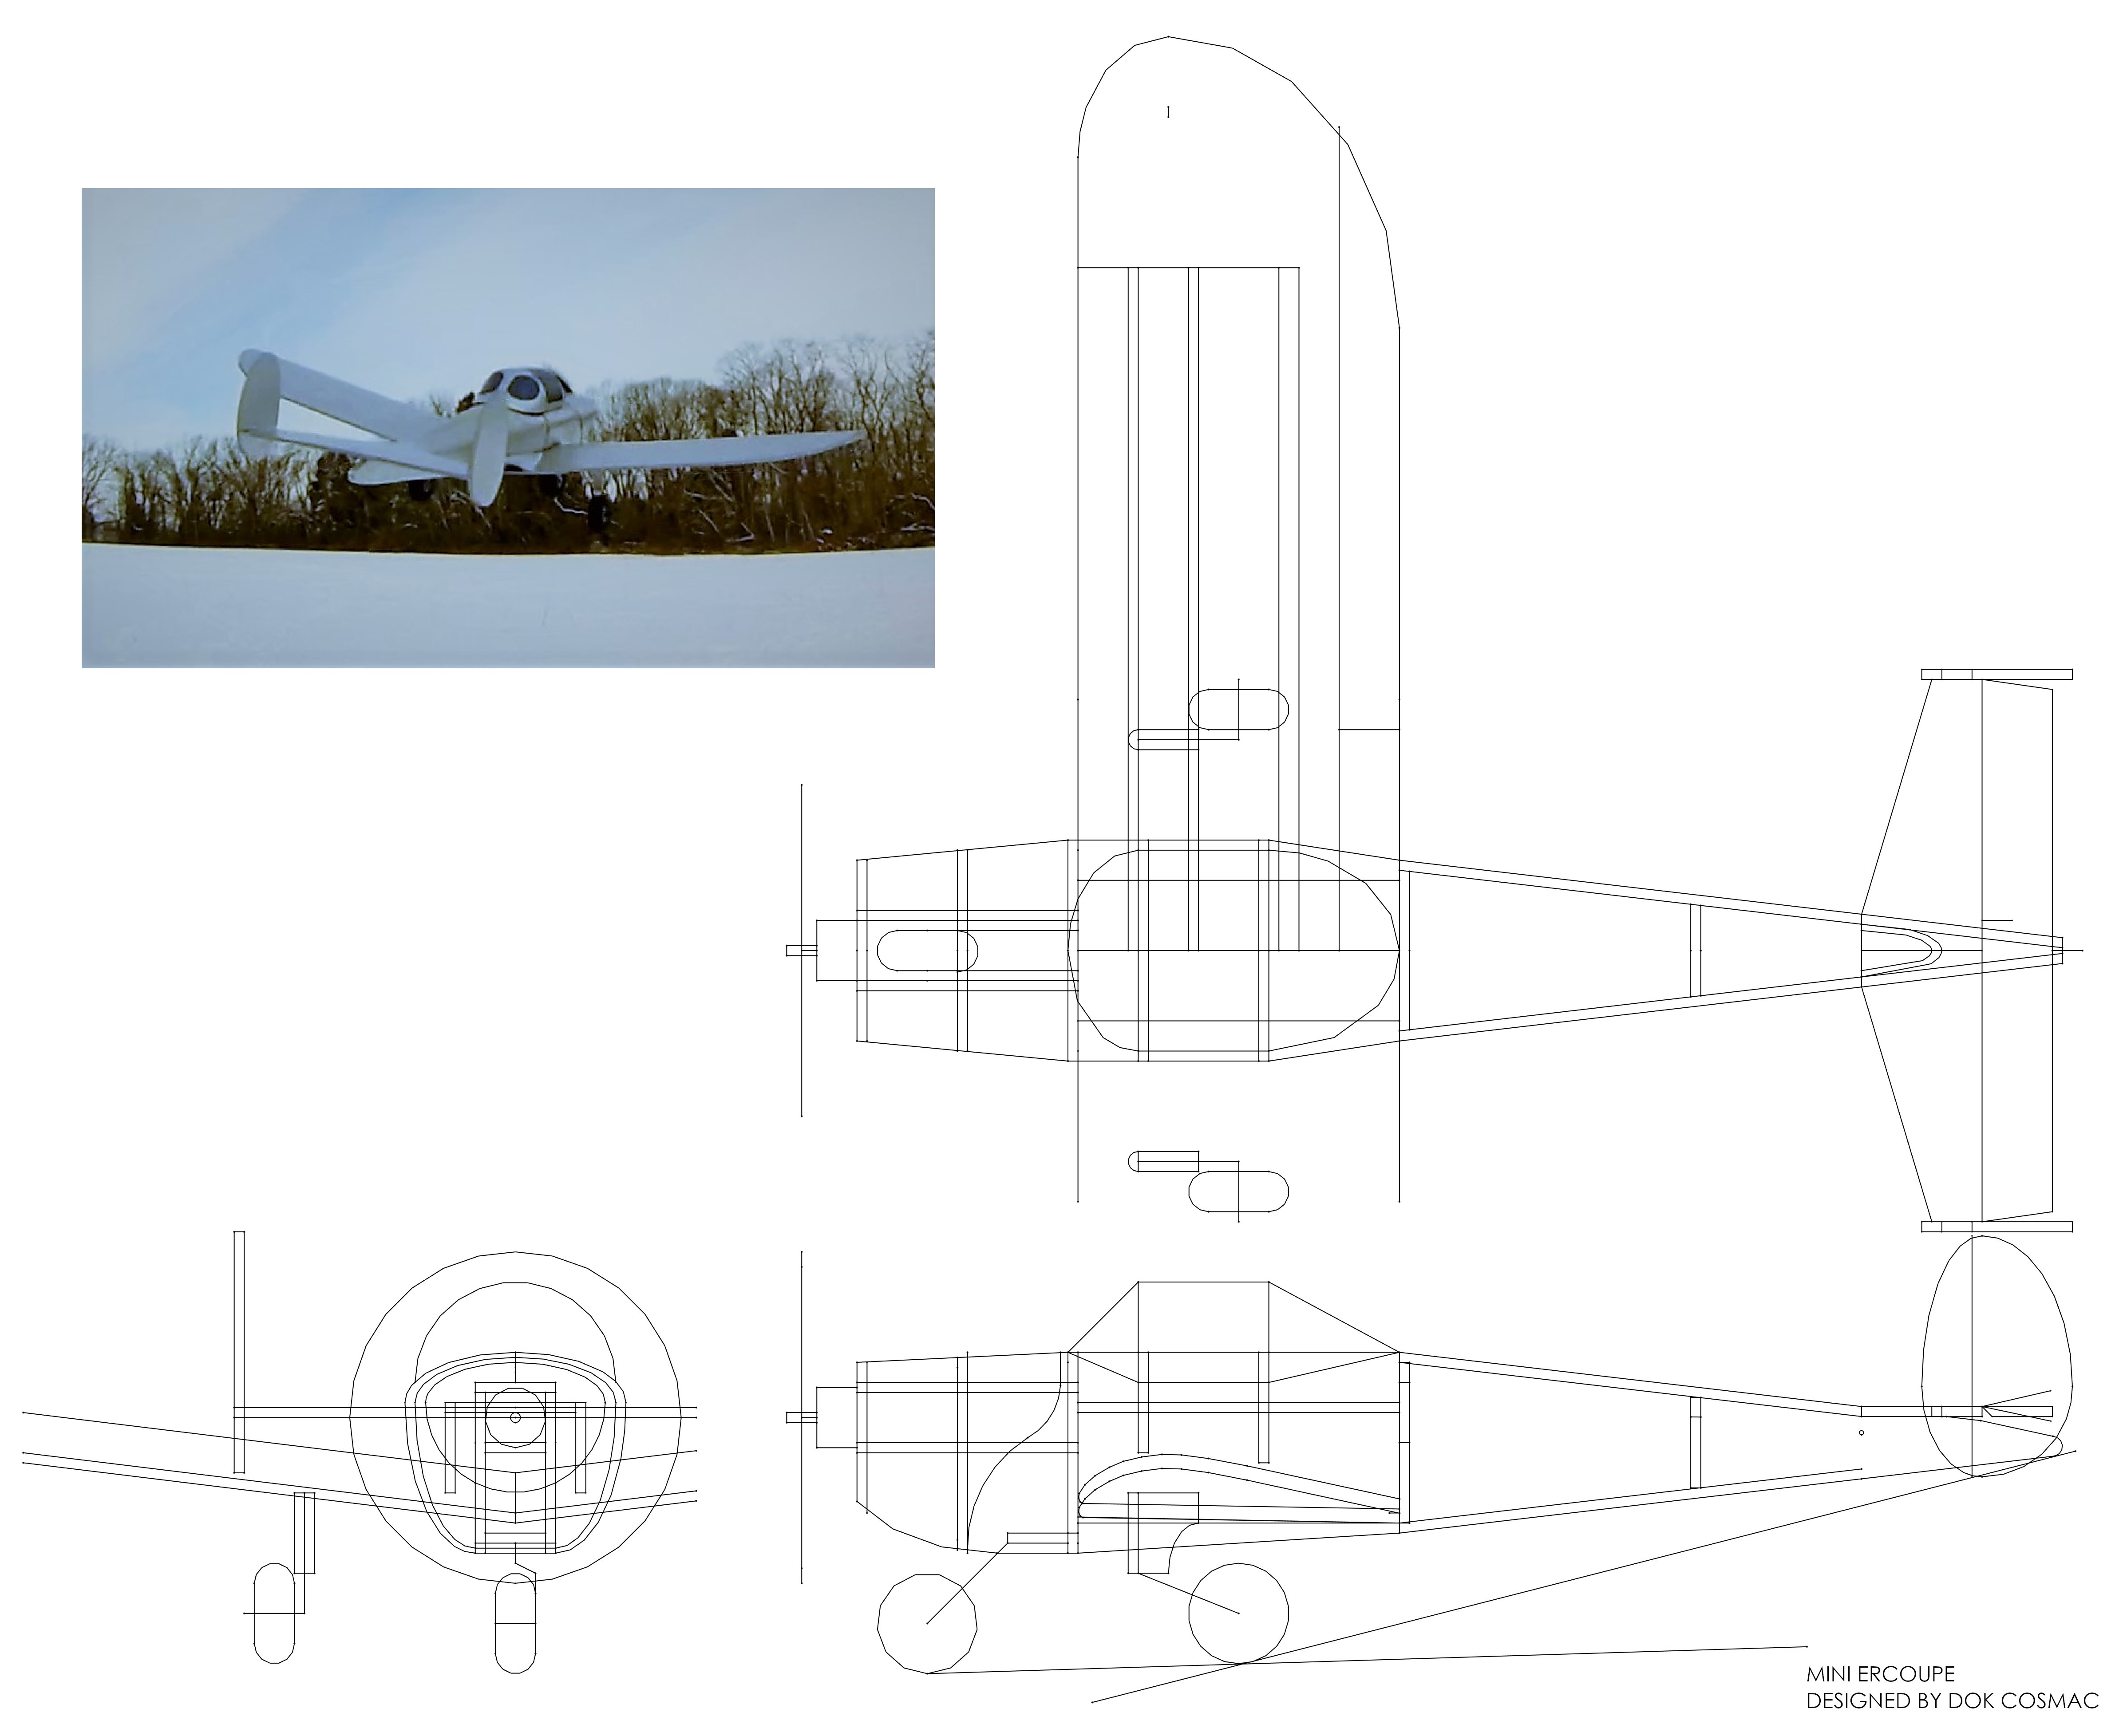
My mini version of the Ercoupe uses the gear from the Flite Test power pack F and three sheets of foam board. Other materials include a sheet of sturdy poster board, landing gear wheels and appropriate wire (I used DuBro Super Lite 2" wheels), FT mini motor mount and control horns, pushrods, and a thin plastic tube such as a coffee stirrer for pushrod guides in the tail. The battery I use is an 850mAh 3-cell, but there is ample room for a 4-cell or larger capacity battery. The model is set up with 3-channel "bank and yank" control with fixed rudders. Because of the full span aileron design, if you want to try really slow flight, you could experiment with a flaperon setup. However, the real Ercoupe did not have them. The wing is a folded wing with a box spar and cambered plate wingtips, in the typical FT style, but with a smoothly curved upper surface for a more scale look. The fuselage employs a foam interior box-former structure with a foam tail boom; the cockpit and nose are wrapped with four overlapped poster board skins to save a little weight. There is ample space in the cockpit and canopy for flight control boards, FPV gear, and so on. I would judge this as an intermediate difficulty build, comparable in complexity to the FT Mini Zero.
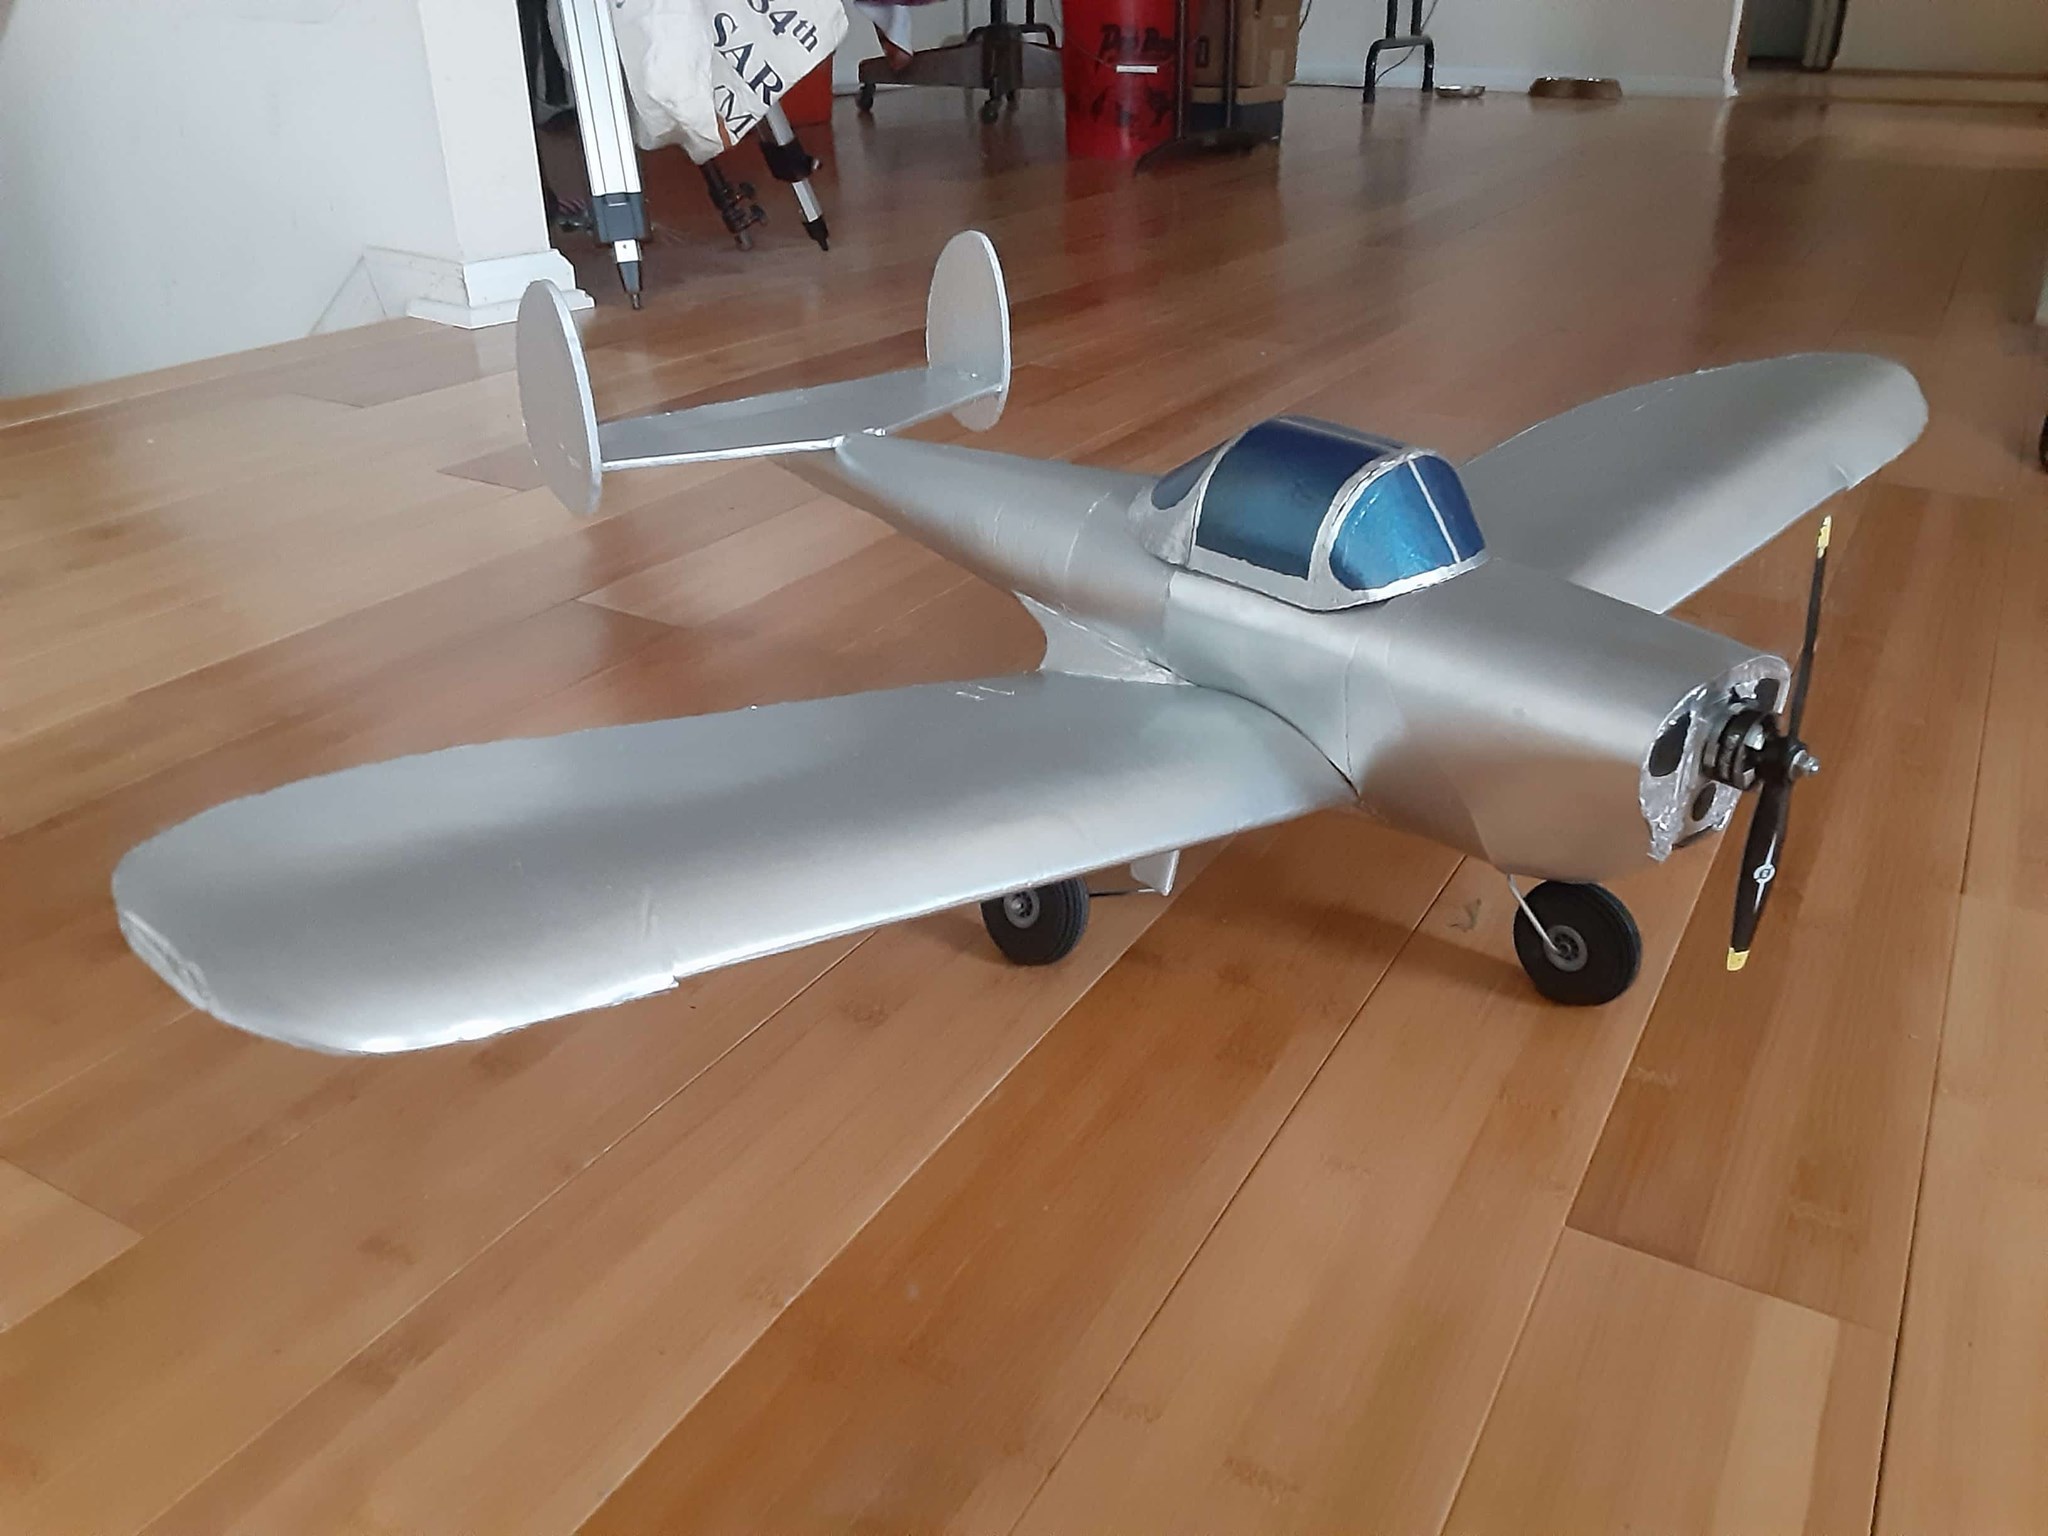
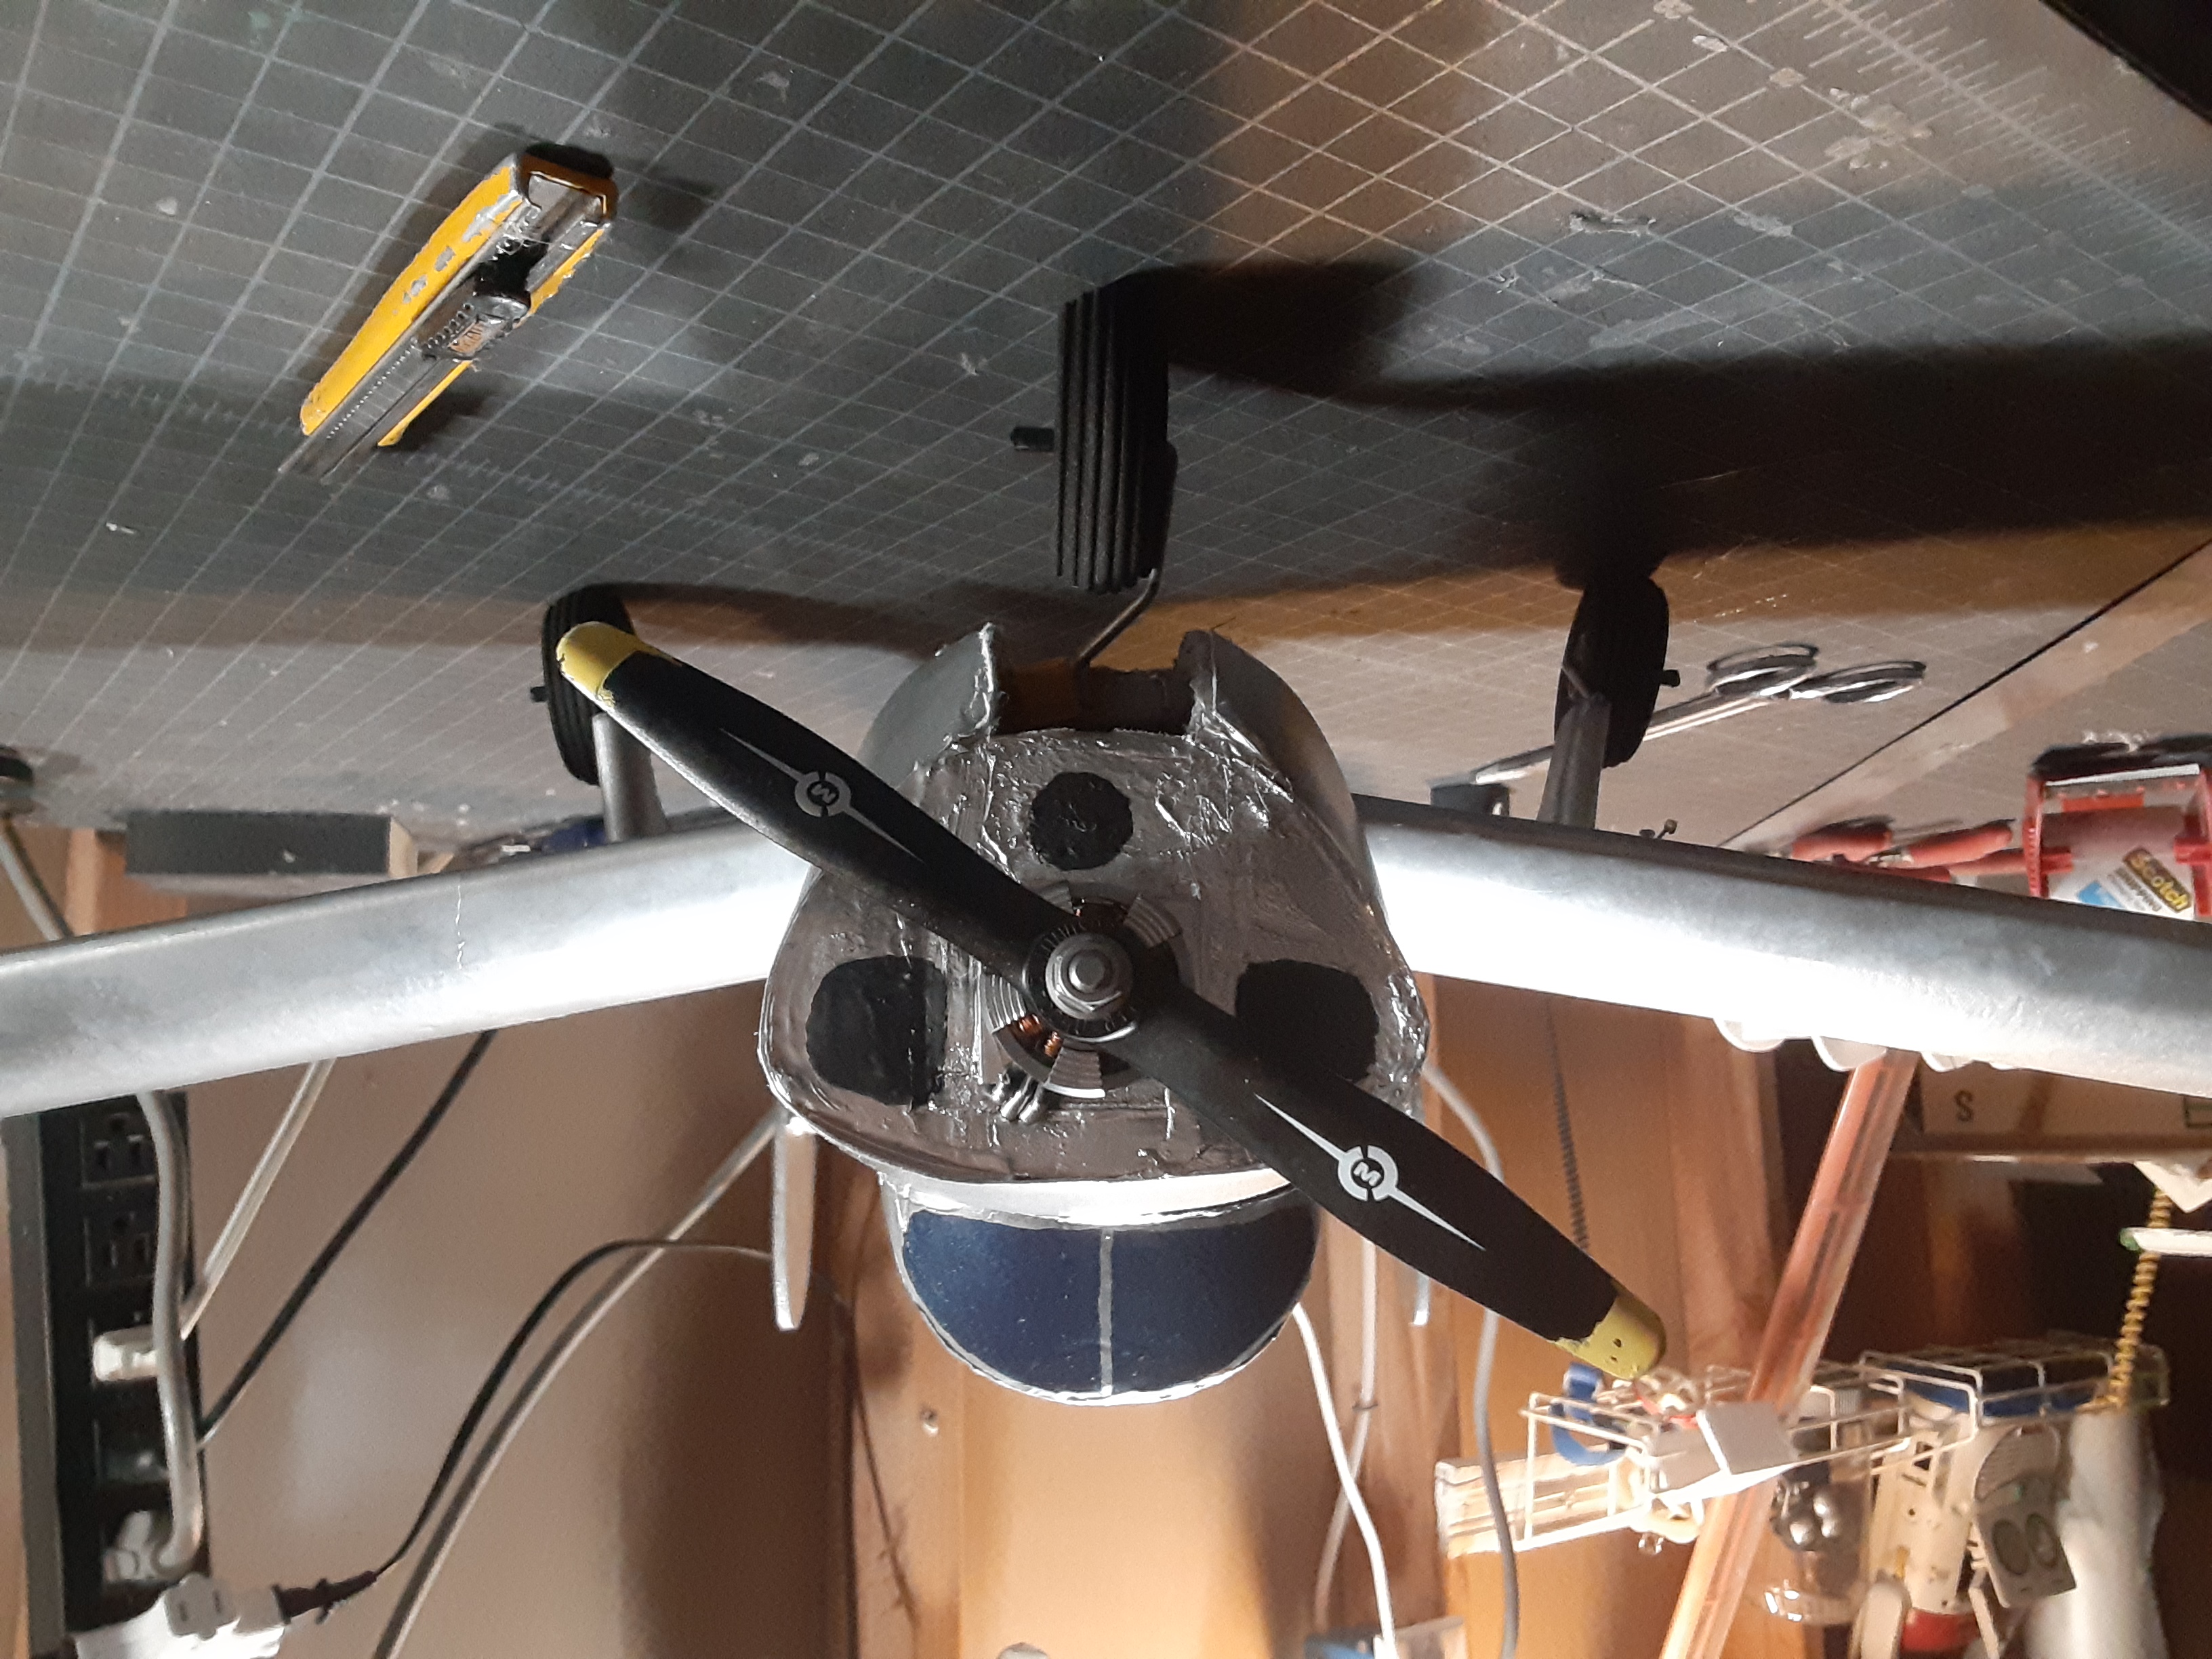 Close-up of nose showing battery bay and nose gear Close-up of nose showing battery bay and nose gear | 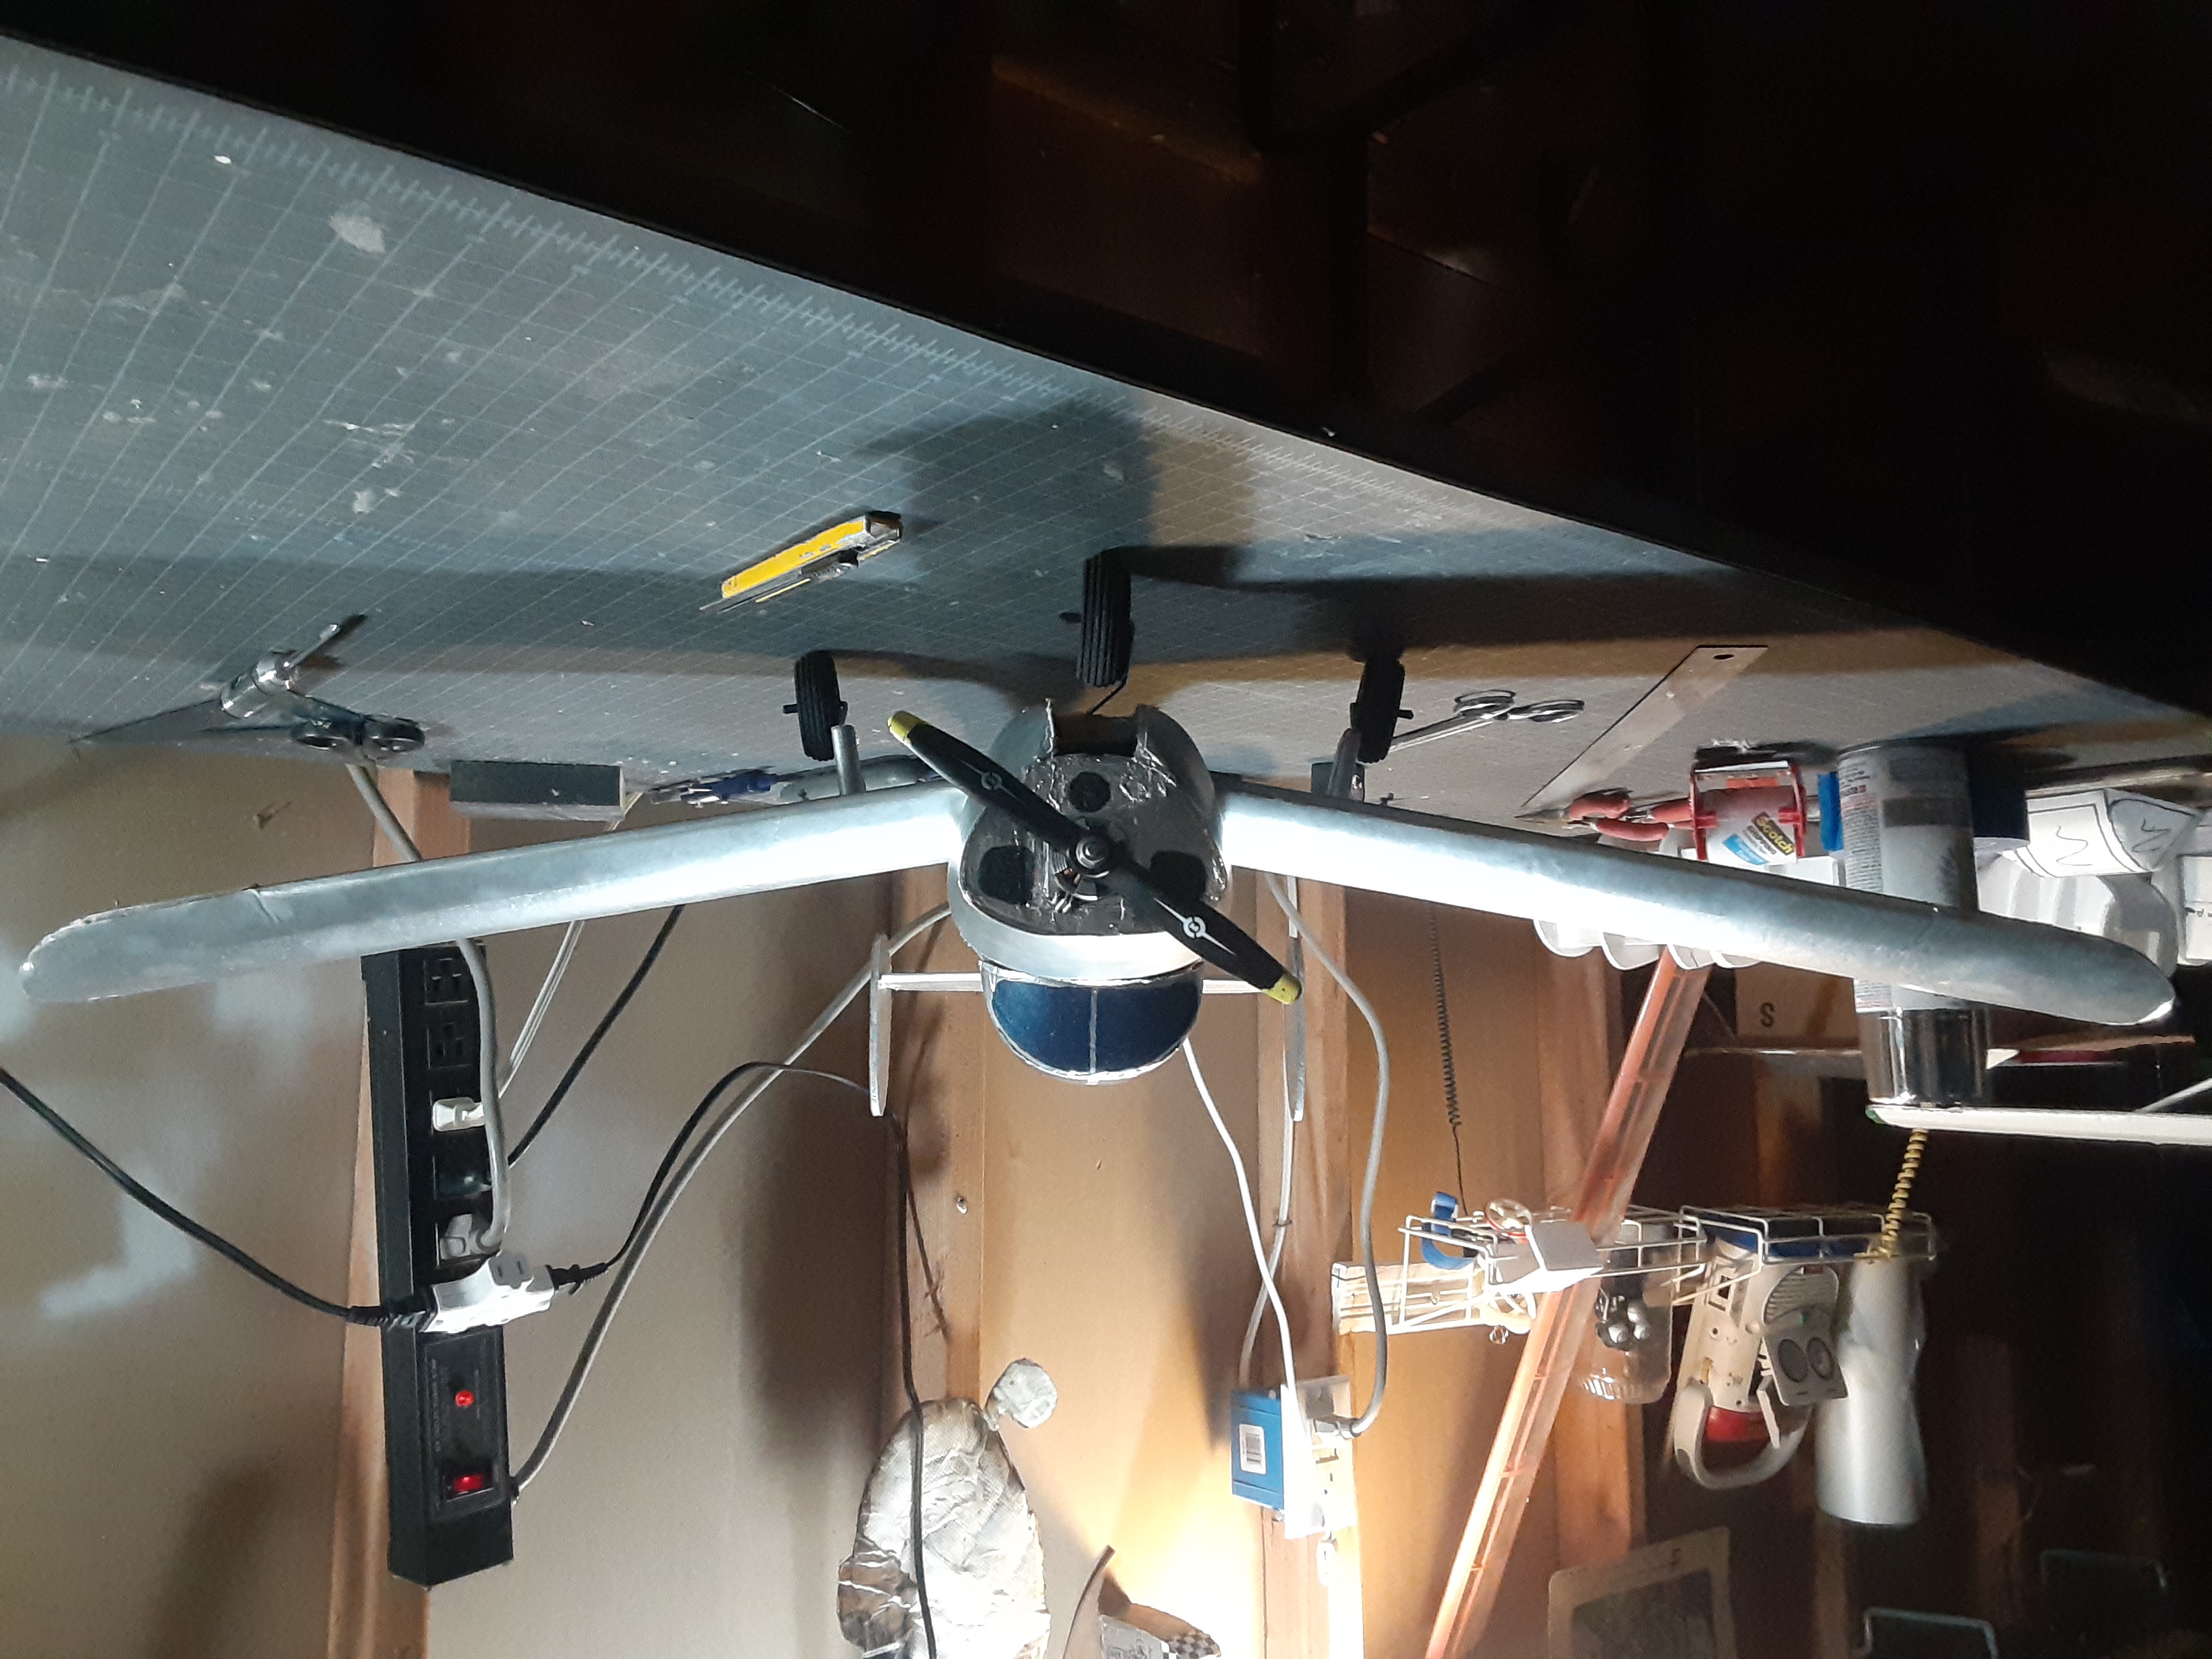 The Ercoupe's 14 degree dihedral provides great stability The Ercoupe's 14 degree dihedral provides great stability |
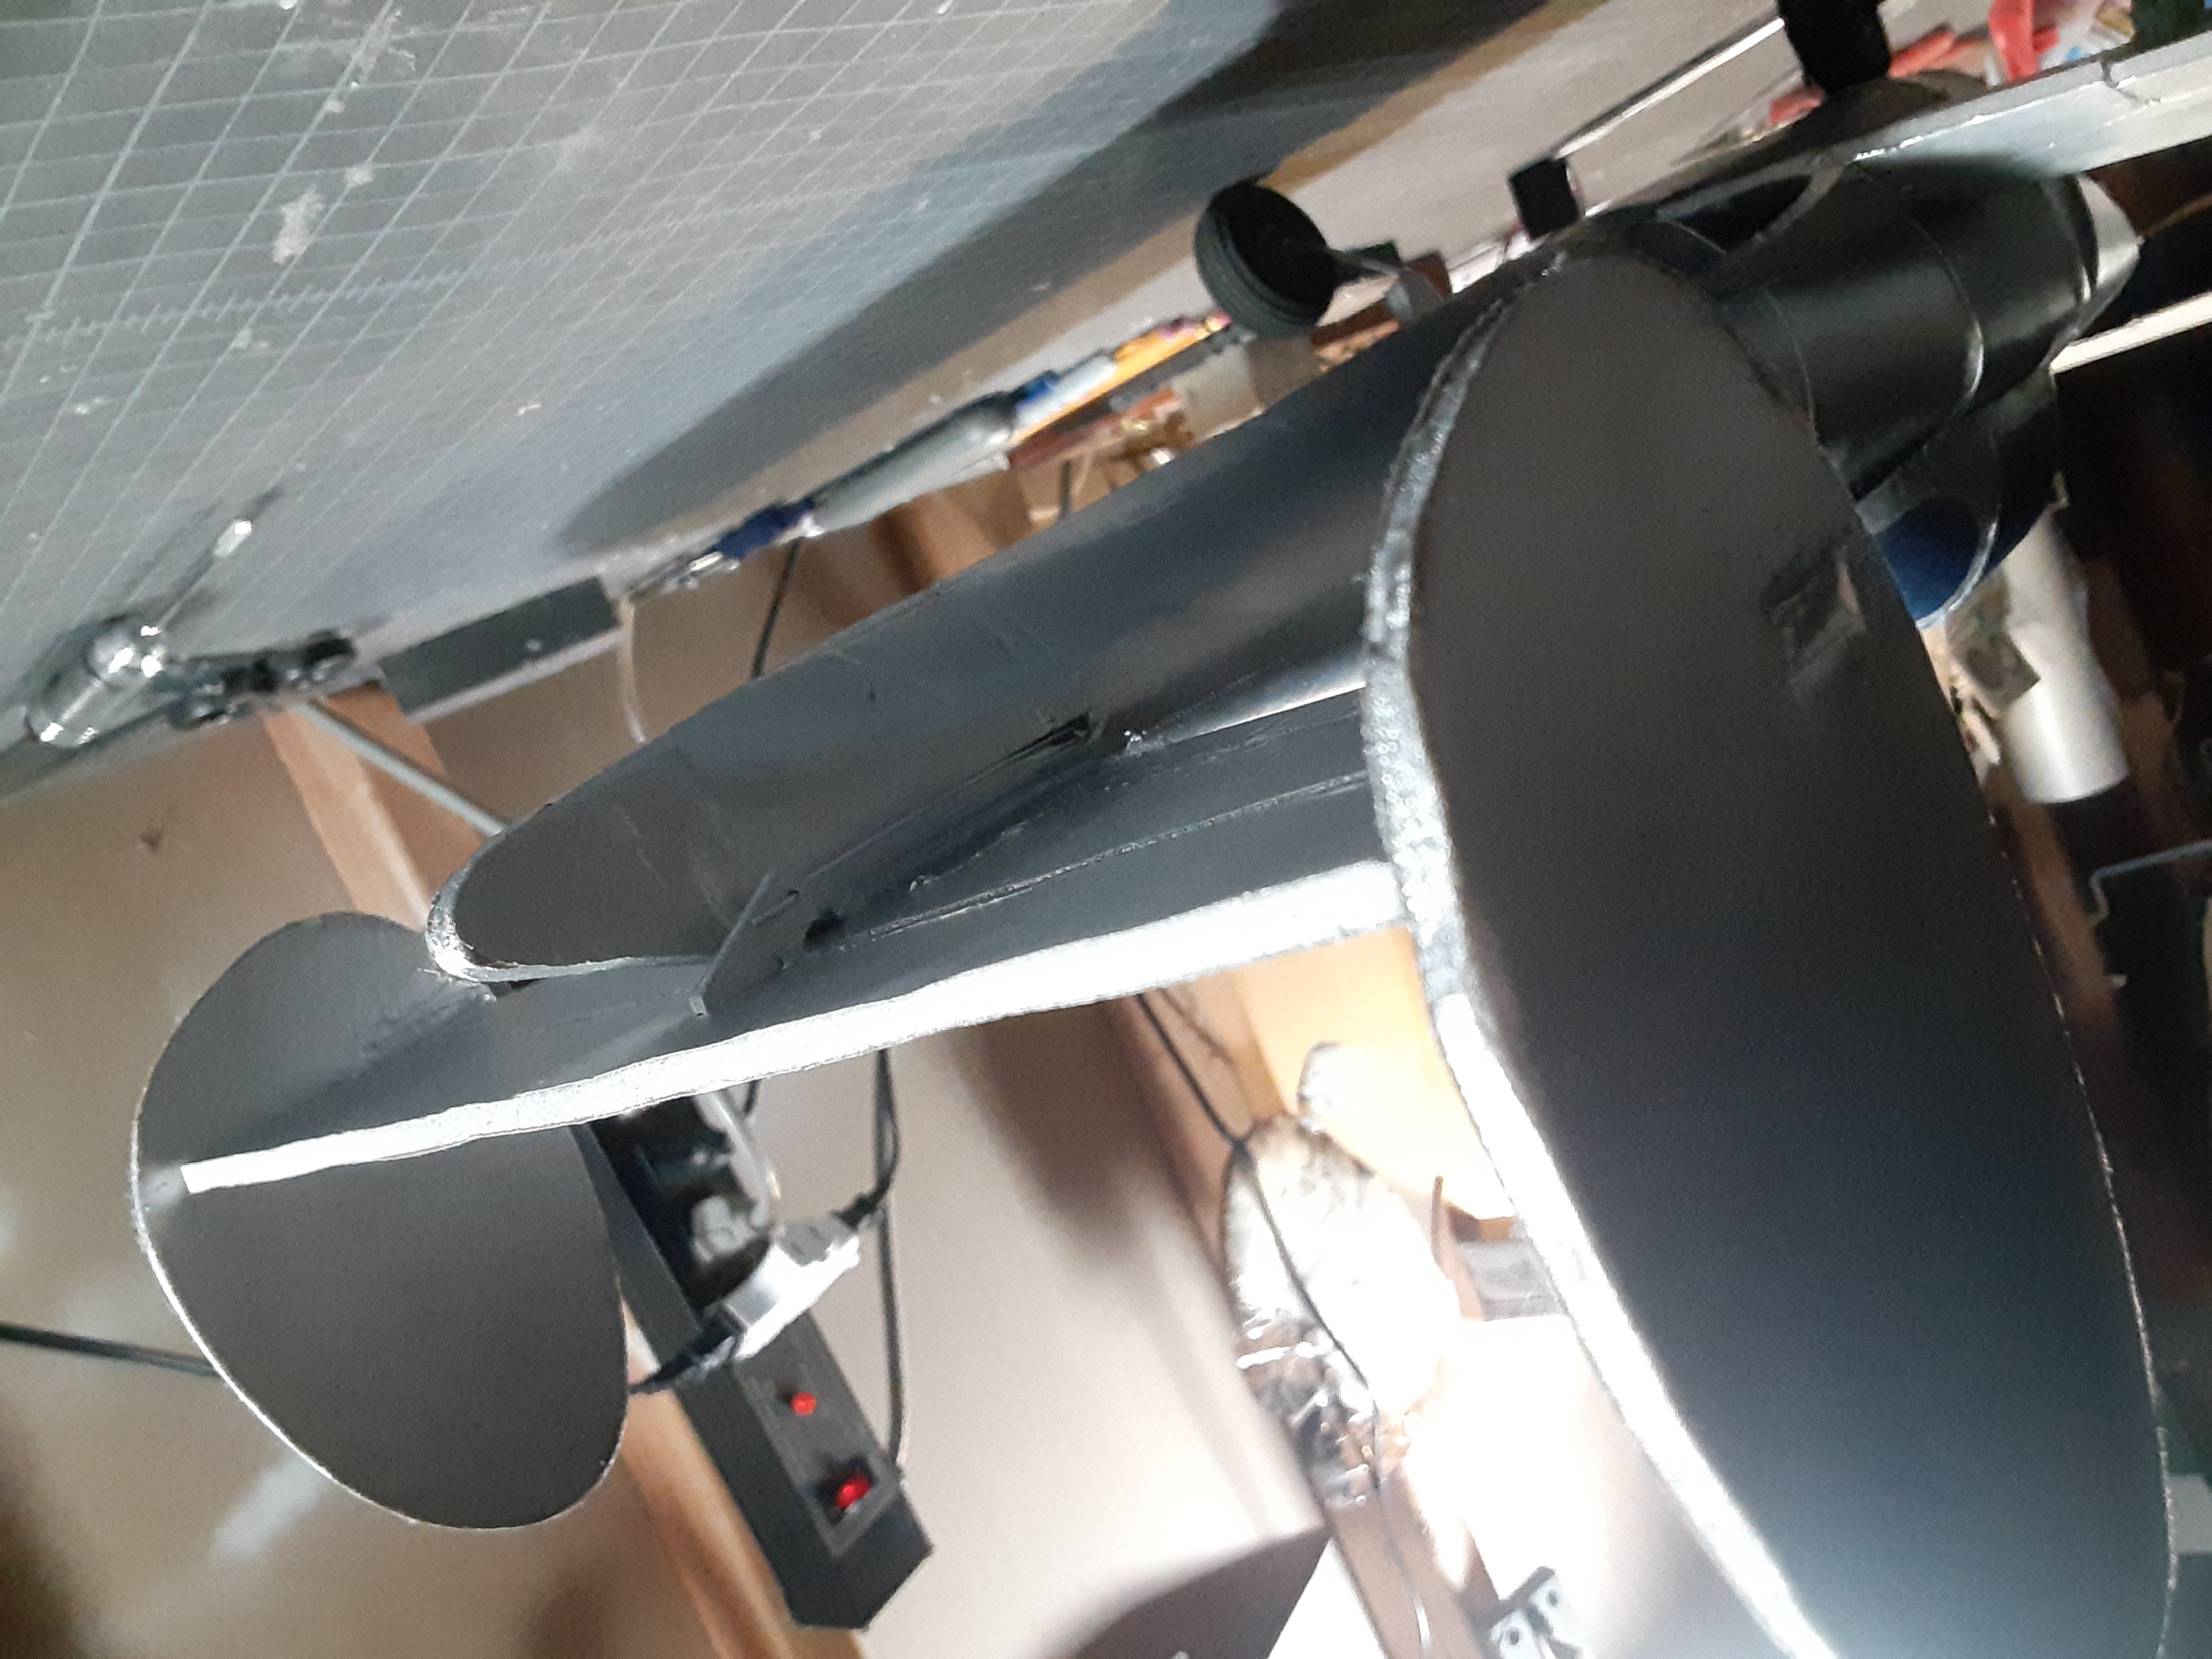
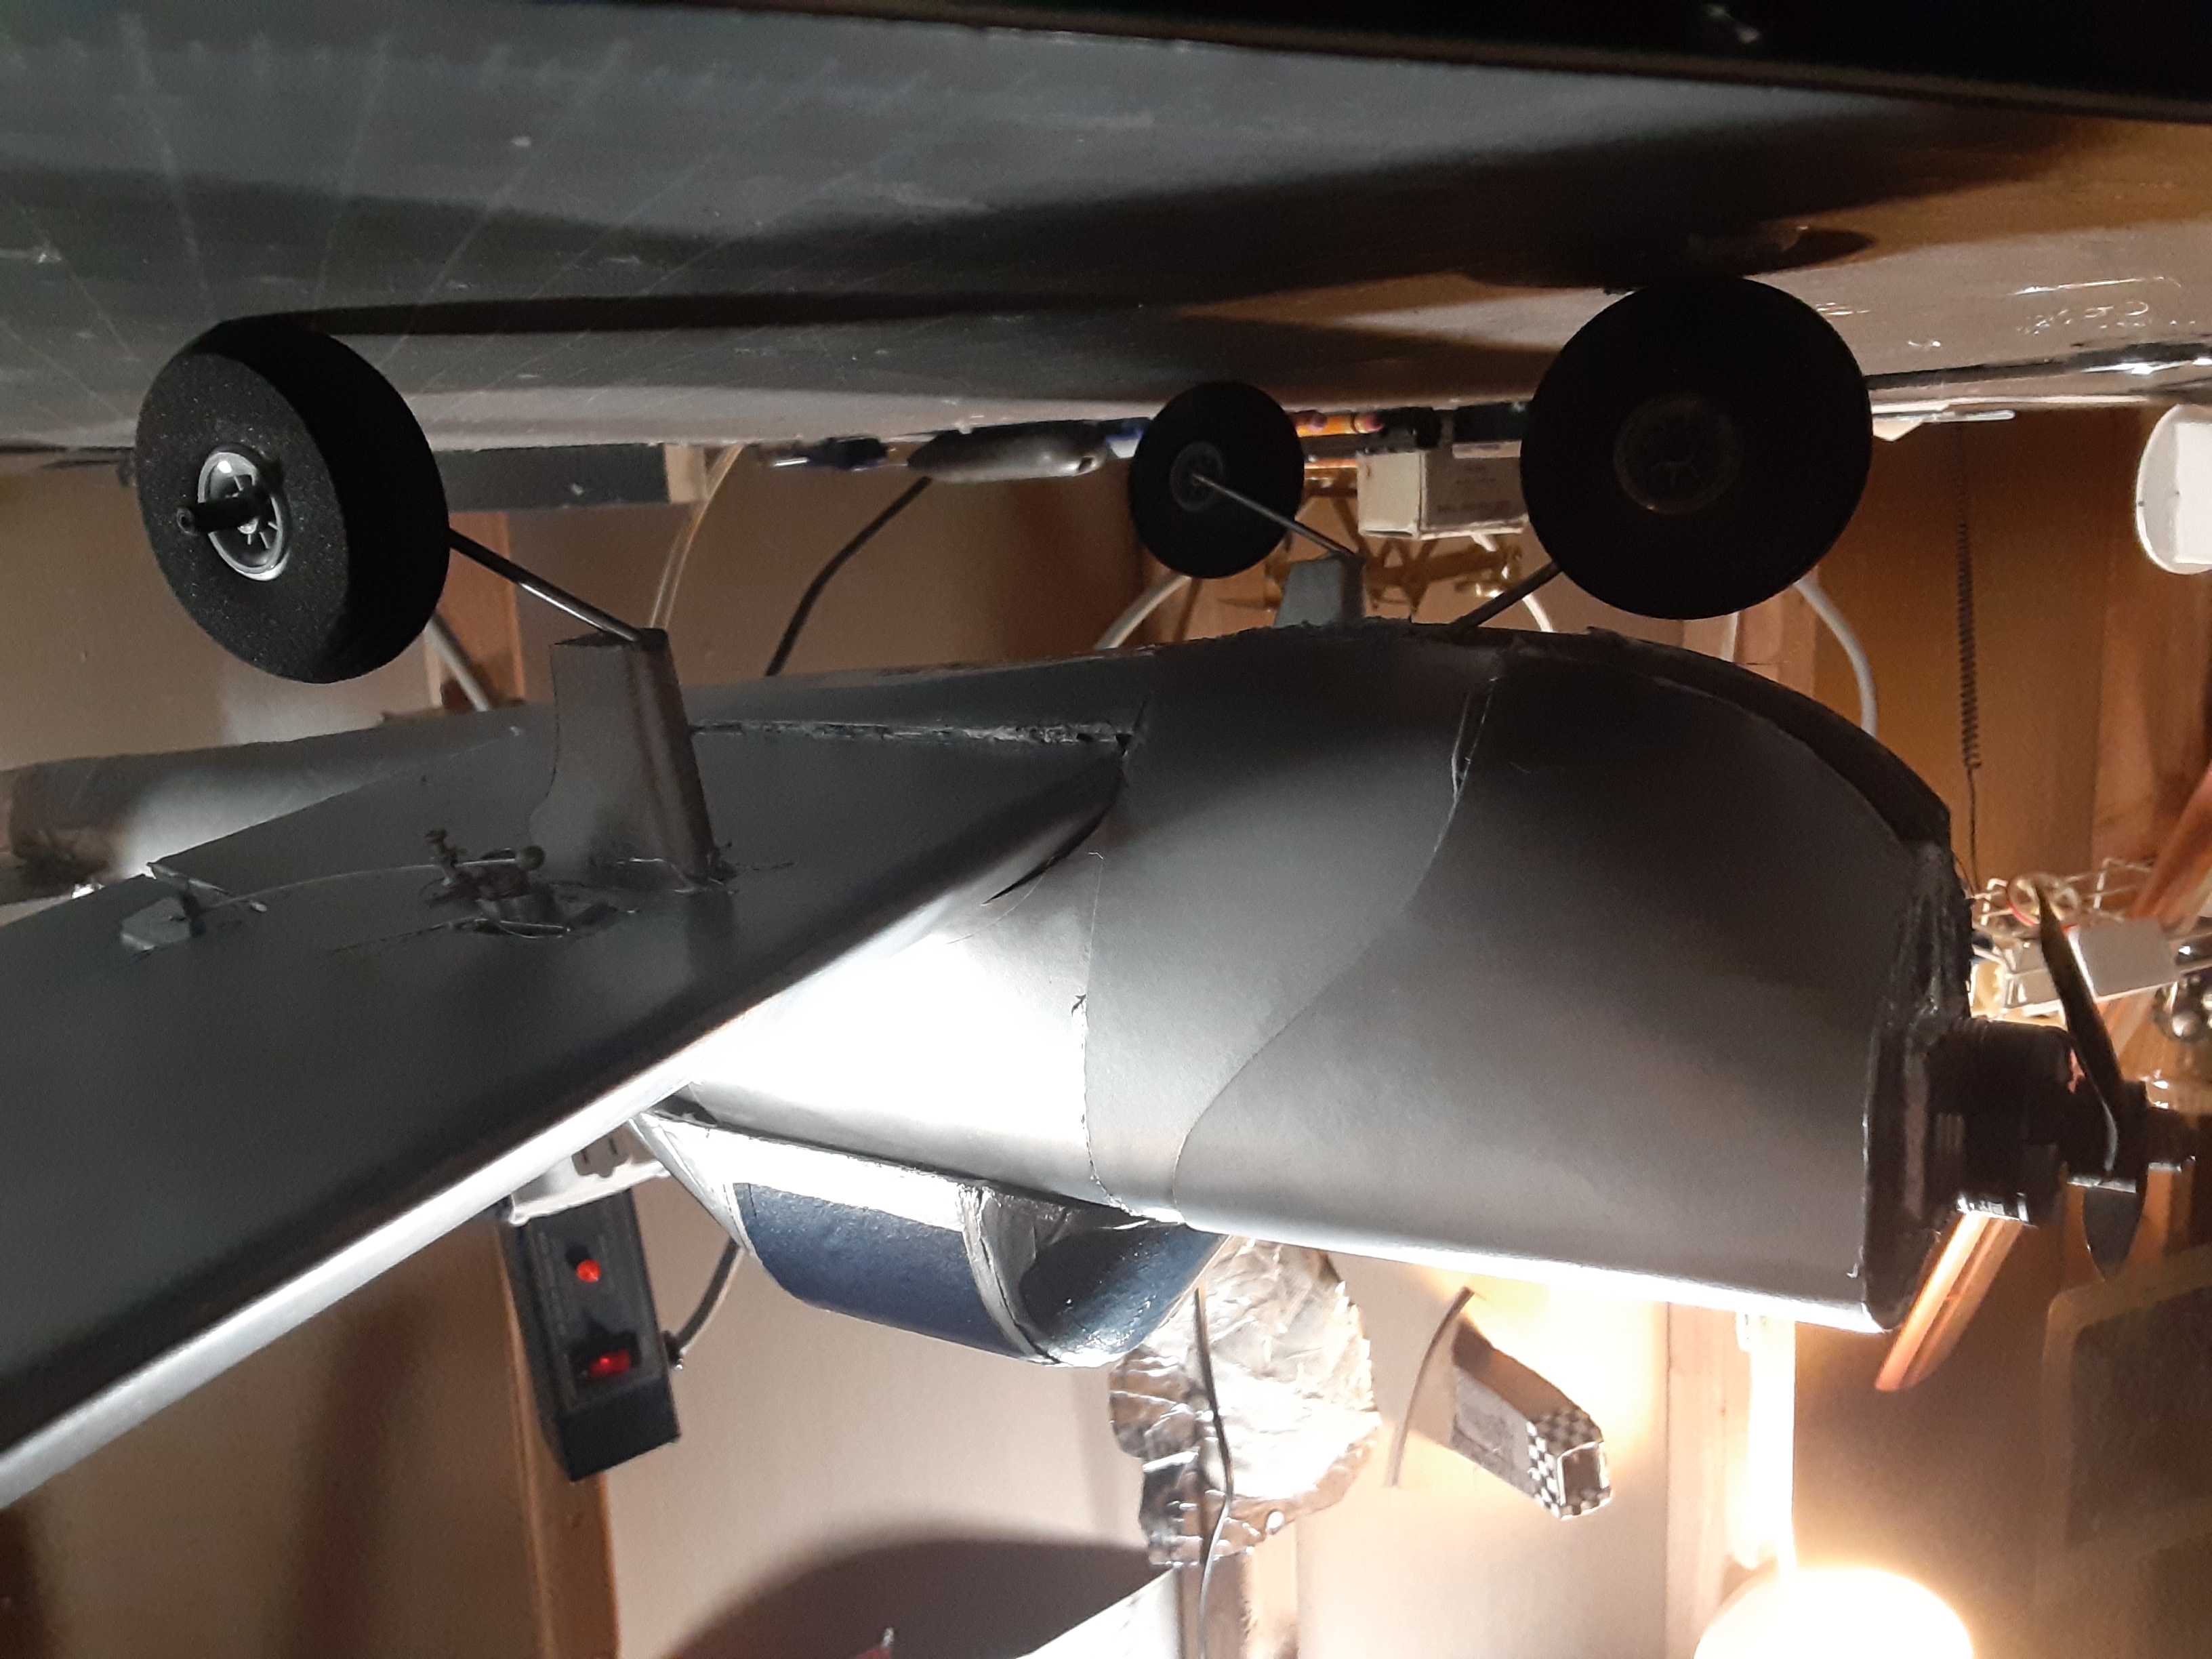 The nose features a scale-look cowling The nose features a scale-look cowling | 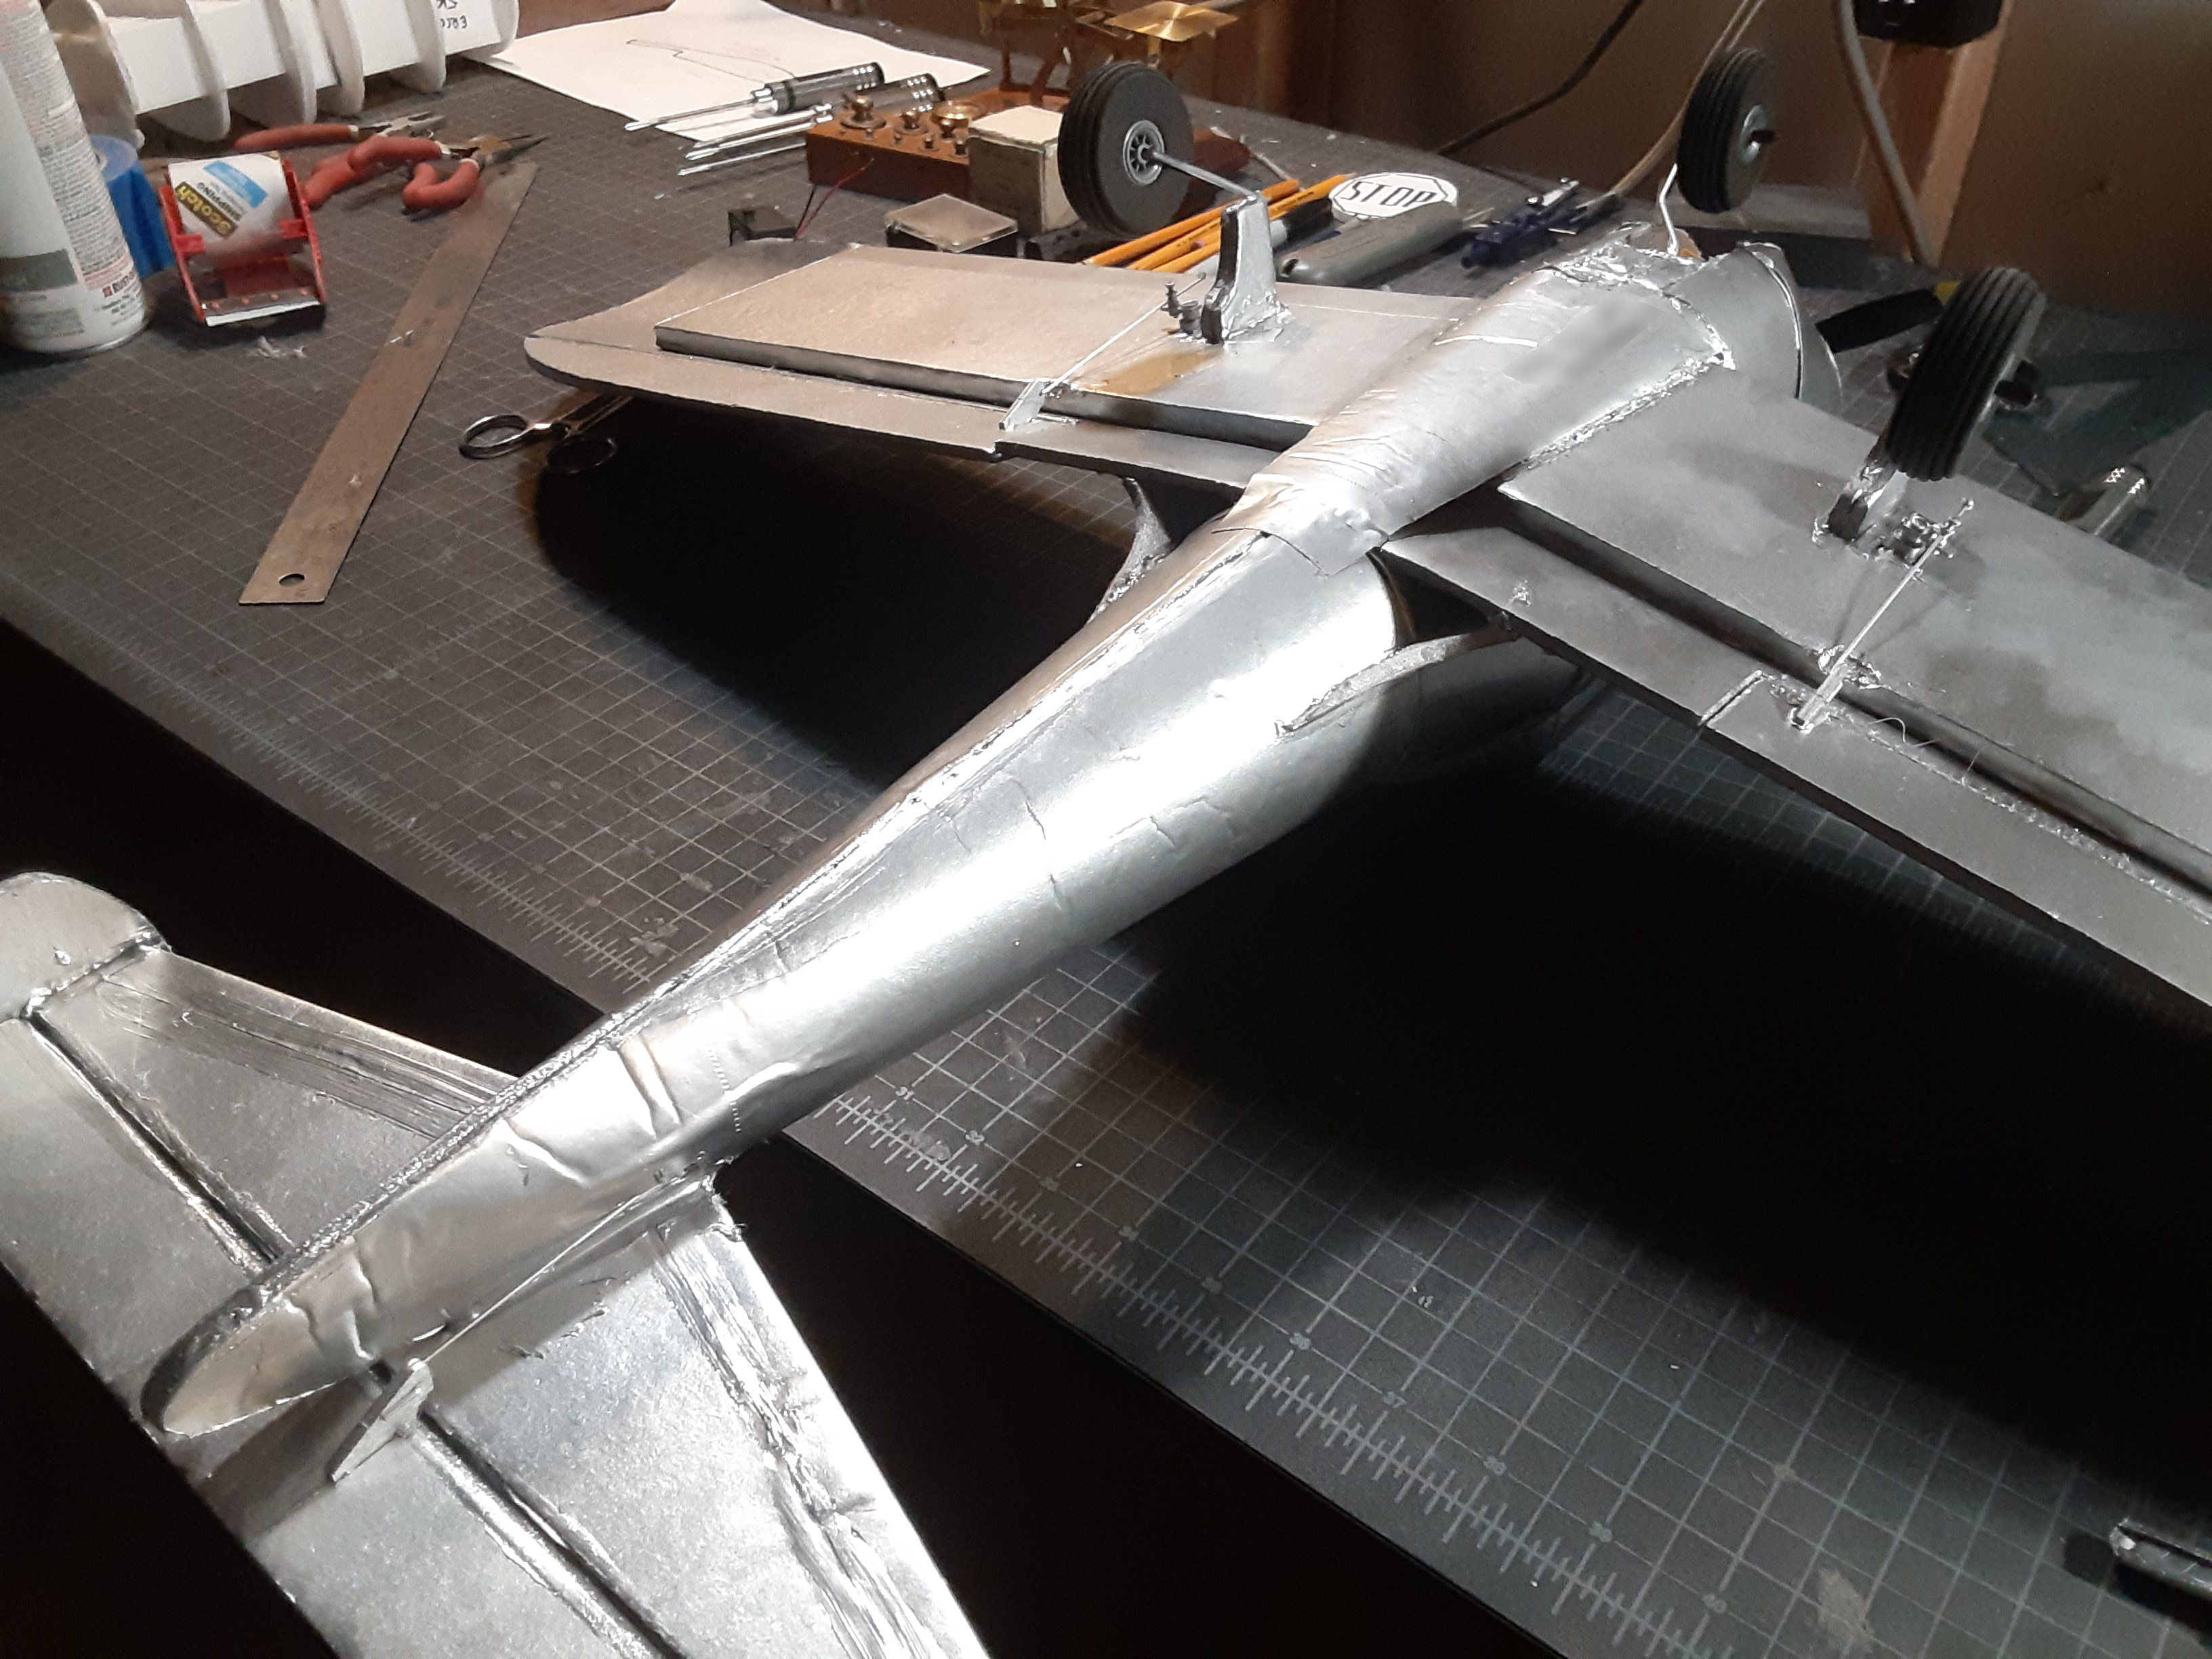 Note the tail boom which flattens out at the tip Note the tail boom which flattens out at the tip |
 Empennage showing elevator control horn and pushrod Empennage showing elevator control horn and pushrod |  Canopy removed to show receiver and elevator servo Canopy removed to show receiver and elevator servo |
Once trimmed, the model is a fine trainer with good stability and handling characteristics. However, there is plenty of control and power to perform aerobatic maneuvers such as tight turns, loops, Immelmans etc. The tricycle gear makes takeoffs and landings a breeze if you have a smooth runway, although there is no way to steer on the ground. If you set it up with a dead-straight thrust angle, it will pull to the left. To prevent this, add a little right thrust angle by placing a thin washer or shim under the left side of the motor. Be aware that like the real aircraft, it is not a very good glider, but dead stick landings are certainly achievable. I have uploaded a short video of the Mini Ercoupe in flight below.
Plans
There are three .jpg images below that should print at 500x750mm (just a bit under your standard 20"x30" foam sheet). Your local copy shop can help you out printing these. Because I don't own a laser cutter, I like to glue the plans to some foam board and make templates from them. This is so that when I inevitably crash, I can easily pin and trace the old templates to make parts for a new plane.
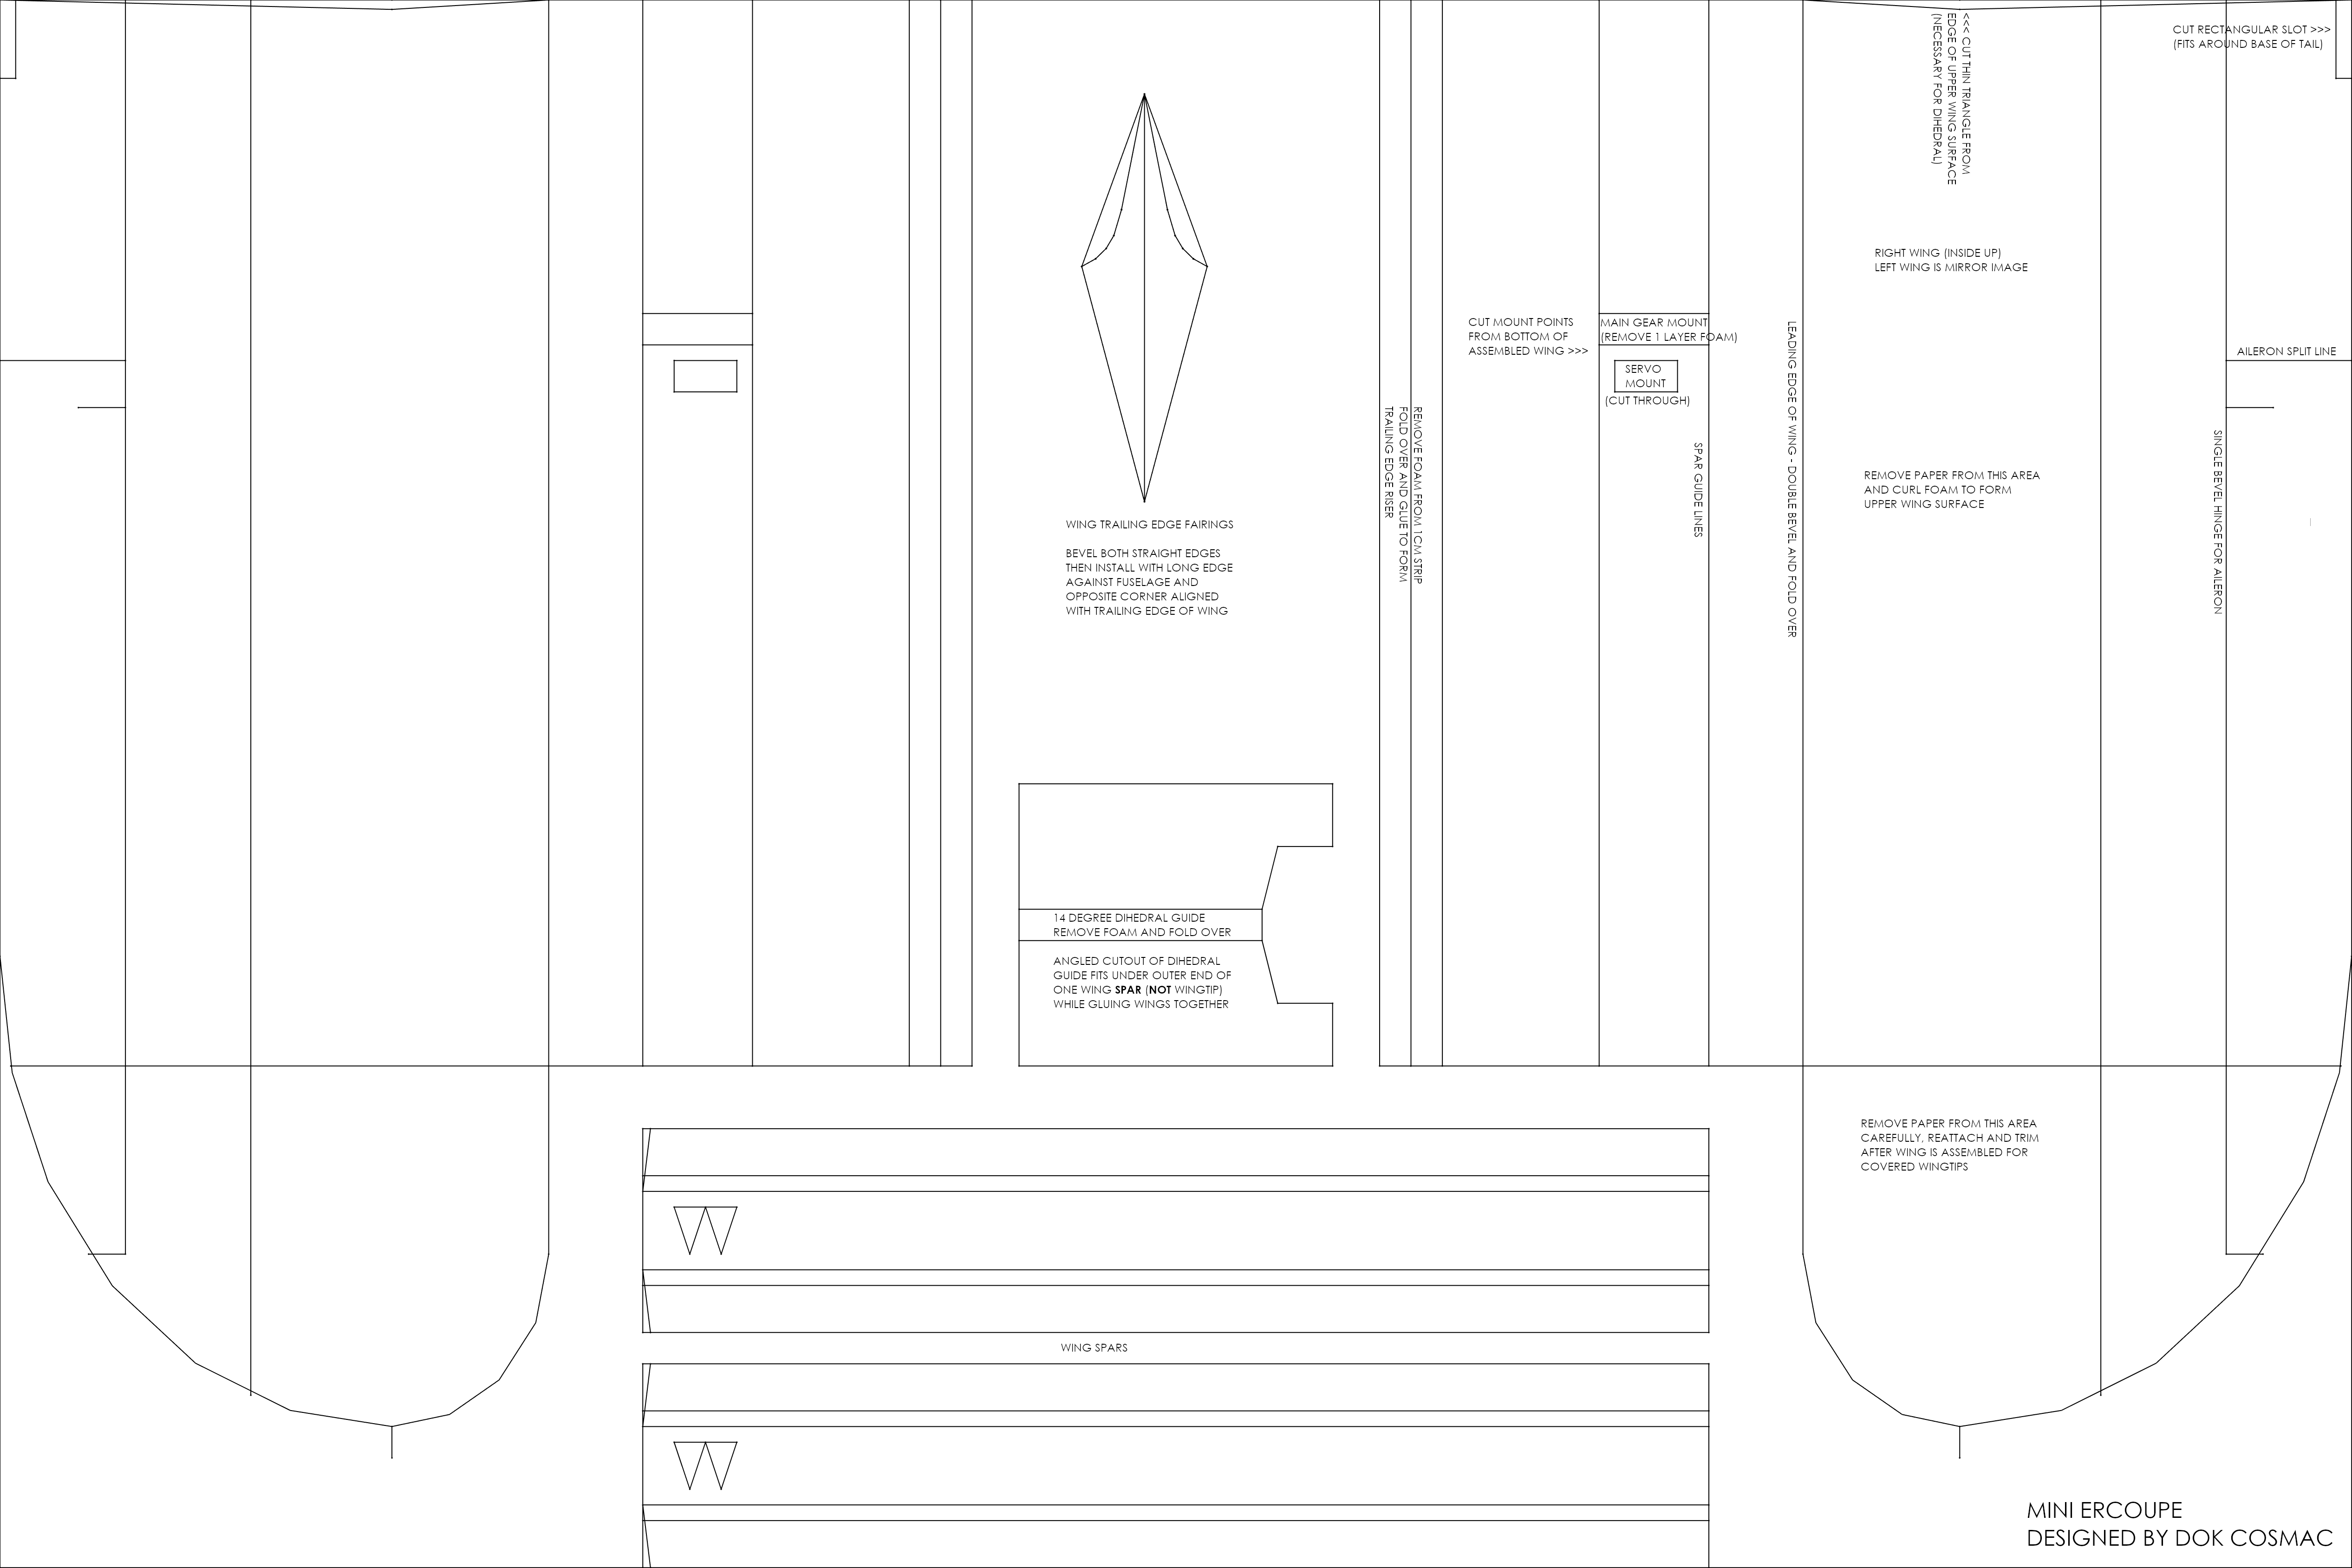 Wing Wing |  Fuselage, empennage, etc Fuselage, empennage, etc | 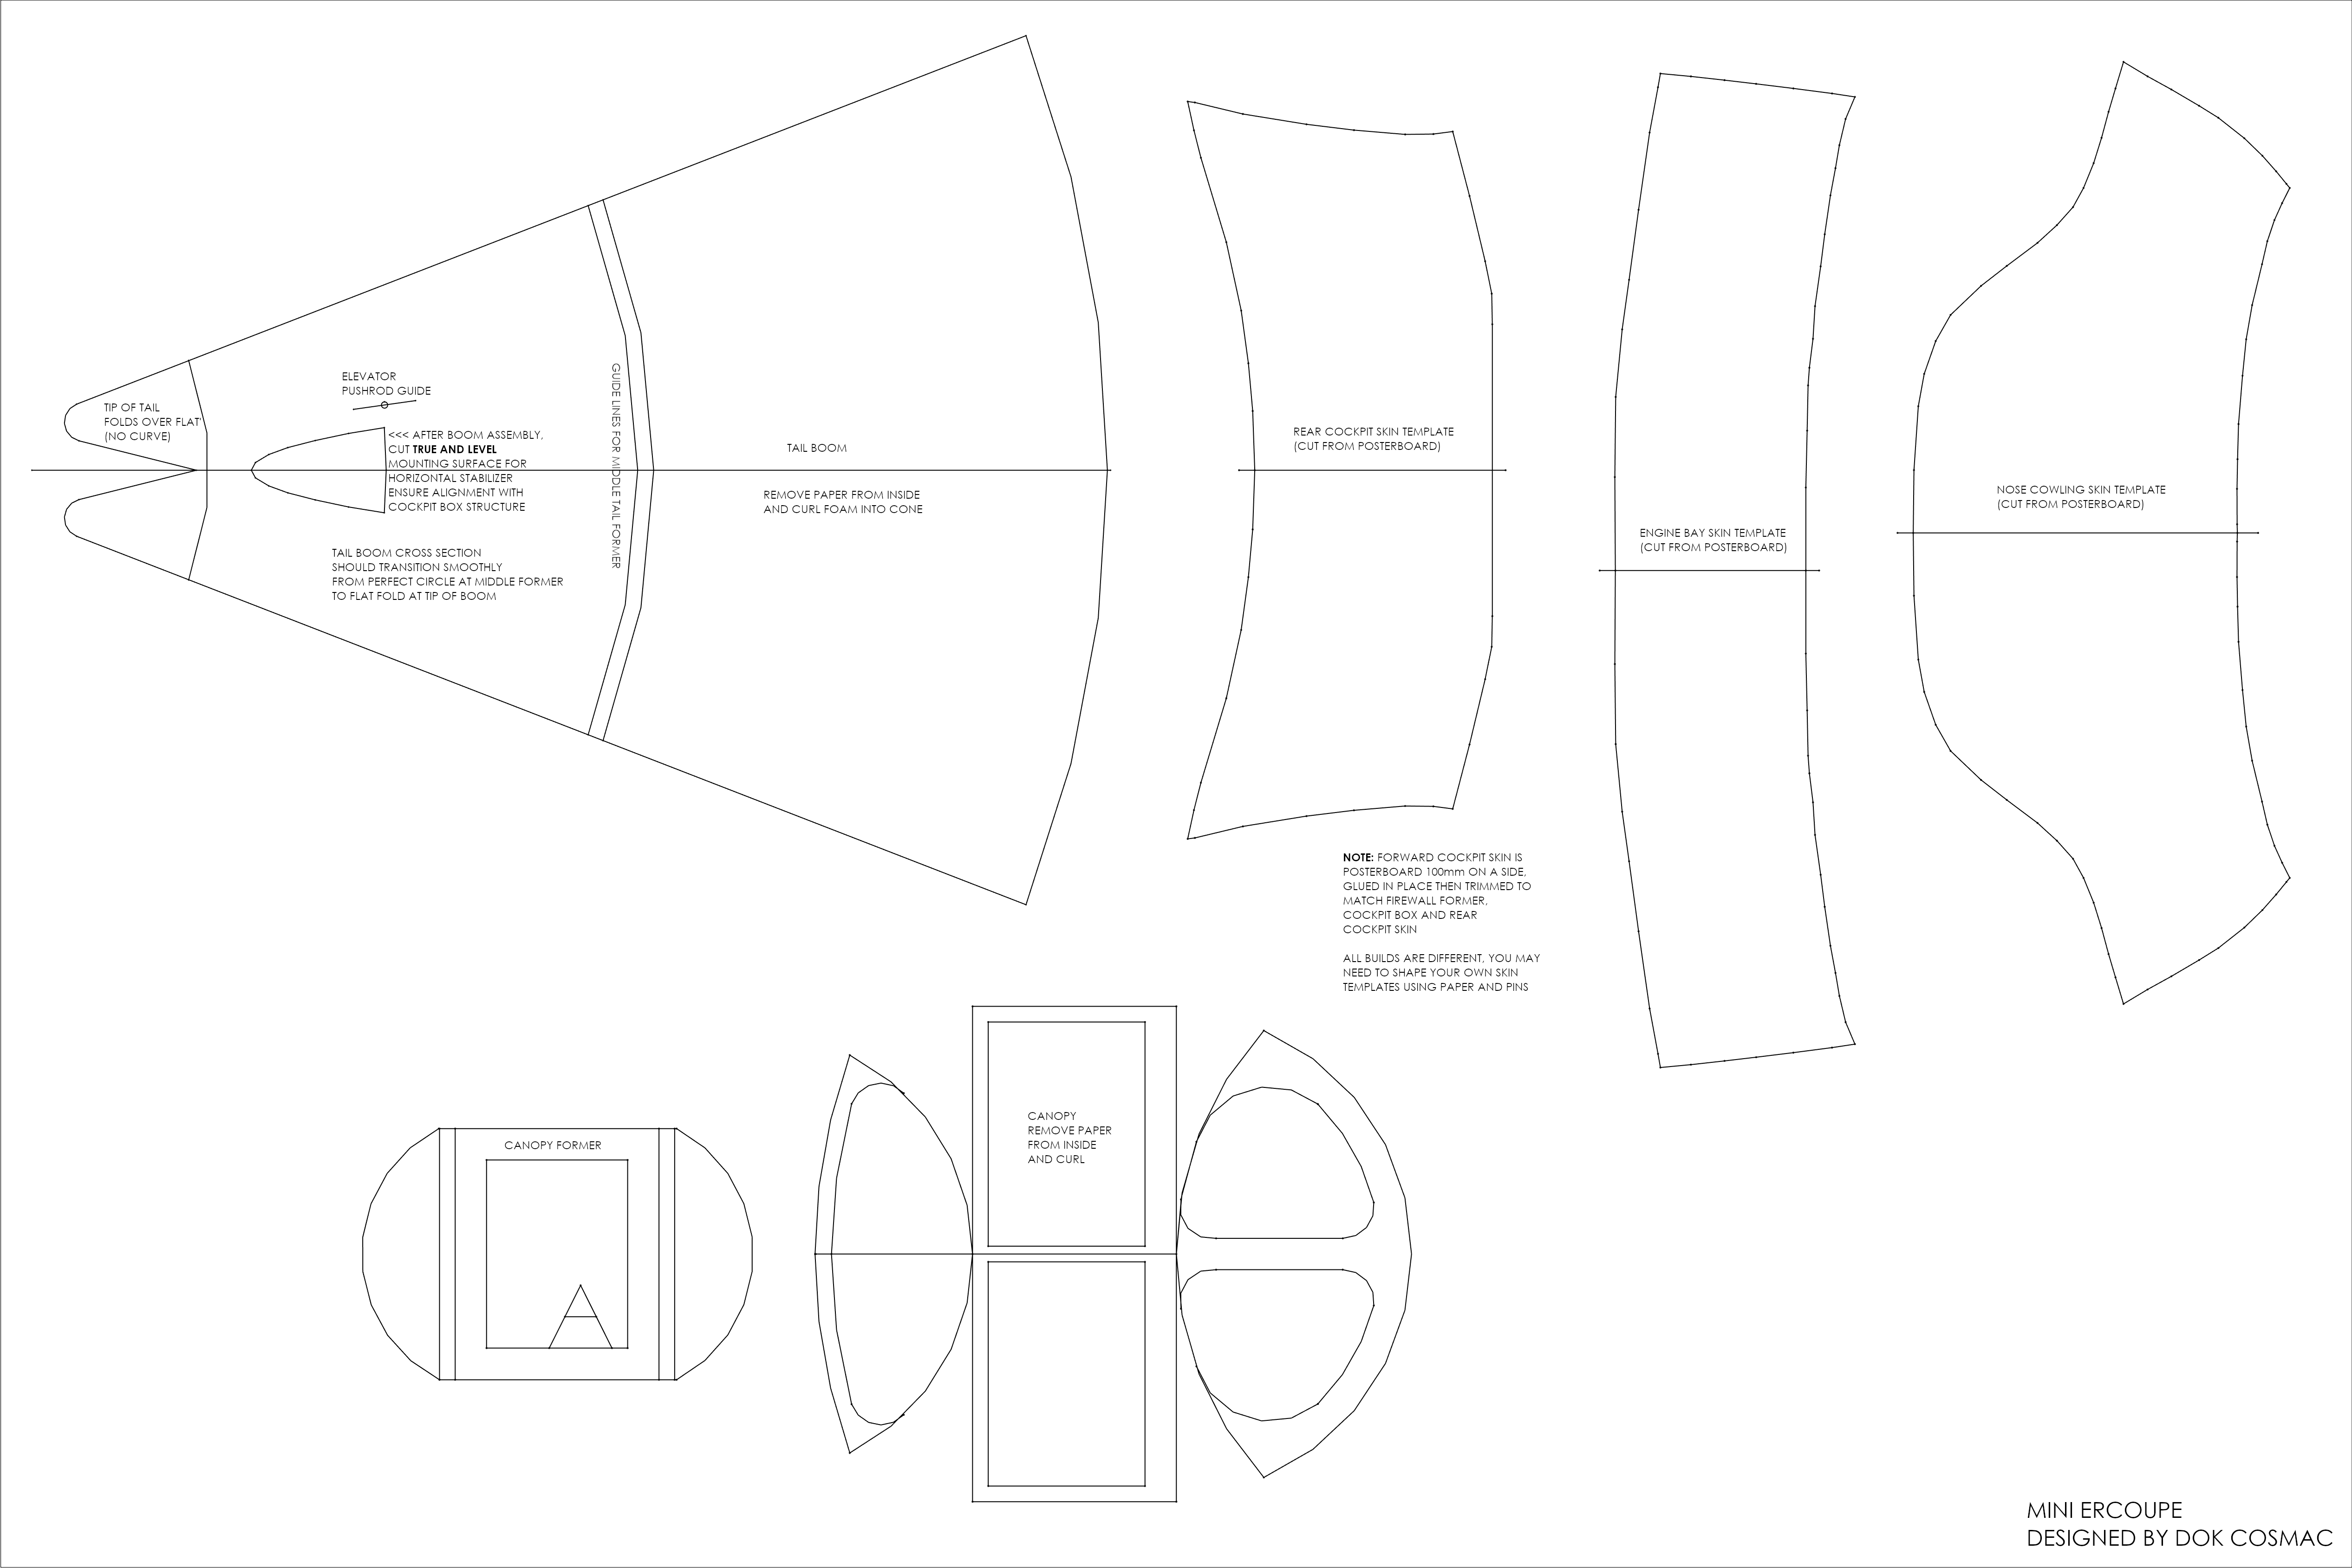 Canopy, tail cone, skin templates Canopy, tail cone, skin templates |
Assembly
Although these are not detailed instructions, this is the general order that I designed the Mini Ercoupe to be built in, and can help you as a guide if you want to attempt it. There are more notes on the plans. Please don't hesitate to contact me with any questions.
I am also putting up a series of build videos here that might help, including how to add working rudders: Mini Ercoupe Build Playlist
1. Start with the tail. Build the horizontal stabilizer/elevator, making a glue hinge for the elevator. Attach the vertical stabilizers checking carefully for alignment in all axes. Bead the inside corners and smear the outside joints with glue to make them really secure. Build the tail interior structure from two formers and a vertical stretcher, then curl the tail boom by removing the paper from the inside surface and gently rolling it along a table edge. Make sure to install the elevator pushrod guides and pushrod at this time. Glue the boom around the tail structure. When wrapping formers with a skin (foam or poster board), I always start from the centerline (in this case, where the tail stretcher meets the former) and work outwards doing one side at a time for best results. Note that the tip of the boom is folded flat, not curved. Cut the horizontal stabilizer mounting surface from the tail cone and test fit the tail plane. Make sure it lines up level with the cockpit box mounting points on the tail base former, before gluing it down. Fill the corners between the tail cone and the stabilizer with a bead of glue to make them really strong. Attach a mini control horn to the pushrod and glue it into the elevator.
2. Build the wing. If you’ve built any of FT’s simple series, you know how this goes; the only difference is that the top surface is curled by the table-edge method instead of creased. Install the aileron servos, routing the wires through the center top of the spar; build and install the main gear on the wing if desired.
3. Build the fuselage box and shelf, cockpit box, and fuselage formers, making sure everything is square and that the formers line up with the guide lines on the boxes. Build the power pod and set up the ESC and motor. A thin washer or shim between the left side of the motor and the firewall will help compensate for left turning tendency. Install the power pod. I glued mine in, but if you want to fine-tune thrust angles, change motors, etc you can hold it in with skewers in the usual swappable way. Route the ESC control wire to ther receiver platform and tape it in place. Make sure the battery wire is also accesible from the battery bay opening area; cut minimal holes in the structure as necessary to route wires. Mount the elevator servo to the cockpit box, routing its wire to the receiver platform and taping the extra in place.
4. Attach the tail to forward fuselage, carefully checking the alignment between the horizontal stabilizer and fuselage box structures. Attach the pushrod to the elevator servo using an adjustable end stop. You should use the innermost hole on the shortest stubbiest servo horn you have; the Ercoupe should not be overcontrolled.
5. Skin the cockpit area of the fuselage with posterboard, starting from back of aircraft and working forward, in two overlapped sections. Posterboard can be curled to fit using the edge of a table, just like foam. The forward cockpit skin is not on the plans; it is a rectangle 100mm long that must be glued in place and carefully trimmed, so that its bottom edge will fit snugly over the wing when test fit. Route the wing servo wires to the reciever platform and tape.
6.After a test fit, glue the wing to the fuselage structure, ensuring it is centered and aligned with the horizontal stabilizer. There should be just a degree or two of incidence. Cutout, bevel and install the wing trailing edge fairings, AKA those little triangles that blend the wing into the fuselage. Build the bottom cover, attaching nose gear if desired, and install it.
7. Skin the nose area of the fuselage with posterboard, back to front, in two overlapped sections. Cut out holes in the cockpit skin for access to the receiver platform and elevator servo. Build the canopy, installing FPV gear if desired, and attach it to the fuselage with two strips of velcro. Install and test your receiver and/or flight control board on the receiver platform. Check that the plane balances at around ~25% of the chord of the wing with the battery loaded. Give everything a final check.
8. Install the prop and fly. Make sure to trim out your controls before doing any maneuvers, and adjust the servo pushrod end stops as necessary to take out the trim once it's back on the bench.
Thanks to all of the RC aviation and Flite Test community for the support and inspiration. I hope you enjoy the challenge of building and flying my Ercoupe as much as I enjoyed designing it. Good luck and safe flying!
For more information about the real Ercoupe, I recommend the documentary Fearless Flying, which I found useful in doing research on the aircraft. It can be found at https://www.youtube.com/watch?v=DPxsh6fnSoU


Log In to reply
Log In to reply
Log In to reply
Log In to reply
Log In to reply
Log In to reply