I designed this little delta wing trainer to allow me to give people demo flights on a buddy box without much cost or risk. It's not the world's best primary trainer; it's a little too fast and agile for that, but it's not bad. The main thing is that at $25 plus Tx it's pretty cheap. The airframe is constructed entirely of dollar tree foam and hot glue. It uses elevons only; no need for a functional rudder.
I've included a KFm2 airfoil and polyhedral at the tips, and that really does make it more docile. It has pretty decent slow speed characteristics; many is the time I've saved it from a flustered student about 5 feet off the deck (they often freak out just before their first landing). It's been cartwheeled, planted in the weeds, and hand-launched at full throttle directly into the dirt, and it still looks and flies great.
The main reason for its strength has to be the covering. I use packing tape (thanks to Ed of Experimental Airlines) and it really turns dollar tree foam into something special.
I hope you enjoy!
The Build:
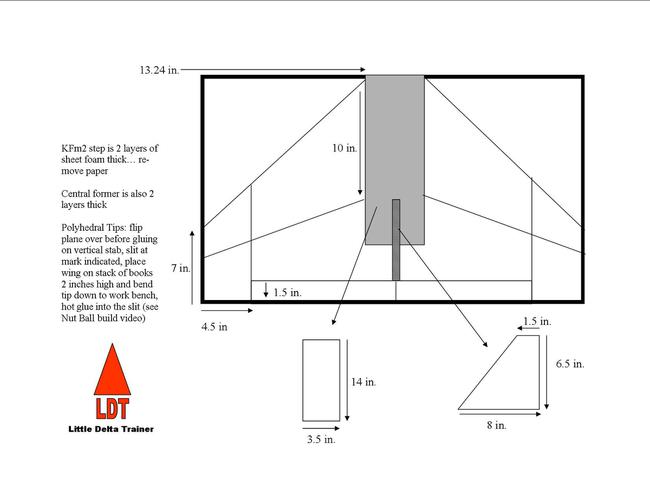
1. Mark out the measurements on a sheet of Dollar Tree foam board.
2. Cut 2 KFm2 steps from a second sheet, and peel the paper off.
3. Use a sparing amount of hot glue to fix them to the main wing, peeling the paper from the point where it contacts the wing. You're going to stick it all down with packing tape anyway. Once done, cut a leading edge into it, about 45 degrees, and sand smooth.
4. Add the central rectangular brace, which is constructed from 2 layers of peeled foam.
5. Cover the entire thing with packing tape.
6. Add the polyhedral tips... see the Nut Ball build video and use 2 inches.
7. Cover the entire thing with packing tape (I used some duct tape on the leading edge).
8. Cut a slit into the central brace and add the vertical stab. Use a carpenter's square to make a straight line to guide your cut or you'll include some unintended yaw.
9. Cut the ailerons (see Ed at Experimental Airlines to learn a great method for this).
10. Make a motor mount (I like an L-shaped light ply mount with side reinforcement) and glue it to the former, making sure to peel paper and packing tape away from the contact point. This makes for a much stronger bond. Attach your motor.
11. Tape on your servos, battery, esc and reciever (use masking tape). Check for balance. The balance point is 6-7 inches behind the leading edge of the firewall.
12. Install your electronics and maiden it. If you use a 130 watt motor be sure to hand launch it at full throttle. This thing does not fly like a super-light foamy. I like to have my student grip it just above the polyhedral tips and pop it up at a 45 degree angle into the wind.
Equipment:
1000 mah battery from Hobby King
130 watt Blue Wonder motor from Hobby King (she could take more)
8x3.8 prop from Hobby King (on a prop saver)
2 Hextronic servos (9 gram)
Orange Rx from Hobby King
ESC: I glued it in face-down, but it's an appropriate one from... Hobby King!
Radio: I use a Spektrum 6 channel computer radio
Measurements:


Log In to reply
Log In to reply
http://m.youtube.com/watch?v=CwZbyoEL1pg&desktop_uri=%2Fwatch%3Fv%3DCwZbyoEL1pg
Log In to reply