Hullo everyone!
Before everything else, these are the skills you need to make this circuit:
- Basic knowledge of parallel and series circuits
- Decent soldering skills
- Patience
So here's my simple-ish solution to running out of batteries if you're using a 1S FPV mulitrotor.
I'll admit, you probably can't mount this on a Cheerson CX10, but if you were making something using a Quanum WISP 110 or a Diatone 110, I think this little circuit I made will be super handy.

I based it of on FPVHobby's 1S 3.5 Low Voltage alarm:
http://www.fpvhobby.com/149-1s-lipo-low-voltage-alarm.html
But I'm from the Philippines. And to be quite honest, our customs isn't exactly very friendly to anyone's wallet. So I decided to go searching for a means of making my own version of the thing.
All I wanted to do was find a way to make an LED bulb turn on as your voltage dropped to 3.5v. I'm pretty sure that's what FPVHobby's thing did. And the internet has plenty of solutions but none were simple enough, nor easy to make.
Then I found this circuit on RCgroups:

It was simple enough and the components weren't difficult to find. In fact, all I had to do was rip open some broken laptop chargers and I found the most important component, the "TL431" bit. This is the "switch" that turns your LED on when your voltage drops to 3.5v
I'm no electrical engineer, but I could read. This circuit ONLY NEEDS 5 components:
1. TL431 shunt regulator. It looks EXACTLY like your typical transistor, but it's kinda not. As long as you see the numbers "431" on it, you're good to go. The one I got in the charger was labelled "KIA431A" and it works. If your soldering skills are up for the challenge, you can easily get one from an old power supply or charger.
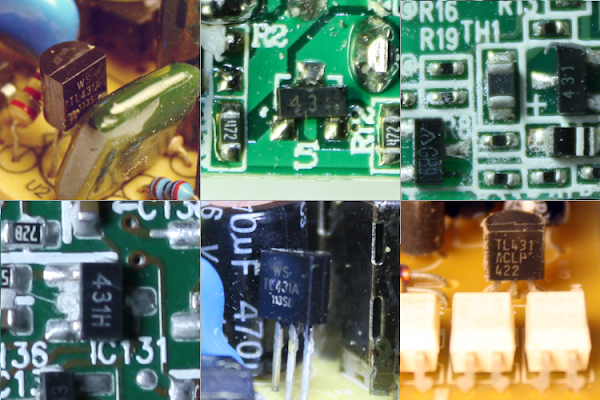
(Top row: cheap 5 volt power supply, cheap phone charger, Apple iPhone charger. Bottom row: MagSafe power adapter, KMS USB charger, Dell ATX power supply)
And these images will help you place the TL431 properly in your circuit:


2. A 2v LED bulb. The voltage rating is kind of important otherwise the light will never turn off. Although you can use an LED that's rated for a lower voltage, all you need to do is add another diode in series BEFORE the LED bulb.
RESISTORS: Pay attentions to the colored strips of the resistors
3. 3.9k ohm resistor

4. 470 ohm resistor
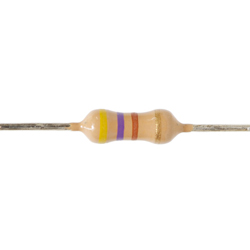
5. And lastly a 10k ohm resistor

All these you can either pull out of old electronic junk or purchase from a local electronics shop.
ASSEMBLY:
This is my first attempt at assembling the circuit


As you can see here, I didn't have a 3.9kohm resistor. So I put a 3.3kohm and a 680ohm in series to get approximately 3.9k ohms. And I have a 4148 diode right beside the TL431.
TIP:
Connect all negative (or ground) connections to the Anode pole of the TL431. It'll help.
Now, i know it's no OSD. And i'm pretty sure it's slightly heavier than the one from FPVHobby. But for a DIY solution, I think it's reasonable. And a whole lot cheaper. FPVHobby's was $7.40, mine cost less than $1
How can I then use this for FPV? I could place the LED at the very corner of the camera, where it's peeking out at the very corner of your monitor.
Happy flying and God bless you! :D


Log In to reply
Log In to reply
Log In to reply
Log In to reply
Log In to reply
Log In to reply
Log In to reply
Log In to reply
Log In to reply
http://everycircuit.com/circuit/6077729746714624
Log In to reply
Log In to reply
Log In to reply
Log In to reply
Log In to reply