Updated-Paper Skin for Foam Board

by Desert Wings | October 6, 2014 | (51) Posted in How To

Flite Test planes are addictive!  For me, building is as much fun as flying.  That being said, I sometimes go overboard with coverings, paint, and details.  I spend way to much time decorating when I should be flying.  To try to speed up the building process and still have something that looks cool, I thought I would try something new.... a printed paper "Skin" for my next plane that I could apply to the foamboard before cutting it out.  

The advantages you ask?...

  • Reduced Weight - less tape and paint means less weight and every gram counts
  • No tiled plans to put together; some people like puzzles... I like planes
  • The covering/art can be more complex; you can ad logos, pictures, weathering, rivets, panel lines or anything you want.
  • The plane plans are printed and applied directly to the foamboad along with your custom artwork so you can start cutting foamboard right away and by-pass cutting out the plans and tracing them onto the foamboard.

Unfortunately there are drawbacks including potential cost or availability to get the printed skin.

As was quickly pointed out in the comments, many depron and profile builders have been using similar techniques for years.


Bayboos has used this technique for his Depron Builds


MyDigitalParadise has used this process for profiles. He linked the following RCGroup page regarding printing profile skins:

http://www.rcgroups.com/forums/showthread.php?t=724566#sthash.CS8koWOt.dpuf


 Morgan99 has printed directly to depron/epp using a sign maker printer (very cool design and result)


I am lucky enough to have access to a large printer at work and for the cost of the paper and ink ($3) I can print a non-tiled Flite Test plan with my own creative artwork on plain paper.  I have attached links to different decorated Flite Test plans in .pdf format:


FT-3D - MX2           FT-3D RedBull    FT-3D Green Geo      FT-3D Purple Geo       FT-3D Rainbow
FT-3D - U-Can-Do    FT Duster          FT Mini-Scout            FT-Spitfire Camo


Feel free to use the linked plans above as a starting point for your own designs.  My son is currently working on artwork for a Storch build.  I will probably do other FT designs and post them here....maybe bookmark and check back for additional free work done by others.  If you do a design and are willing to share, send it to me in .pdf format and I will add it to this article (see email address in profile).

STEP1 - Design and Print

I start by downloading the non-tiled version of the plans from Flite Test (in this tutorial, FT 3D).  I then import the .pdf file into a drawing program.  Like Josh Bixler, I love and use Corel Draw; but any art/graphic program could be used.  This is where the creativity comes in.  You can add any colors, art, or 

graphics you want to the basic FT plans.  At this stage you need to look at the design and decide if you need to reverse the plans to decorate both sides of a verticle stab or the bottom of the horizontal stab/elevator, etc.  Once your creative juices have run dry and you are satisfied with your plane skin save the file.  Remember to keep the original scale or adjust it as desired just be aware that you want it to print exactly the size you need...  then Print.  Many office supply stores will print on plain paper at affordable rates.  I know many people have printed the non-tiled plans.....if anyone can add comments on cheap places to print  - please share.

STEP 2 - Prep the Foam Board

Carefully remove the existing paper from one side of the foamboard.  I like to use water and dampen the paper that I am removing as it makes the process a little easier and seems to reduce the curling affect that pulling the paper off causes.  If you choose to use water, apply it carefully with a damp rag or sponge and do not get anywhere near your beautiful printed design or any foamboard paper you do not intend to peel.


STEP 3 - Dry Fit

Once the paper is off, cut your printed design into sections that can be applied to a single piece of foam board.  I try to segregate my pieces into 20"X30" foam board size areas when I do the design so the resulting print is easy to lay out and effeciently use up every inch of the foam board.  Leave yourself some margins, you can cut to the plan design lines later in one step as you cut your plane out of the foamboard (this is one of the advantages).  

Test fit the cutout sheet(s) to make sure they will fit on your foamboard (again make sure there is no water around from your previous step).


STEP 4 - Apply the new paper skin

Spray the back of the printed design with 3M 77 adhesive spray (or equivelant) and let it air dry for about 10 seconds...then immediately apply the design to the paperless side of the foamboard.  Do not spray the adhesive directly on the foam as the propellant will eat up the foam.  If you have curling on your foam, or the design, get a few extra hands to help you in this process.  You want your foam board to be laying flat when you apply the new paper.  If this step intimidates you or you are unsure if the adhesive is adequate or how much to spray on, you can test this process with some scrap foam and paper; after you let it dry a few minutes, you can also try peeling the test result back off the foam to check your adhesion, and to see if there is any damage to the foam.  When applying the spray adhesive I make about three passes over the entire paper making sure I get all the edges.  Don't skimp to much here or your paper wont stick well; at the same time going overboard will add weight.  Note that the paper will feel a little heavy with the adhesive but it gets lighter again as it dries. 

ALTERNATE METHOD.  If you are not worried about the weight, just apply the printed paper over the top of the existing foamboard paper (do not remove any paper).  This will add a little weight but also a little more rigidity and strength.  The choice is yours.

STEP 5 - Rub it out and let it dry

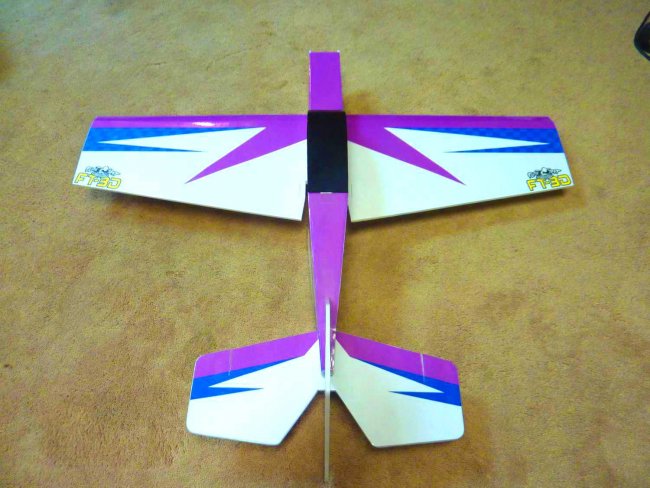
Using a soft clean cloth, rub the design firmly onto the foam board making sure that it is well attached.  Then place another sheet of foam over the top of your handiwork and set some books on top while the spray adhesive dries out a little.  I like to let mine sit for about a half hour before I begin cutting out my design.

If you are applying a design to both sides of a piece of foam (like your verticle stab), apply the first side as described above.  Then, cut out your foam board following the plan lines and flip the plane part over and repeat the process but his time, cut out your 2nd side printed "skin" right on the design lines,apply your adhesive, and carefully line up and attach the second side to the foam board.


Step 6 - Finish and Fly

Now cut, build, and fly the awesomeness that is your foamboard creation. Normally when working with FT designs you are working from the "back or inside" of the wing or fuselage so all creases, 50% cuts, bevels are done from the design template on the same side. When applying a graphic you are working from the "front or outside" and you don't want the blue and red reference lines to show on the graphic. So I apply the graphic to the front where I leave any line that is a 100% cut on with the graphic (all the black lines). Then after cutting all of my 100% cuts I turn the foam over and measure and mark where my creases, bevels, and 50% cuts should be. This can be done a couple different ways:
• Print a plain version with all the lines left on that can be used to transfer these reference points to the back,
• Leave small dots on the front of the design for key reference points and then transfer these points to the back by pin pricking through the foam from the front to the back.
• Just take some measurements and make notes before deleting the lines and then recreate the lines on the back.

STEP 7 - Rate and Comment and if you try this method, send me pics and feedback to update this article with.  


COMMENTS

Sky Walker on October 18, 2014
Wow, I like the green geo plan. It looks like a ParkZone Sukhoi.
Log In to reply
jordy123 on July 11, 2016
That was my first thought, too! what a coincidence.
Log In to reply
Gsimpson2g on October 18, 2014
I love this idea! I will have to try this when I build my Spitfire and Storch.
Log In to reply
LetsFlyRC on October 18, 2014
Very nice looking FT-3D
Log In to reply
PropSpinner on October 19, 2014
Simply beautiful!
Log In to reply
canuck on October 19, 2014
Wonderful idea. I'll have to get the people at work to print me up some.
Log In to reply
udo789 on October 19, 2014
Fantastic. I have one question: when I start cutting at Step 5, how do I know where the red 50% score lines, the blue lightly crease lines, and various cut-outs are located? For example, on the wings the new paper skin is applied to the outside surface of the wings, but the red and blue lines are on the inside surface of the wing.
Log In to reply
Desert Wings on October 19, 2014
Good question. I need to edit the article to discuss this. Normally when working with FT designs you are working from the "back or inside" of the wing or fuselage so all creases, 50% cuts, bevels are done from the design template on the same side. When applying a graphic you are working from the "front or outside" and you don't want the blue and red reference lines to show on the graphic. So I apply the graphic to the front where I leave any line that is a 100% cut on with the graphic (all the black lines). Then after cutting all of my 100% cuts I turn the foam over and measure and mark where my creases, bevels, and 50% cuts should be. This can be done a couple different ways:
• Print a plain version with all the lines left on that can be used to transfer these reference points to the back,
• Leave small dots on the front of the design for key reference points and then transfer these points to the back by pin pricking through the foam from the front to the back.
• Just take some measurements and make notes before deleting the lines and then recreate the lines on the back.

Log In to reply
udo789 on October 20, 2014
Thank you for your reply. I figured you were doing this. For expediency, simplicity, and speed I like the pin method best. As a suggestion, you could show most of the reference lines because they occur on folds and would therefore be barely visible. On the wings, key reference points are a good idea.
Log In to reply
Bayboos on October 19, 2014
From my experience, this idea have one more advantage - it allows working with non-covered foam (like Depron) with the same techniques as with Readi-Board. Please take a look at this FT 3D - it's built from Depron, using the same "cover it yourself" idea:

Log In to reply
Desert Wings on October 19, 2014
Your plane looks great, with its clean crisp graphic lines. If you are willing to share the artwork for this plane (or other FT designs), I will post it with the designs above for others to use. I have not worked with depron. What do you use for adhesive...and is the process roughly the same as what I have described?
Log In to reply
Bayboos on October 19, 2014
The process is almost identical; even the adhesive is the same (3M 77). I was also trying out 78 - it's much heavier, but it's also foam-safe. The only difference is that Depron comes with no paper covering at all, so I need to choose either to cover one side or both (and do it myself, of course).

The paint scheme of this plane does not exist in digital form as of today; but it's based on factory paint scheme of Zlin Z-50 airplane:


Log In to reply
Bellows on October 19, 2014
Beautiful looking planes and a great idea. I am concerned about waterproofing though. Often I fly from hay fields and they are wet. Even at fly ins sometimes there is moisture present. Wouldn't these printed colors run? I use packing tape in most cases to cover or poly.I know they add weight but in my case it needs to be done.
LooseBruce
Log In to reply
Desert Wings on October 19, 2014
Depending on the printer and paper used, the colorfastness will differ. The prints that I have used are definitely not colorfast. I live and fly in a dry area so this is not a huge issue but I have tried several different methods of fixing this.
• Move to the desert – and don’t let people drool on your planes.
• Your idea of a lightweight clear packing tape works well. Usually the cheapest, lightest, lowest mils is best.
• Lightweight laminating film, sometimes referred to as “New Stuff” can be applied to the print side of the paper only. I have used a 1.7mil film. This is best done before even adhering the paper to the foam, though it can be done after if you are careful with temperature.
• Use Flite Test’s Minwax polyurethane approach to waterproofing (non-water based) (this can cause a slight yellowing so it would be better on designs without a lot of white paper.
• Spray a couple of light layers of clear (non-water based) polyurethane on.

Log In to reply
Hell2Go on October 19, 2014
What you need for the ideal print would be an A1 Size UV Flatbed Printer as it could print directly onto the foamboard and the ink would make it waterproof. The only problem is they are expensive. The cost could be offset by printing planes and selling them. FliteTest should get one for some Ultra Speed Build Kits. That would be awesome!
Log In to reply
Desert Wings on October 19, 2014
I was looking at feed printers similar to what they use for vinyl cutting. I will have to check the flatbeds out. I know it's not in my budget but it is fun to dream and maybe I can find someone close that will let me use theirs for cheap once in awhile. Thanks for the comment.
Log In to reply
flight monkey on October 19, 2014
I love the idea ! I will definitely try it. Thank you so much, for supplying free pdf artwork. Very cool of you.
Log In to reply
ttprigg on October 19, 2014
great process, it sure looks great! Thanks for the article.
I was wondering what "type" of paper you are printing on. I notice a "Gloss" look with reflections off the vertical stabilizer. Are you using a "laser" or an "inkjet" printer? I have access to a HP-designjet and I am wondering if that would work.
Log In to reply
Desert Wings on October 19, 2014
Inkjet - HP Designjet on plain paper. The FT3D in the article includes a very thin layer of laminating film on the print side only (1.7 mil film) giving it a glossy look and waterproofing it. (see additional discussion in the comment regarding waterproofing)
Log In to reply
ttprigg on October 23, 2014
So, I ordered some film and started to develop some "graphics". When I printed them, (DesignJet 500) the colors were not consistent with what is on the screen (I normally just print "line-work" and not graphics...). The colors were darker and "more brown". I don't know if I can calibrate the color on the printer. Any thoughts?
Log In to reply
Desert Wings on October 23, 2014
Here is some information on color calibration for your plotter:

http://www.hp.com/ctg/Manual/c00748239.pdf (try the solutions section under color accuracy)

http://h30499.www3.hp.com/t5/Printers-Designjet-Large-Format/designjet-500-color-problem/td-p/398634#.VEmlgPnF81I

It appears from some of the links that you should calibrate the color specific to your paper type and that you may benefit from a firmware update. You can also do color correction from within the graphic software. Hopefully one or more of these tools will help. I think you will like the laminating film "new stuff" it is great for many scratch building applications (but it does not shrink so do not try compound curves). It is great for strengthening EPP foamies and wings (sticks better than tape). See email in my profile to send me pics of how it turns out and/or share your graphics file so I can post it in the article.
Log In to reply
x3mperformance on October 19, 2014
Awesome.
Innovative and to my taste.
Log In to reply
CJGFX on October 20, 2014
A brilliant idea, I need to look around for a printer who can produce the print outs. As has been mentioned before, it would help a great deal for people like me who don't have access to foam board, but depron. Simple print the layouts, stick, cut to size and them fold and glue. Cuts outs the need for printing plans then cutting the depron to the plans and then painting/decorating the plane at the end. AND it has the advantage of re-enforcing the depron at the same time, which at the moment I do with coloured packing tape..
Brilliant and thanks for a great article.

Log In to reply
Desert Wings on October 20, 2014
Thanks for the feedback. I hope that the information is useful to others including those using depron. I was glad to see the response from Bayboos who has used this method on his depron planes before. Let me know if you have success...and save your artwork/designs.
Log In to reply
Krivak957 on October 20, 2014
I didn't see an address or link for contacting you if we have some planes to be printed. Did I miss it somewhere??
Log In to reply
Desert Wings on October 20, 2014
There is a recently added email address in my profile. The address is to be used if you have a design file that you want to share with others. If I receive any, I can edit the original article above to add these artwork files for others to download and use. Unfortunately I can't print and send the plans out to others. I think my son and I are pushing the patience of my company on personal use of the large printer.
Log In to reply
spannerman on August 10, 2016
Brilliant work! Is there a way to print each section onto A4 size paper? I only have a home printer/copier/ scanner
Thankyou
Log In to reply
MyDigitalParadise on October 21, 2014
Love the design. I'd just like to add my thumbs up for this approach. We have been using it for years to build profile Warbirds over at RCGroups and it has spread to many other designs as well. My most recent was a Profile P-51 Miss America and I have a feeling as I work my way through a backlog of projects I'll apply the graphics to the FliteTest P-51 as well.
Log In to reply
MyDigitalParadise on October 21, 2014
Just for reference here is the thread over at RCGroups. I intend to port over a few of the design ideas to Flite Test designs.
Log In to reply
MyDigitalParadise on October 21, 2014
http://www.rcgroups.com/forums/showthread.php?t=724566
Log In to reply
Desert Wings on October 21, 2014
Thanks for the comments and Link. I spent sometime browsing the RCGroups designs and I am motivated to add panel lines, shading, rivets, and weathering to some of the FT warbird designs now. Have you or the RCGroup-ies developed a superior adhesion method which would beat the 3M-77?
Log In to reply
supersized_redneck on October 22, 2014
I was attempting to use a technique that i use when i draw with charcoal ( Hairspray ) and it seals the charcoal , so that the artwork does not smudge.

i was wanting an alternative to MINWAX ! What i discovered ,was that as soon as the hairspray dries on my DOLLAR TREE foam board...............the PAPER COMES OFF INSTANTLY with no DAMAGE to the FOAM Board, from my TESTS. Didn't get the result i wanted ! But i did discover how to get the paper off in case i need to.
Log In to reply
Desert Wings on October 22, 2014
I am intrigued and want to test this a little…. maybe hairspray on old paper for removal and then hairspray and let it dry on the new skin BEFORE applying it to the foam. If it makes the ink colorfast I think it would be lighter than Minwax, clear tape, or laminating film.
Log In to reply
BigSexy on October 22, 2014
Wow this is as awesome as the swappable concept! It's such an easy way to do it, I cannot believe it wasn't thought of before! Props
Log In to reply
Morgan99 on October 24, 2014
Nice! I printed directly on the material. Depron and foamboard. I used Adobe Illustrator for designing the graphics.

The result:
http://www.svensktmodellflyg.se/forum1.asp?viewmode=1&msgid=222229&page&CurrentMainTopic=2
Log In to reply
Desert Wings on October 24, 2014
Thank You so much for sharing your graphics - Very awesome. I have added pictures in the body of the article. Would you be willing to share some of your designs? Send me the Illustrator file or a .pdf export version and I will add it to the article above. Thanks Again
Log In to reply
Kurt0326 on October 30, 2014
I think I'm going to give this a go. Was pricing prints at about $17-18 for a 36"x36", that sound about right to you guys?
Log In to reply
Desert Wings on October 31, 2014
I think we need to find something cheaper out there. Maybe see if anyone at your club works with maps, drafting or engineering and who might have access to a large printer. Costco prints beautiful large prints for $13 but the paper is too nice and heavy (photo paper). The one I asked did not do plain paper. Does any one else have some cheaper places to print? The result is awesome but I hate to see anyone put $20 covering on $2's of Dollar Tree foam.
Log In to reply
Kurt0326 on March 10, 2017
So I got crazy and when to staples and printed your FT3D-Red Bull. I was going to cost me $50 for that print in real size because it's such a large print. But after they printed it, the blue turned out more lavender then blue. I didn't like it but after a long conversation with the manager, I took it for free. Great, but it's purple not blue. oh, and I did note that I think the lower side of the horizontal stabilizer looks like the blue flames should stretch to the tips. Right now they end about a 1/4" from the edge.
Log In to reply
ivaneduardo747 on October 31, 2014
Do you think there is another way to stick the paper to the foam without using spray adhesive? I'm not sure if I can get it in my country.
Log In to reply
ivaneduardo747 on October 31, 2014
Well I found a store that claims to sell it but it's not 3M. Wish me luck on that one.
Log In to reply
Desert Wings on October 31, 2014
I hope it works, let us know and send me pics/files if you want to share.
Log In to reply
ivaneduardo747 on November 2, 2014
I will, if I get round to it. I also want to share my designs. By the way guys, Inkscape works just as well as en alternative to Corel. It has a great interactive tutorial in the help menu! It's trully free and open source. It's not as advanced but it's more than enough for us.
Log In to reply
ksmith108 on January 1, 2015
Just wondering if anyone has any other designs to share.
Log In to reply
Desert Wings on January 5, 2015
I did add another FT3D, a Mini Scout, and I am working on a Spitfire.
Log In to reply
ksmith108 on January 9, 2015
thanks for sharing your new skins ..... I think the red bull skin is awesome great job
Log In to reply
Kurt0326 on March 11, 2015
Oh that RED BULL design looks great! I did notice that you only put one side of the vertical stab on the sheet though... I am willing to pay that $20 price to print this if you can fix it for me. I still have not found any one with access to a large printer in my area.
Log In to reply
Desert Wings on March 12, 2015
I'll fix it and post the correction tonight. I am building one now and ran into the same problem.....doh...and haven't reposted the fix yet. I just did a quick mirror image and reprinted that one part. Check again in the morning and it will be there.
Log In to reply
Desert Wings on March 13, 2015
The file has been updated to included the reverse side of the vertical stab. Hey if you have any engineering firms in your city, most have large plotters and some are willing to print cheap. My city also has a large printer and will print a 36" X 40" for $8. It may be worth a few phone calls. I hope to have my Red Bull completed soon, I will post pics. If you do one please share the pictures and maiden.
Log In to reply
pistolpete1982 on May 22, 2015
Any new designs? Like the FT mustang or the FT spitfire? I might have to make one of the designs to fit, really like the green geo scheme
Log In to reply
Desert Wings on May 22, 2015
Thanks - I need to finish my own Green GEO FT3d. I have several planes that I need to post pics of with the skins on them. I have not had time to do any new designs recently but will get around to it. I am working on a Fun Cub design for foam board with a skin. I will post plans and the skin when I am successful and done.
Did you see the Camo Spitfire... and the Red Bull FT3D?
Log In to reply
Josue on September 26, 2015
I have created MX2 and U-CAN-Do version on tjis link
http://www.rcgroups.com/forums/showthread.php?t=2100811&page=77#post32780723

Log In to reply
Desert Wings on September 27, 2015
I have added your pdf's to the body of the article. Your designs are great. Could I talk you into doing a good design for the new BushWacker? If you have pictures of a completed FT3D with your designs please send me a picture. I want to redo the article with a picture of a completed airframe(s) and a link to their associated design pdf files.
Log In to reply
Josue on October 2, 2015
I have added YAK-54 version on rcgrups forum. Contactme joviro24@gmail.com
Log In to reply
RCMasterx on November 3, 2015
I didn't see this covered in the article or comments, what do you use to assure that it prints at 100%? On the original plans there is a legend in the upper left corner. I know the foam is 3/16" thick. I made the mistake of not checking this after getting my first full size plans printed.

Log In to reply
Desert Wings on November 13, 2015
When printing the .pdf files from Adobe Acrobat, you will get a print dialog box when you choose print. In the dialog box there is a section for "Page Sizing & Handling", where you should choose either "Actual size" or "Custom Scale: 100%". When doing this, make sure your printer can handle the size of paper in the pdf file. My .pdf files are typically designed so that any printer capable of 36" rolls will easily print the file. Depending on the printer you may also need to open the printer "Properties" to check for print quality and sizing, as sometimes printer settings will override the file settings shown in the print dialog box. If you have doubts, draw a scale which wont take up much paper to print, then print the scale on the target printer you will be using and physically measure the result to see if the resulting print evidences any adjustment or distortion.
Log In to reply
bgfireguy92 on November 9, 2015
Hello Desert Wings this is great. Now if you're up for it could you do a tutorial on how to do this stuff on inkscape? I really want to do these cool graphics on planes but I am illiterate on graphics programs.
Log In to reply
Desert Wings on November 10, 2015
Inkscape is FREE, open source, and a decent program. Unfortunately, I am not familiar with it-I have used Corel Draw and Adobe products. I would start by importing the Flite Test file for the plane you want. Then just start playing with Fills, lines, etc. There are many existing you tube tutorials for Inkscape.

I will try Inkscape and maybe I can post a tutorial article specifically for taking FT plans to finished skins in Inkscape.
Log In to reply
ZackB on March 26, 2016
Hey man I love this article. One issue though. The decals for the fuselage need to be reversed otherwise they should go on the inside where the plans go. A buddy and I were building an ft3d yesterday with the green skin and ran into this issue. We figured it out but the plane has no paper on the inside. Great article. Keep up the good work.
Log In to reply
jordy123 on July 11, 2016
lol spitfire poop foam
Log In to reply
Desert Wings on July 11, 2016
I'm glad you noticed. Subtle humor is always good.
Log In to reply
FatPanda on August 3, 2016
Are these FT 3D plans you posted here the updated ones after Aaron made the design suggestions? I love this idea, and wanted to borrow your plans, but I couldnt' tell if they were the same as the most updated ones or not...
Log In to reply
Desert Wings on August 7, 2016
Yes they are updated plans. Please post a pic when you are done.
Log In to reply
FatPanda on August 26, 2016
https://goo.gl/photos/CyDZH4WdiANzvSr9A
Log In to reply
FatPanda on August 26, 2016
Almost done. Looks cool though! Thanks for letting me use the design
Log In to reply
Desert Wings on August 27, 2016
That looks Great FatPanda, here is his plane:


Log In to reply
RCMasterx on August 26, 2016
Hi Desert Wings, Could you add the scale bar to those skins that don't have one? I have my local printer use that to print the correct scale and use whatever size paper is needed. My first time with them, they asked what size paper and I guessed at it and it was not to scale. Now I have them use the bar. Thanks for sharing your work and great job! I can't wait to start my Spitfire with your skins. -JD
Log In to reply
Desert Wings on August 27, 2016
The paper size for the spitfire is 36" width X 44" height. I have added the paper dimensions as well as a 6 inch and 10 cm scale bar to the bottom of the Spit-Fire plans. I hope you enjoy the build and the results. I will check the other plans that I have done and add the paper size and scale bar to them as well.
Log In to reply
aritchie71 on September 24, 2016
Hi there, a quick hello from Scotland! I have a 24" wide printer and i could print these off onto paper but i don't know how to move the individual parts around so that i can print them out with my printer, do you have any tips on how to do it? I don't really do this type of stuff!

Regards,

Andy.
Log In to reply
Desert Wings on September 25, 2016
You can import the .pdf file into a drawing program like Corel Draw, or Adobe Illustrator then change the paper size and rearrange the elements by selecting them and rotating/moving them to fit within the paper size then print.... or I would be happy to help you. Your printer is 24" wide, does it have a specific length (paper size) or are you using a paper roll (unlimited length)? Which design are you interested in.
Log In to reply
zajaco on July 9, 2017
Is there a tutorial or video out there that shows the high level process in Corel Draw? I think the basics would be enough to get me started.

1) Importing the .pdf
2) cutting out the portions of the .pdf that need graphics
3) adding color/graphics to those sections

I think if I was able to feel comfortable with the process over the 15 day Corel trial period, I might just spring for the home use version. As it stands right now, graphic design programs other than MS paint are pretty foreign to me ;-)
Log In to reply

You need to log-in to comment on articles.


Updated-Paper Skin for Foam Board