Please rate this article after reading.
This article is originally posted, and maintained and updated, here: http://electricrcaircraftguy.blogspot.com/2013/02/soldering-heavy-duty-connectors.html
For other RC articles, please visit my main blog here: http://electricrcaircraftguy.blogspot.com/
------------------------------------------------------------------------------------------------------------------------------------------------------------
Related Articles:
Background:
So, tonight I decided to do an experiment to see how large of wire could be used with my favorite connector, the genuine XT60, from HobbyKing. Ultimately, I determined that a careful hand and hot iron (60W recommended, as my "Beginner RC Airplane Setup" document explains here) can easily handle wires at least up to 7 AWG, which is a very large diamter wire. In my experiment, I twisted two 12AWG wires together, to make a 7AWG-equivalent wire, which I then soldered to an XT60 connector with no problem. A smaller diameter wire, such as a 10 AWG, can easily be soldered to an XT60 connector with this iron linked above (as this is the exact iron I used). However, as 10AWG wire is capable of carrying currents much greater than 60A, you may be interested in using the larger XT90 connector, on which 10 AWG wire comes standard on a HobbyKing XT90 parallel harness or serial harness.
Various Large-Current, Large-Diameter-Wire, Connector Descriptions, & Links:
XT60-style connectors are my favorite, hands down, for my personal use. The 60 means "60 Amps," so as long as your *continuous* current is 60A or less, use these connectors, with any wire up to about 7 Gauge or so (though 14AWG wire is large enough to do the trick). Anyway, for 60A or less continuous, or ~100A peak (<=30 sec), XT60's are the way to go. For 90A continuous, or ~140A peak, use XT90's. For 150A continuous (250A peak), use XT150's. Also, as a side note, 10 AWG wire is designed to easily handle a high voltage 90A continuous current over short distances (you can verify using this online calculator here, with values of 1% loss, 22.2V DC, 90A, and 0.3m cable length), but again, if your system pulls <60A continuous, feel free to use XT60's, even for wire such as 10 AWG or as large as 7AWG.
- XT60 Connectors
- XT60 Parallel Cable (comes with 16AWG wire)
- XT60 Series Cable (comes with 14AWG wire)
- XT90 Connectors
- XT90 Parallel Cable (comes with 10AWG wire)
- XT90 Series Cable (comes with 10AWG wire)
- XT150 Connectors
My Soldering Experiment on the XT60 Connector:
-My goal was to see if large gauge wire (10AWG or larger) could be soldered to the XT60 connector, in order to use this connector to replace other large, bulky, or cumbersome connectors on very large battery packs where you need less than 60A continuous current draw. (Note: if you ever replace battery connectors, be very careful not to short out the battery leads by cutting off both wires on the battery connector at once. Rather, cut off and solder one wire at a time to a new connector).
-Results: I successfully soldered the equivalent of 7AWG wires onto an XT60 connector. I did not try to solder wires any larger, as this was large enough for the purposes of my experiment.
-This entire experiment, including taking the photos, took me 20 minutes, and 30 seconds. I timed it, from the time I cut the first wire to the time I finished heat shrinking the last piece of heat shrink covering.
Since I didn't have any 10AWG wire (my largest wire I have is 12AWG), I first cut a piece of 12AWG high-strand count, very high-quality silver-coated, silicone-cased audio cable. You can see the gauge printed on the wire.

Next, I stripped the covering off of *both* strands of high-quality 12AWG wire, and twisted them together to make one big strand of wire. I measured this large single strand, made up of two 12AWG wire strands twisted together, and found that its diameter was 3.13mm, or almost as large as an 8AWG wire (see here for a table of AWG wire sizes and diameters; an 8AWG wire has a diameter of 3.264mm).

I then tinned the end of this wire, and the solder increased the thickness to 3.75mm, or ~7AWG equivalent.

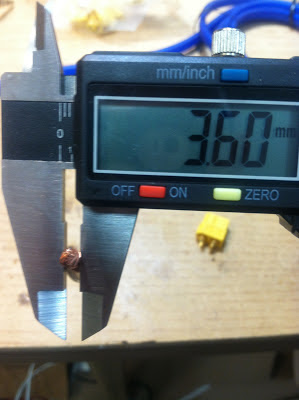
I then cut another wire, this time a low quality, low-strand-count copper audio cable, stripped the covering off of *both* strands of wire, twisted the two 12AWG strands together, and measured the diameter. Since this lower quality wire was slightly thicker, the combined strands measured 3.60mm diameter, or 7AWG equivalent.
After tinning this wire, its diameter was 4.48mm, or nearly 5AWG equivalent.

Next, I carefully tinned the two golden terminals on the XT60 connector, leaving an ample pool of solder in the recess of each terminal in order to wick into the tinned wires upon soldering, making the joining process easier. I then soldered the two sets of tinned wires to those terminals, one at a time.
The below three pictures show the high-strand-count wires (blue casing; 8AWG wire equivalent when untinned) and the low-strand-count wires (copper, with clear casing,; 7AWG wire equivalent when untinned), soldered to the XT60 connector. The 60W iron worked extremely well and easily tinned the large wires, and did this soldering job with minimal effort and only a few seconds of contact at a time on the wires or connector terminals. The solder joint was very solid, firm, and strong, and I would feel confident yanking on these wires all day long without them coming loose.


Finally, I placed a piece of 6mm black heat shrink tubing over the two 12AWG negative wires, and a piece of 10mm red heat shrink tubing over the two 12AWG positive wires. The positive wires required larger heat shrink tubing since the nicer blue silicone casing was thicker than the cheap plastic casing on the other wires. As a final touch, I used a small piece of 14mm black heat shrink tubing over the edge of the XT60 connector itself. Voila! All done, no problems, 7AWG equivalent wire successfully soldered to an XT60 connector with no problems whatsoever. NOTE: IF YOU TRY THIS WITH A 30W SOLDERING IRON, I THINK YOU WILL HAVE PROBLEMS. You'll probably have a very difficult time getting good heat transfer, and will have to hold the heat on for a very long period of time, likely melting the nylon XT60 connector, and perhaps getting frustrated and angry. :)

Here is a final picture of all of my soldering equipment I used.


Keep up the great work!!!!!!!!!!!!!!!! ;)
Log In to reply