Upgraded Supersized FT-22
Added Ailerons, Bigger Motor and ESC - New Plans included.

If you watched the flight videos in the Supersized FT-22 build article, you will have heard me say “a plane this size needs ailerons”. Although the Supersized FT-22 flew OK, I was eager for more performance. It seemed to me that the elevons alone didn’t have the leverage to twist the bigger plane over fast enough. I tried to perform some rolls and aborted the maneuver because it just wasn't snappy enough. I also thought the Supersized FT-22 was underpowered. My regular sized Glassed FT-22 has a thrust to weight ratio of 1.02 at full throttle compared to the Supersized FT-22 which had a 0.86 thrust to weight ratio. So, feeling underpowered was to be expected with the motor that I installed on the original Supersized FT-22 build. To overcome these deficiencies, the Supersized FT-22 now sports ailerons and a bigger motor. This article will demonstrate how I added ailerons to the already built plane. Adding aileron servos to the rear of the plane changed the balance, so the plane was rebalance by relocating the battery and new motor forward. To perform the relocation, I demonstrate how to disassemble a fiberglass foam core plane without damaging the parts and then reassembly.
Adding ailerons to an already built plane
The size and placement of control surfaces on scratch building models is based on primarily on previous designs and experience. A while ago I built a Dave Powers F-22 Raptor with ailerons (that didn’t fly so well becasue it was underpowered).I used the RCPower’s plans as a basis for adding ailerons to this plane.

I thought a 4 cm to 4.5 cm wide aileron should work although this is about half of the size of the ailerons on the RCPowers F-22. If it doesn’t work well enough, I’ll make recommendations for a larger size for the next build. Using a ruler, I drew a line parallel with the trailing edge of the wing.

Cut along the line using several light strokes with a forever sharp hobby blade. Cut off a 1 to 2 mm from the end to make it shorter than the hole it came out of to give it a little clearance from the wing.

Create a bevel in the aileron control surface. If you have skinned the plane with fiberglass, as I have, you will discover cutting a bevel with a knife is pretty difficult to impossible. I used sandpaper, which is way easier than fighting with the tough skin.
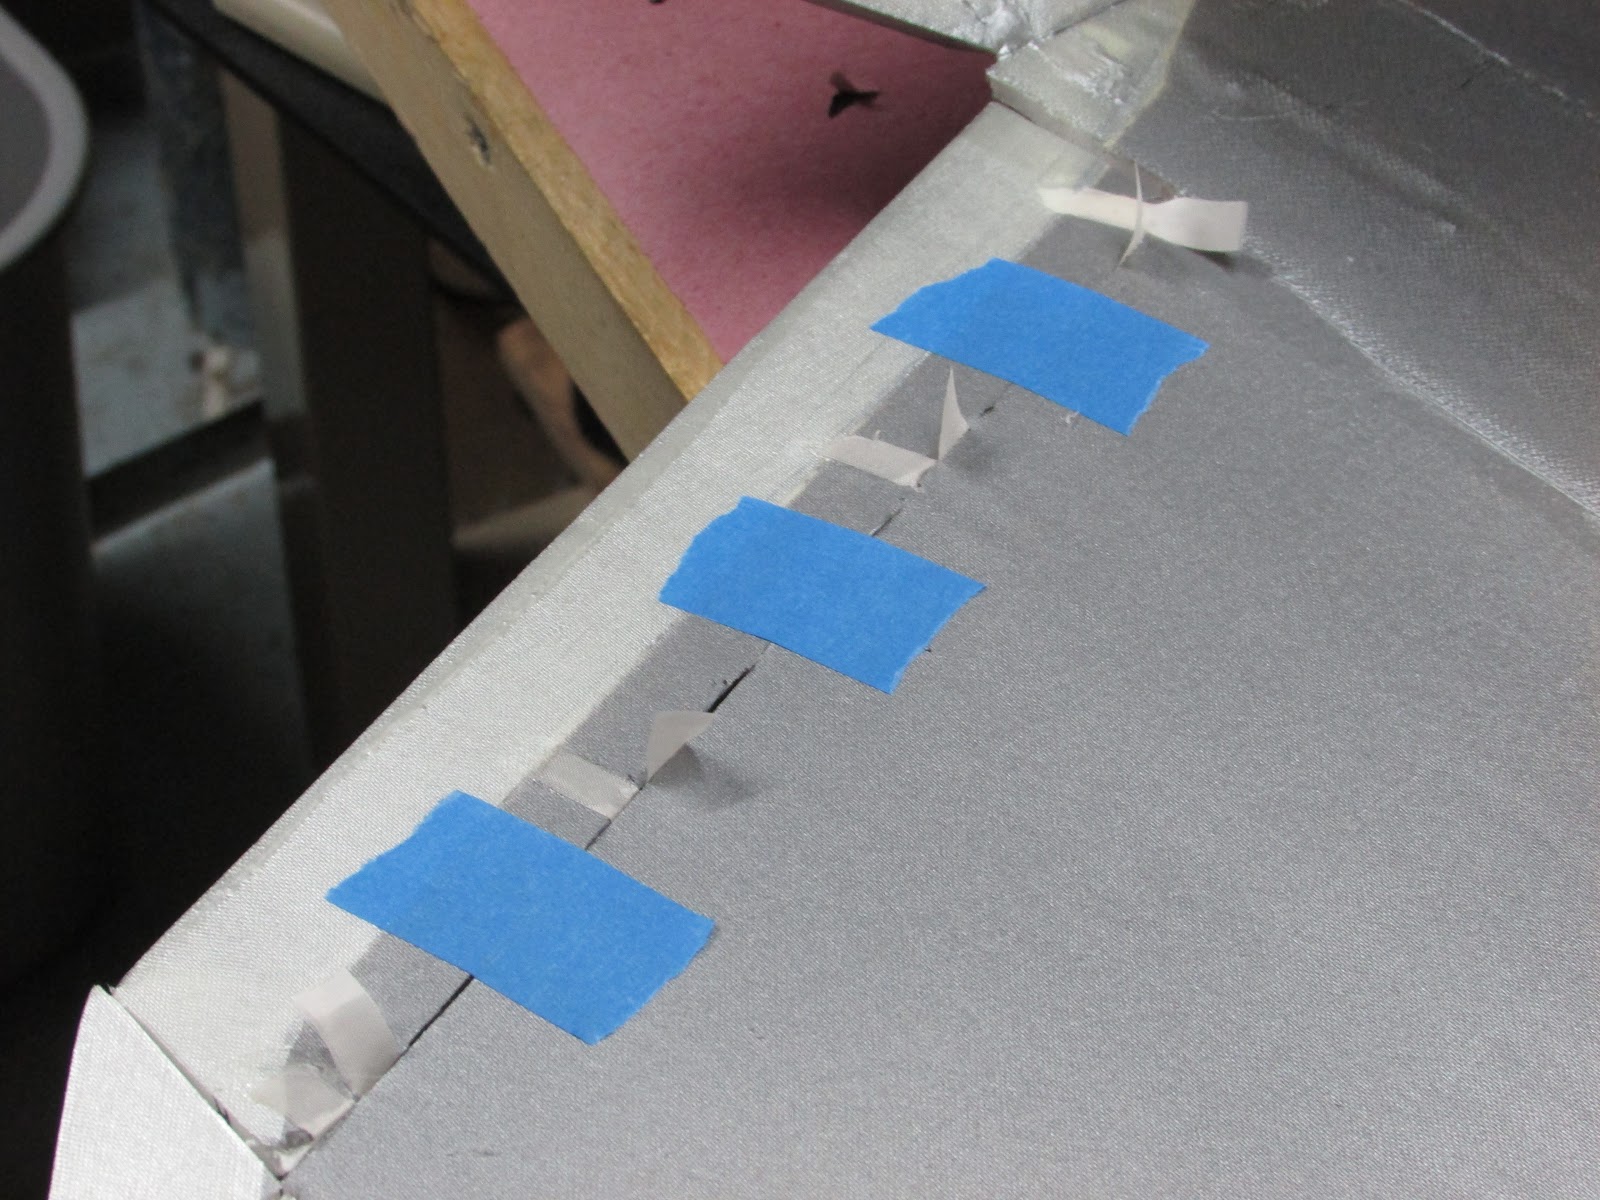
Attach the control surface to the plane using your favorite hinge technique. I hold the control surface in place with masking tape and use little strips of polyester cloth and hot glue to make several “X” hinges spaced about 5 cm apart.
Disassembly of a plane with alcohol.
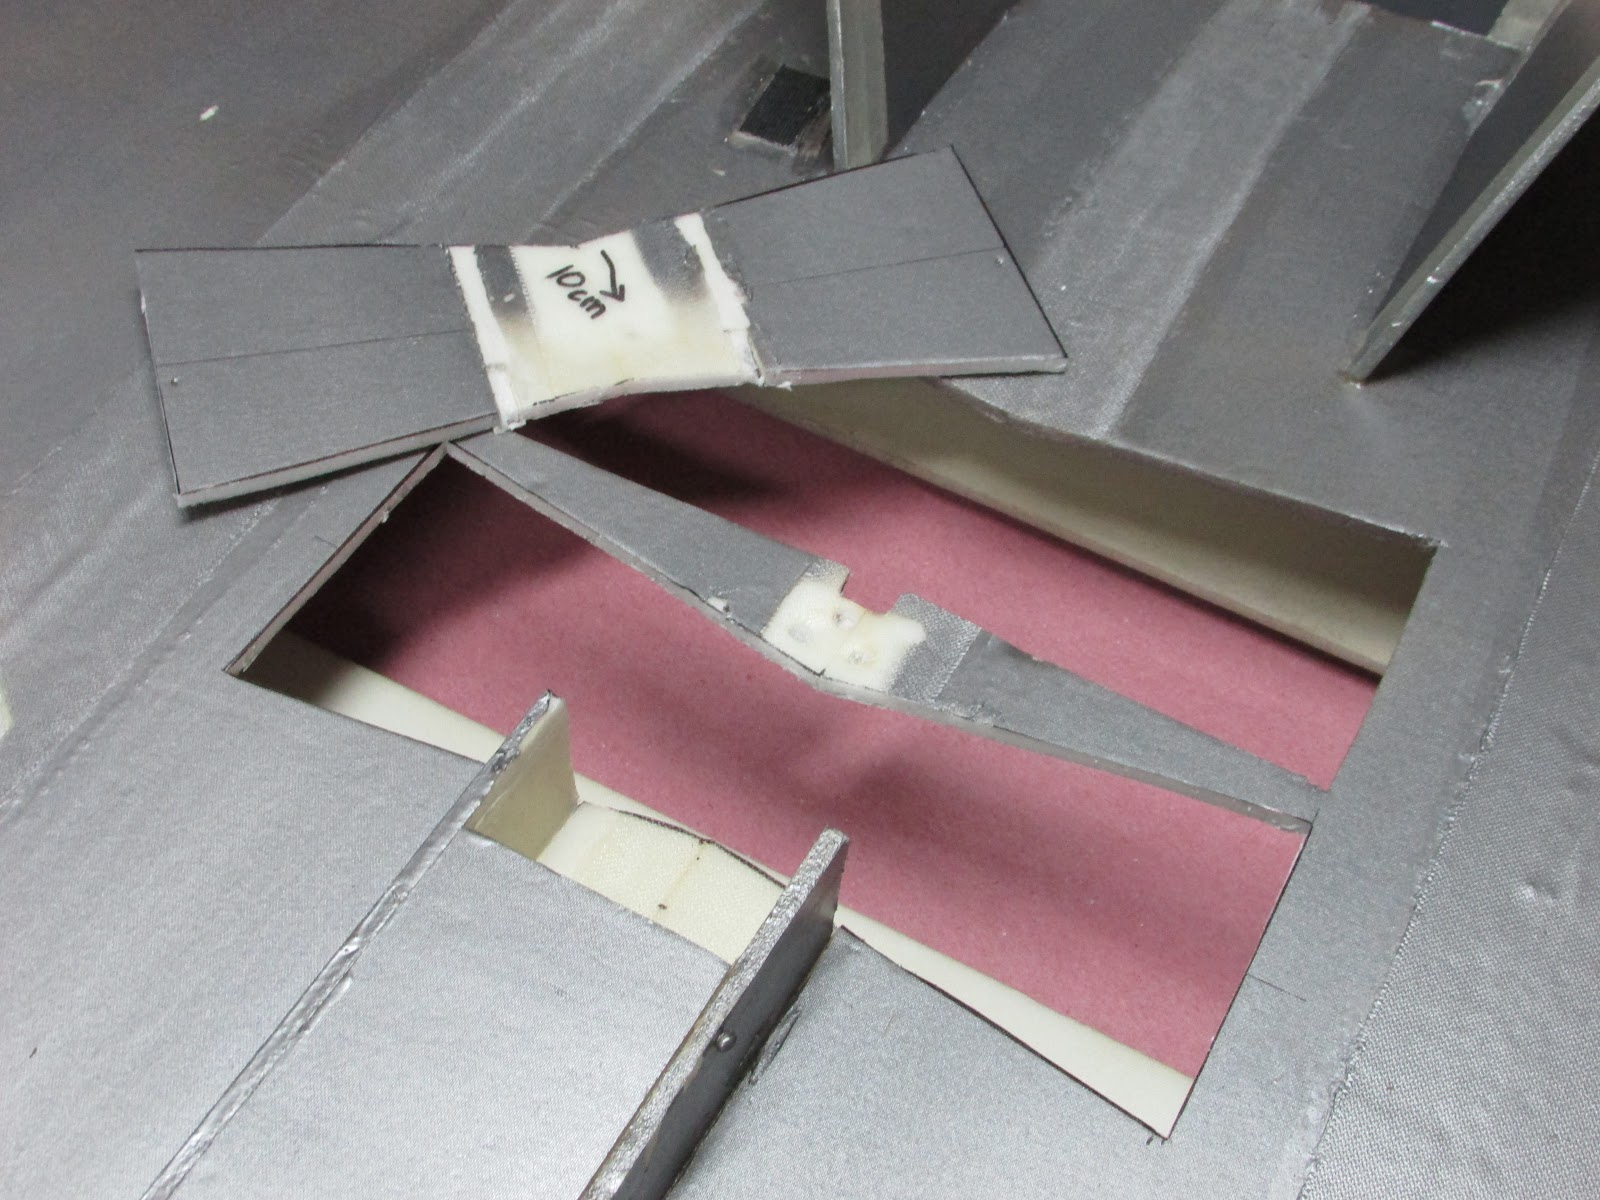
To gain access to the inside of the fuselage in order to mount the servos for the ailerons, I removed the rear skid plate. I have said it before, and I will say it again, working with fiberglass foam core has its advantages like being super-strong and waterproof. Here is one more HUGE advantage, you can use alcohol to separate the hot glued parts. Josh and Peter demonstrated the coolest (and one of the most useful) hot glue tricks when they showed that hot glue could be removed from “non-porous” surfaces with alcohol. Since being introduced to that trick, I have been using alcohol to remove hot glue from fingers, pants, workbench, the self healing cutting mat and most importantly, planes. The parts that are hot glued together come apart neatly. Keep in mind that this does not work on untreated Readi-Board because the paper will peel from the foam, but for fiberglassed foam core, it is simply AWESOME to the MAX!
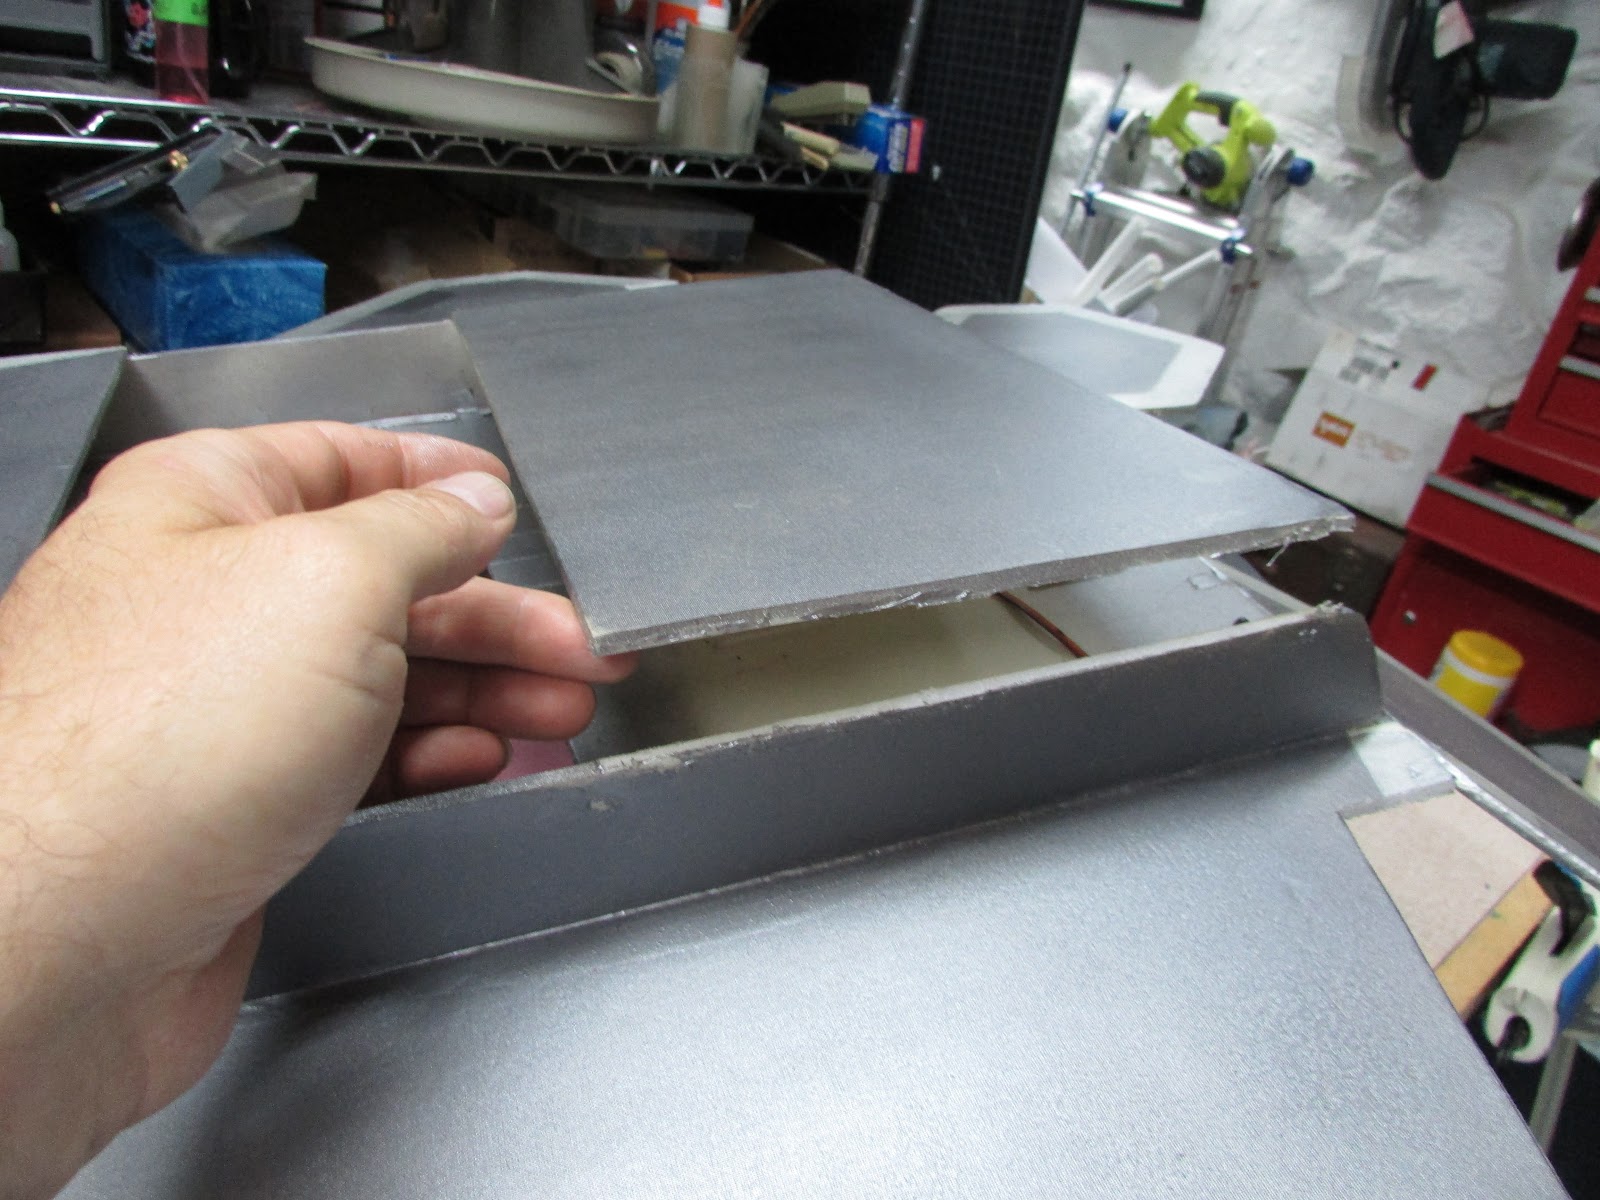
Just drip a bit of alcohol along the hot glue seam, wiggle it back and forth a bit to get the alcohol worked into the joint and the hot glue will gradually loosen and let go. Here the rear skid plate lifts free from the fuselage side panel.
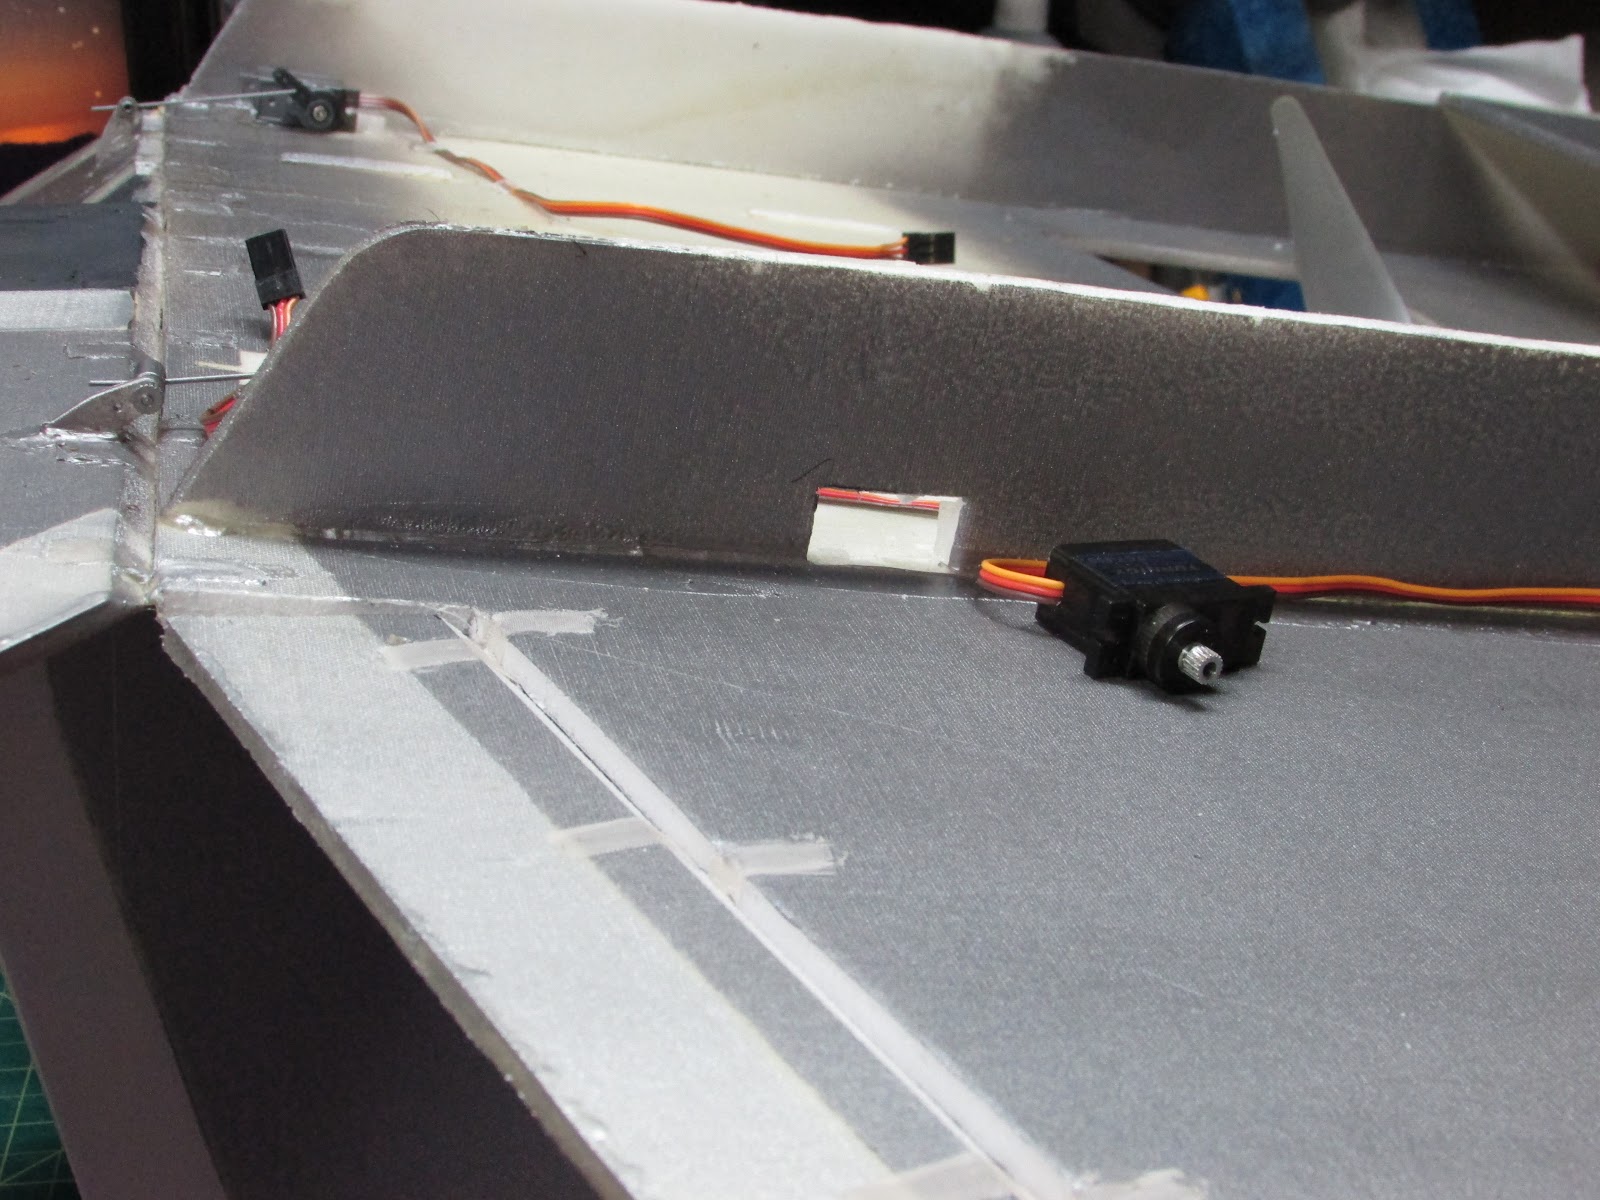
I didn’t want the servos to mess up the nice flat surfaces of the wing, so I decided to mount them in the side panel of the fuselage (or engine compartment). I guessed at what I thought would be a good angle for the control rod and cut a servo-sized hole into the fuselage.

Glue the servo into the hole, center the control arm and attach the control arm to the aileron.
I designed the aileron controls to work in conjunction with the elevons rather than decouple the aileron control from the elevons and having two separate control surfaces. The idea was to have the aileron surfaces aid the elevons in controlling the roll, rather than being the only roll control. I’m so excited to see how much this helps… Let’s go to field!
Let’s see how it flies.
Whew! that was a close one. I’ve heard it said a couple of times
a nose-heavy plane will fly poorly, but a tail-heavy plane will fly only once. Now I’ve lived through it.
I was really lucky to get it back to the ground safely. The plane wanted to climb as soon as I launched it. I quickly dialed in a bunch of down elevator trim, which helped, but it was a real chore keeping it flying. It seemed like every time I wanted to turn, adding little up elevator to bring the nose around flipped the plane’s nose up into a stall, especially going up wind. I guess there is one good thing to say about the new configuration, the roll control was far superior with the addition of the aileron surfaces.
Balancing to the CG.
Frankly, I was pretty amazed that just adding two little 9 g servos to the plane would be so devastating to the flight characteristics. Back to the bench to balance the plane. I had a few things I could do to balance the plane. I could add weight to the nose, I could move the motor forward or I could move the battery forward. I am opposed to adding weight to a plane just to get it to balance. If you are into the scale models and that is the only way to get it balanced without changing the scale configuration, then sure, go ahead. I just think you are better off redistributing necessary weight rather that adding dead weight.

Since it is easier to move the battery than the motor, I decided to move it. However, I was surprised at how far I had to move the battery to regain the balance. Balancing the plane by moving only the battery placed it so far forward that it would be centered forward of where the cockpit meets the hatch, right under the hatch hinge. This placement is not as convenient for swapping out the battery. I could reconfiguring the plane and make the cockpit be the hatch, but that would require extending the battery tray and creating a cockpit hatch - possible but pretty difficult. Hmmmm - Maybe it would be best to move both the battery and the motor forward? To check out the combination move, I unscrewed the motor from the motor mount and slid it back while keeping the battery in an accessible spot. 
Choosing a motor
I will explain my thought process for the motor upgrade in hopes that it may be helpful to someone who is traversing the same path. My bench measurements indicated that the NTM 28-26 1200kv originally installed on the supersized FT-22 it produced 26 oz static thrust with 9x6 prop at full throttle. The plane weighs 34 oz making a 0.86 thrust to weight ratio. I have another plane, a F/A-18 Super Hornet, that weighs about 4 oz more (¼ pound) than the Supersized FT-22. The F/A-18 flies pretty well with a GH SuperMega Jet V2 2200 kv motor and 7x6 propeller which produces a 1.18 thrust to weight ratio. The F/A-18 flight really nice, but is still a little bit underpowered for the stunts I’d like to perform. For this upgrade, I would like to hit a point that is equal to or exceeds the performance of the F/A-18.
Motor specifications. There is a minor snag in finding a comparable motor by a different maker, manufactures don’t use the same numbers to specify motor properties. Not all manufacturers provide the physical specifications, i.e. the max amperage/watts, the dimensions and kv. Since the GH SuperMega Jet performed reasonably well for a different model of similar weight, I would imagine that a similar sized motor should push the Supersized FT-22 just fine. I measured the size of the Super MegaJet V2 so I could choose a like-sized motor in the NTM series. The MegaJet measured 28 mm in diameter, 36 mm long (from mount end to can end) and 25 mm magnet length. The NTM 28-36 series motors have the same physical dimensions as the GH SuperMega Jet V2. The 9x6 prop I used in the original setup was pretty good, so why not get the motor to accommodate it? I purchased the NTM 28-36 1400kv thinking it would swing a 9x6 pretty well. The HK website indicates that a this motor driven by a 3S LiPo and a 9x6 uses 432W - 39A. Perfect! Order the motor and matching ESC… waiting…. waiting. While waiting for the parts, I have time to disassemble the plane to remove the ESC and get ready for the new motor

Like before, using a little alcohol and gentle persuasion, I removed the front skid plate to gain access to the ESC and

I removed the fuselage joiner to gain access to the motor mount.
Balancing on the CG with the bigger motor
I got the new motor and and before installing it, I performed some analysis with different size propellers to see what kind of thrust and amps each combination would have. It turns out that the NTM 28-36 1400kv with a 9x4.5 prop produces 40 oz thrust at 28 amps at full throttle. Interestingly, at least to me, the 9x6 prop also produced 40 oz of thrust, but at 38 amps. I guess that is the cost for more speed. I went with the 9x4.5 prop to keep the motor cooler.

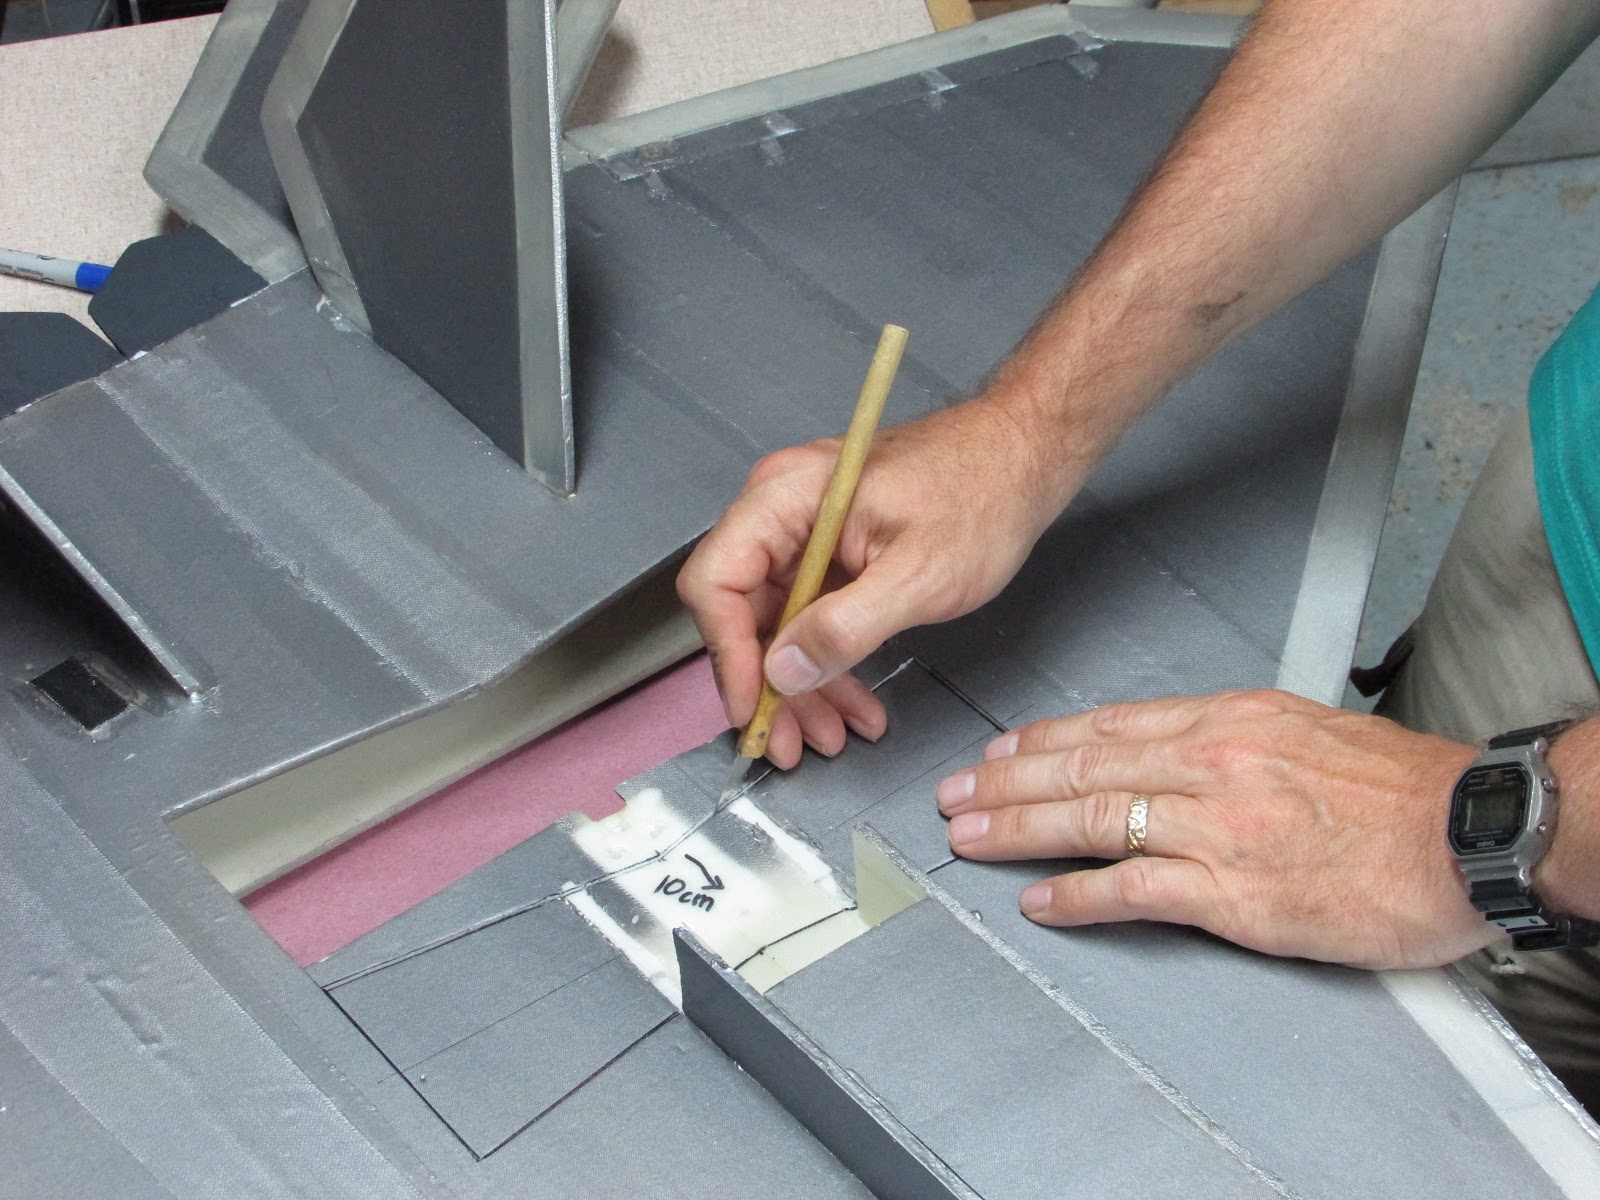
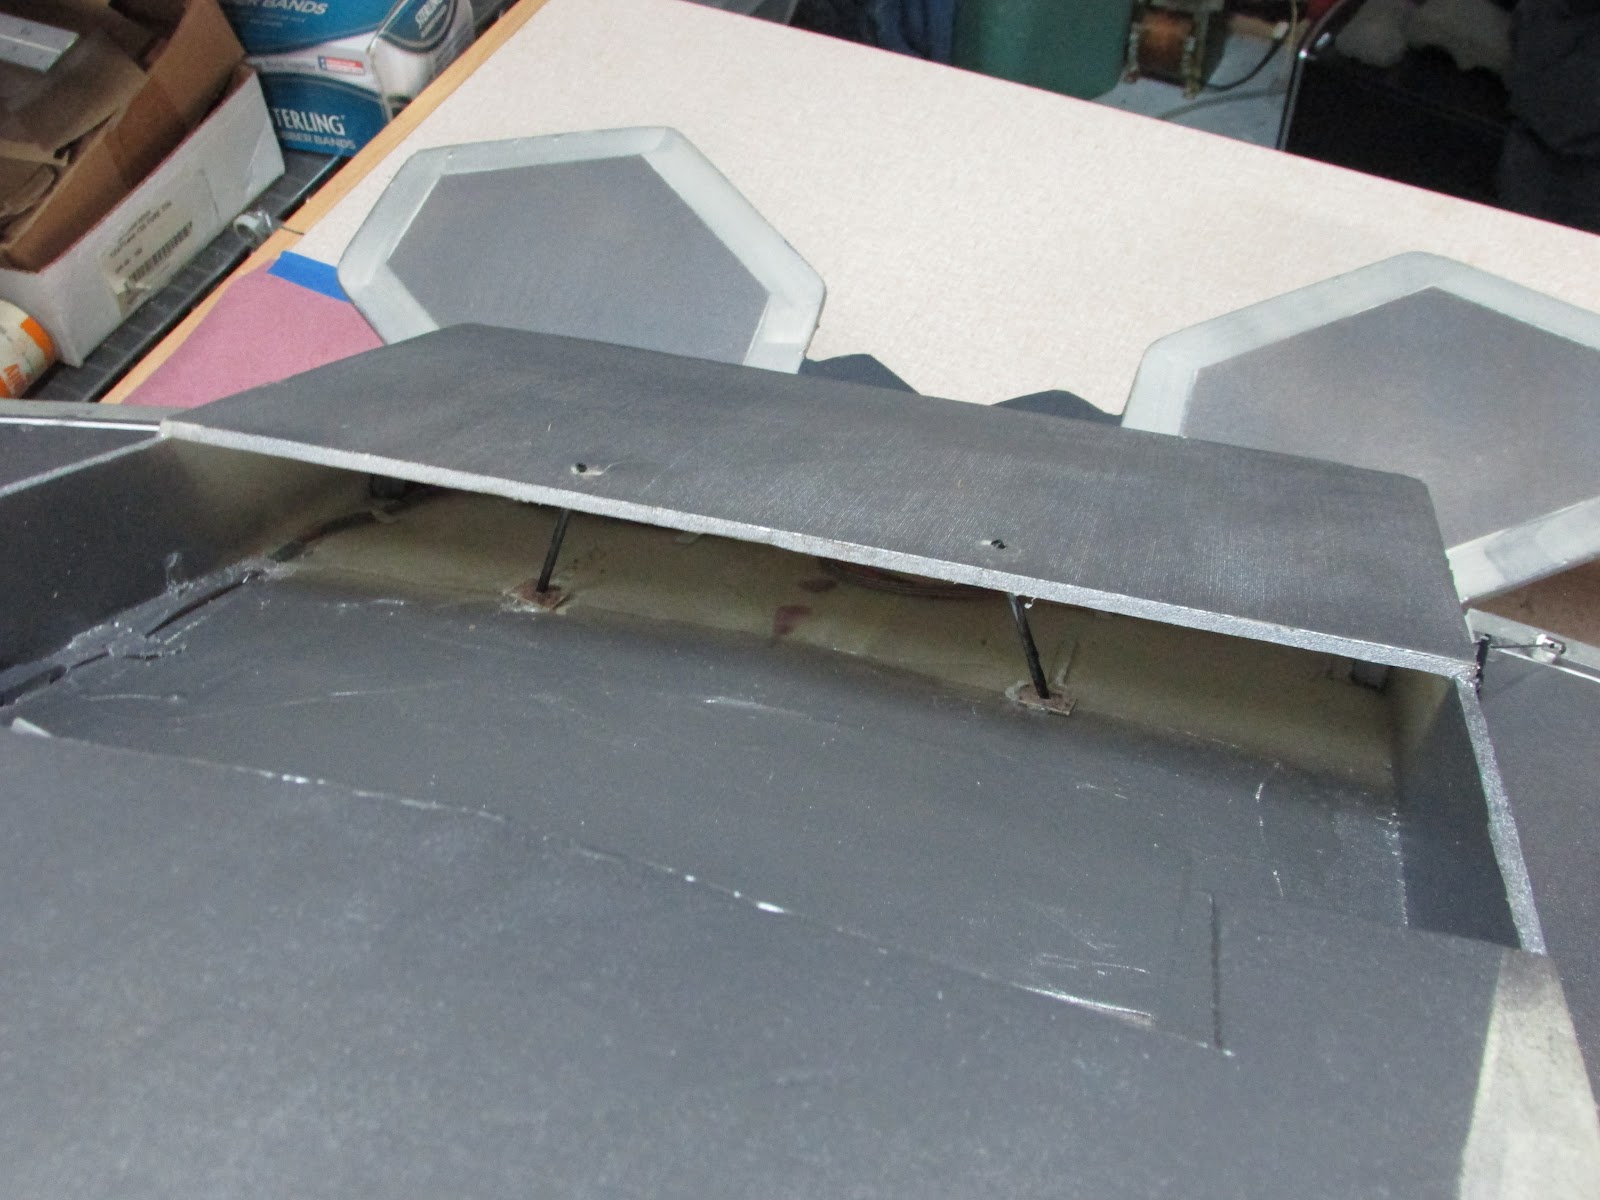
Here is a picture of where the motor ended up in order to balance the plane. The battery was moved to the most forward part of the battery compartment and motor forward 10 cm, basically centered on the plane’s CG point. This goes to show the profound effect that distance from the CG has on balancing. The small servos are located far from the CG and the motor and battery very near the CG.
Cut out the new propeller hole using several light strokes with a forever sharp blade.
Wow, two propeller holes… that gives me an idea for another build!

Mount the motor so that it is straight, I used a ruler to help with the alignment. I also cut out the sliver of foam that was left between the new and old holes.
Filling in the old propeller hole

To fill the old propeller hole, I laid a piece of foam underneath the hole, traced the hole and cut it out. Because I was going to fiberglass a skin, the paper was removed from both sides of the foam and the piece fitted perfectly!

Use masking tape on the underside to hold the piece of foam in place.

The fiberglass patch was applied by removing the paint from 1 inch around the hole and cutting out a piece of fiberglass cloth that covers the new piece and overlaps the existing plane by a few centimeters. Mix the epoxy resin and wet out the fiberglass cloth. After the layer cures, turn over, remove the masking tape and repeat.

Picture of final filled propeller hole. Trim the fiberglass and sand a bit. Looks great! Note that with this larger motor setup, I used a piece of plywood below the foam to create a motor mount-foam-plywood sandwich.

The front skid plate also needed a trim to accommodate the new propeller position. Glue it back into place with hot glue.

Replace the fuselage joiner with hot glue, it had to be shortened by about 7 cm.

Paint the patch and we’re ready to go again.
Beefing up the vertical stabilizers
One last minute modification. Just after finishing the final touches on the Upgraded Supersized FT-22, I came across this video of a large scale F-22 crashing because its vertical stabilizers came off the plane mid-flight. I looked at my plane and wiggled the stabilizers and observed that they were pretty loose. The only thing holding them on was a bead of glue.

I decided to bolster their structural stability by adding a 3 mm carbon fiber tube to the leading edge of each stabilizer.
The carbon fiber tubes were poked through the wing surface and rear skid plate and hot glued in place. I think that should hold them on.
Let’s try another flight.
Comments
The Supersized FT-22 is now a really great flying plane. This power upgrade added 14 oz of thrust at full throttle (26 oz originally to 40 oz) while adding only 3.1 oz of weight (the weight increase also includes the addition of the servos, bigger ESC and hardware for the ailerons). It seems to fly really slow because it is so big. Have ever seen a C-5 Galaxy fly? They appear to just hang in the sky although cruising at 500 MPH. In the end it would have been easier to just add a little weight to the nose of the plane rather than going through all this work, but in the end, I’m happy with the outcome. The plans below were modified to provide the new motor location and servo locations. Enjoy!
Materials
- Adams Ready-Board (Dollar Tree)
- Fiberglass cloth - 1.43 oz/yd (http://thayercraft.com/)
- Epoxy Resin - 635 thin (http://www.uscomposites.com/)
- Servos - 9g x4 (Hobbyking)
- Motor - NTM 28-36 1400kv (Hobbyking)
- Propeller - APC 9x4.5(http://www.radicalrc.com/shop/)
- ESC - Hobbyking Plush 40A (Hobbyking)
- Battery - 2200 mAh 3S 40C
- Receiver - OrangeRx 6 channel DSM2/DSMX
- Transmitter - FrSky Taranis X9D with DIY DSM2/DSMX transmitter module. Elevon mixing was performed with the Taranis, however, this function can also be performed with Turnigy V-Tail mixer.
Stats
Weight of the Supersized FT-22 without the battery- 1 lb 9.7 oz (728 g).
The battery adds 196 g (7 oz) for a flight weight of 2 lb 1 oz (935 g).
Wingspan 39” (99 cm)
Thrust - 40 oz at full throttle. Thrust:Weight ratio 1.21. The NTM 28-36 1400kv with 9x4.5 propeller draws 28A, 312W at full throttle at 11.1V.
Build Article for the Supersized FT-22
Plans for Supersized FT-22 Upgrade


Log In to reply
Log In to reply
Log In to reply
Wish we could attach pictures to article comments... if you post of forum, let me know. I guess I'll post this on the forum so others can post vid and pics of their builds. I'd be very interested to know how the KF2 airfoils hold up strength wise. The fiberglass is simply first class.
By the way, to help on the strength for those who don't use fiberglass, I've got the this supersized FT-22 designed with real arifoil wings...like the versa wing. By next Spring it should be up in the air.
Log In to reply
http://forum.flitetest.com/showthread.php?23295-FT-22-Supersized-150-Bigger
Hope that link works
Log In to reply