Introduction:
Back in the fall of 2015 I was debating airframes to carry a three axis gimbal. I came across a great project and website documenting a TBS Discovery 3-axis gimbal mod. Unfortunately I do not know the name of the person behind it, but all credit for this mod should go to them. Here is their website.
The original TBS Discovery was never designed for a gimbal. It utilizes a small ledge on the front of the frame to hard mount a GoPro and a FPV camera. Team Blacksheep later released the TBS Discovery Pro which incorporates a two axis gimbal. At the moment there is no three axis gimbal version of the TBS Discovery, which is why this mod exists.

Original TBS Discovery Credit: Team Blacksheep
TBS Discovery Pro Credit: Team Blacksheep
The Mod:
This mod conceptually is very simple. To mount a three axis gimbal the solution is to add rails to the top plate of the discovery, from which the gimbal can hang from. An additional problem is the Discovery is not very tall, so leg extensions have to be added to give the gimbal clearance.
Parts:
Starting with the rail system I sourced the following parts. Hobbyking sells these 10mm carbon tube holders as part of a battery mounting system. You can buy the tube mounts individually, but they will probably cost more. GetFPV has these 10mm carbon tubes that will serve as the rails. Of course you can use any size tube mount and tube depending on what is available and the size of your gimbal.


Step 1:
To mount the tube holders you need to drill holes through the top plate of the TBS Discovery. You have to be careful though because there are traces in the top plate for receiver connections you probably don’t want to destroy or short out by drilling through. The mounts will have to be spaced to fit the mounting points of your gimbal if your gimbal has them. If you are using my 3D printed gimbal design, the center to center distance of the carbon tubes should be 68mm, but make sure to check in case yours varies. If your gimbal does not have a way to mount to rails then space the carbon tubes to your liking so you can improvise a mounting method. The bolts that hold the tube holders on are a little long for the Discovery so I 3D printed some spacers. You can easily make some out of thin wood or an old gift card.

Tube holders mounted with spacers. Note bolts do not interfere with the traces on the top plate.
Step 2:
At this point you can install the carbon tube rail system on top of the TBS Discovery. If you install the gimbal at this point it will probably be touching the ground because the standard flamewheel arms are not tall enough. To fix this there a few options. You can simply glue some Popsicle sticks to the legs, or you could drill holes to fit carbon rods. With a 3D printer available, I made some 3D printed legs extensions that blend in nicely with the stock legs. Files for this print are available here if you’d like to make them. Depending on the size of your gimbal you may want more or less extension to the leg height.

DJI flamewheel legs with extensions attached.
Step 3:
Now the gimbal can finally be mounted. If you are using a gimbal like my 3D printed design, then you can simply slide the gimbal onto the carbon tubes and be done. If not then you may need to get creative using zip ties or scrap pieces of carbon/wood to get a solid mounting surface. What you will notice is that the gimbal will have to be mounted far forward in order to clear the bottom plate of the Discovery, where the original camera mounting point is.

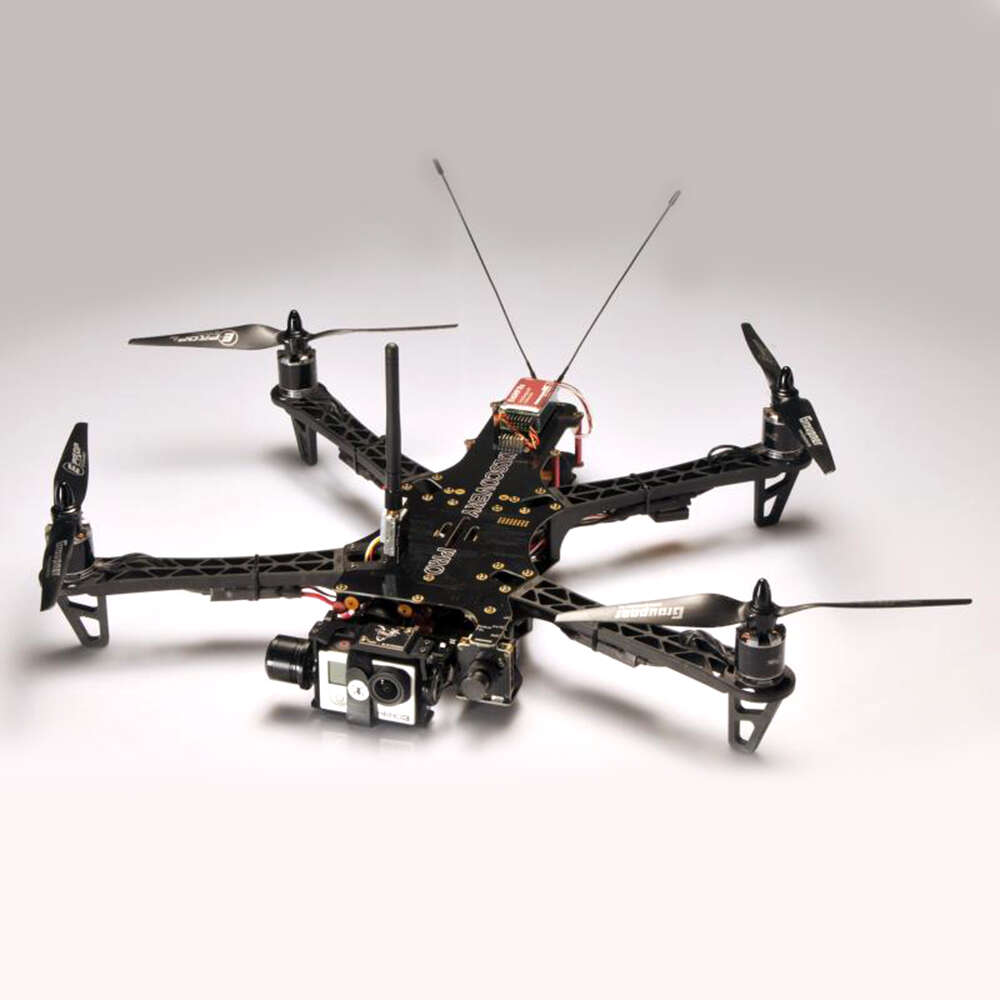
Top view of installed rail system with gimbal and controller attached.
Step 4 (Optional):
If you want to move the gimbal back more, whether for center of gravity issues or just aesthetics, the front of the frame will have to be chopped off. Don’t be too wary of cutting off the FPV camera mounting plate; once the gimbal is installed the original FPV camera mounting location won’t have a good view anyway. I cut up to the bolt holes for the front two frame standoffs. If you go past these holes you risk cutting into some traces and possibly shorting or permanently damaging part of the PDB. Note that you will be cutting fiberglass so use proper safety precautions.

Frame plates after chopping
Now that you trimmed the front of the frame you should be done with the mod. You may want to cut the carbon tubes shorter if desired, but it is not necessary. When filming you can fly through the gimbal to line up your shot, or you can put an FPV camera somewhere else. I find flying through a gimbal slightly disorienting, but entirely possible. The latency from flying FPV on an action cam should not be a big issue as you generally are not flying fast when doing AP and the flight controller will help keep the craft stable.
Conclusion:
Congratulations you now have a 3-axis gimbal on a TBS Discovery! You may not be able to get a full 360 degree view without getting the frame in the shot, but the sport flying intentions of the TBS Discovery frame will allow you to get much more unique shots than the average flying camera.
Overall this mod is very easy to do. Once you have the tube mounts and the tubes themselves, the installion is all up to your preferences. Additionally with the rail system you can easily remove the gimbal and install other things like another camera, a huge light array, or whatever you can come up with.


Find Out More:
Thanks for reading!
If you are interested in my 3D printed gimbal design check out my article about it. Also check out my Thingiverse page if you are interested in a number of different TBS Discovery related parts.
If you’d like to support me and more projects like these, consider subscribing to my youtube channel, or following me on Instagram, Facebook, or Twitter. I’d love to get feedback and suggestions for future mods and projects.
-Sam


I'm waiting for my Gimbal to arrive and Im going to mod my Whitesheep frame to be like this. I have already did something similar but on the bottom plate that holds the same tubes you used but to hold a landing skid and gimbal support. So I will just remove the system and place it on top like yours and just hang the gimbal from it. Wish I had a 3D printer available to me to print off some extended landing gear :-/
Log In to reply
Log In to reply