Flynn's FT Versa : Project UFO

Well it all started with a boy and a dream. Seriously, I was dreaming about UFO's when I was a boy. This is my recap of the build.
... First let me say that I am the absolute worst at stopping and taking pictures while I am building, my apologies.
The Layout
I had an idea for about a year of incorporating in Arduino into a UFO style project that would blink lights in different patterns. I chose the FT Versa wing because of it simplistic design but great capability of handling more weight. And also because of its one large wing with one spar, to which you can mount lights, and as Josh Bixler says "it will light up like a lantern ". First thing I did was to cut out what was needed from some dollar tree foam. I had built one previously and had great success with it as my second FT airframe. This previous version had some dihedral and I was initially concerned that, because of the way I would be building this new one, it would have a flat bottom and no dihedral. So instead of building both halves of the wing and gluing them together I glued the bottom halves together and started to lay out my idea.

The Build
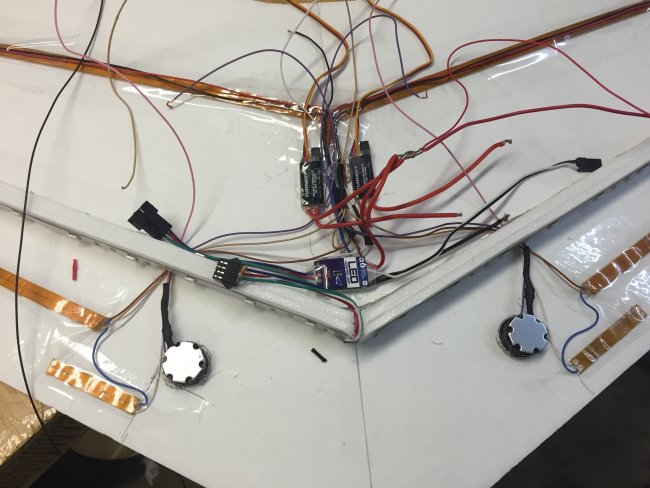
I knew that was going to add a six channel receiver this making it possible to have three alternate channels to control lights and/or input to the Arduino. I wanted the main lights to be RGB LED strip, so I wrapped the spar with the RGB LED strip I got from Hobby King. This worked out excellent because, starting from the inside where the two wings join together, I wrapped around the spar, the beginning and end of the LED strip matched up and almost connected back to each other. I don't know if this was by design or another "happy accident" but it worked out excellent.
I knew I wanted to shut these lights off at some point during flight, so I used some red and blue LEDs as markers, so when everything was shut off, I would still be able to see the orientation.
I also included some white LEDs in an arrow lay-out on the bottom, basically so if I really got messed up with orientation, I could flick these on and figure out what to do next. Having never flown at night, I figured I would do my best to keep myself from crashing.
I also want to include some spotlights underneath that when I turn them on I could fly low in over the land and I figured it would produce a nice glow effect. Kind of "alien searching" style look.
I laid out the LEDs with the sticky side up so that when they were off you saw nothing. Working on one side and then the other I wired up all the negatives together, but then ran individual positives from each group to be connected as I wanted. So I basically had three groups plus the marker lights. The marker lights were always wired on. The white lights, which I could control by a switch. And my spotlights which I could also controlled by switch. The last group, the RGB LEDs, which I can also control on a switch toggling through the colors or shutting off completely.
I got creative with the layout on the top a little bit making some white strips. They were a lot of work to solder up and they didn't look as good as I hoped.
Underneath, I put little recessed light bezels with 3 W LEDs in them as the two spotlights.
The Arduino Microprocessor
Now came the fun part, the Arduino. I took a normal red LED strip and cut out all the negatives to break up each three LED portion so I could illuminate it individually.
(my first, second and third error during this process was cutting the positives on one strip and trying to use NPN transistors. Without getting too technical, once I got the right transistor, they worked but the voltage drop across the emitter and collector was not letting the 12 V get to each LED segment therefore the LED segment was not turning on as bright as it should)
What I ended up using was some MOSFETs. They worked fantastic, but they were kind of larger than your standard transistor. I had 10 segments per side which I wired in parallel so that I only needed 10 outputs from the Arduino and that both sides mirrored each other.

These early tests only use about 6 LED segments. The finished wing has 10 segments each side going from the middle to the wing tip.
I then began to research some Arduino programming. I was somewhat familiar with programming, I had built a slide bolt actuator for my garage so I could lock it and unlock it with an app on my iPhone and had done a couple other projects. One thing I didn't know was how to have each pattern I wanted to cycle through say every 30 seconds. I found that the " for loop " is an Arduino programmers best friend. Basically it counts every cycle and when it reaches a specified limit it moves onto the next part of the program. So after that, I had to come up with some patterns. I definitely wanted the "knight rider" pattern and a pattern that started in the middle and sequenced one at a time on and off moving out towards the end of the wing. I eventually added three more, a random pattern and inverse Knight Rider and a bargraph style. When the Arduino gets to the bottom of the program, all the LEDs flash three times, it was just something I wanted to see if I could do.
These early tests only use about 6 LED segments. The finished wing has 10 segments each side going from the middle to the wing tip.
Arduino Links
Everything you want to know about the Arduino can be found at :
https://www.arduino.cc/
If you are like me and would rather watch videos, this was the youtube instructional video I watched about the Arduino "For Loop" Command
If you would like a copy of the Arduino Code, here is a link to the code I used.
Wrapping it all up


This was about half way through soldering. The wire nuts were removed and everything was soldered.
Before connecting the top part of the wing to the bottom I used white packing tape from Tape brothers and did the standard tape layout, one strip on top of another, which I learned from Ed from experimental airlines. White tape just seemed like the right choice, I could've done clear but I think white added a little bit more to the look, another "happy accident"!!
Wiring was definitely a challenge, to say the least. And I'll say now, if you're not comfortable with soldering or don't like to solder, this build is not for you. I had to make sure when I folded the top part of the wing over it was not hitting any of the components and that the wiring was out of the way. I had to consider battery placement and receiver replacement. I knew I wanted a 3000 mA hour 3S battery because the 2200s have a different profile and are too fat. The 3000 fit nicely but it was another challenge to get it all tucked in.
I use some 9 g metal gear servos that I got from Hobby King and a 30amp ESC/Suppo 2212/10 motor from Altitude Hobbies. I figured I would start my maiden with an 8 x 4 prop. I took it up to my local flying field during the day I did a maiden flight. The added weight and the flatbottom made it quicker than my first versa wing, but definitely flyable. After flying for about five minutes and getting things trimmed out I landed it and check the battery. The battery showed 75-80ish %!! I couldn't believe it. I wondered how long the battery would last doing all the work with the LEDs and the motor, after flying it a few more times and testing the battery I assumed I could easily get about 20 minutes flight time. Another "happy accident"?!
Night Flying at FliteFest 2015
So on to FliteFest, where I had a blast flying at night.
Coming in low over the runway or soybeans and turning on the spot lights was awesome.
I was very concerned about lighting three LEDs at a time and it not looking as good as I wanted. But after the first bank turn I made and it came around pointing at me, I was overjoyed with the result.
Thanks to Jeff for getting these videos and Steve for doing some launching!
The nighttime footage is tough to see but it was a lot of fun to fly.
I haven't flown it again since FliteFest, but it was well worth the time I spent going through it. I learned a lot during this project not only about 12volt components and Arduino but about taking my time and thinking it out each step of the way. Not feeling pressured to rush things really made my goals seem achievable and I was happy with the results.
If I can help you guys in any way with your projects, don't hesitate to ask. I'm not on the forum as much as I used to be (life and that dang job get in the way) I'll try and check more often. Happy Building!
Parts
http://www.altitudehobbies.com/brushless-motors/suppo-motors/a-series-motors/brushless-motor-400-28-30-1400kv-suppo-2212-10
http://www.altitudehobbies.com/brushless-esc-bec/suppo-brushless-escs/suppo-30a-brushless-esc
https://www.hobbyking.com/hobbyking/store/uh_viewItem.asp?idProduct=42493
https://www.hobbyking.com/hobbyking/store/uh_viewItem.asp?idProduct=46040
https://www.superbrightleds.com/moreinfo/component-leds/vollong-3w-white-high-power-leds/896/2209/
https://www.superbrightleds.com/moreinfo/component-led-accessories/secondary-optical-lenses-for-vollong-and-prolight-leds/337/3400/
Arduino Nano
Lots of wire


Log In to reply
Log In to reply
but what is funny is that my last name is Flynn, just saying.
Log In to reply
Log In to reply
Log In to reply
Log In to reply
How did you connect the Arduino to the receiver and get it to read the rx output?
Log In to reply
https://www.youtube.com/watch?v=g0pSfyXOXj8
Log In to reply
Thanks for posting this amazing build! I am jealous and am looking to put controllable lights on my aircraft.
Log In to reply
http://www.hobbyking.com/hobbyking/store/__46040__Turnigy_Receiver_Controlled_Switch.html
In this project I did use one battery for everything. You can use a separate battery only for the lights, but make sure you connect the negatives of each battery together on the plane. Not the batteries themselves but the connector. I can take a picture of another project if it would help.
Log In to reply
And awesome, I have googled LEDs but with so many mixed reviews, it's hard to tell what to buy. I will be using HK. Thanks for the suggestion.
Log In to reply
Log In to reply
http://www.hobbyking.com/hobbycity/store/catalog/e-switch.jpg
You could google an easier way then using an Arduino to simply flash Red/Blue back and forth.
Log In to reply
Thanks in advance. I really appreciate you answering the questions.
Log In to reply
Log In to reply
Log In to reply
Log In to reply
I am curious why you chose to do all of these segments with mosfets and all that wire when you could use individually addressable LED strips and just use the arduino? I know cost of the intelligent strips was a factor for me doing that, but finding a lot of sources of low cost strips is making the idea look more doable from a finance standpoint.
Log In to reply
Log In to reply