Since this is my first article created for the FliteTest community, I feel the need to say few words about myself. My aviation-related backgroud reaches far back into the 20'th century, when I first became glider pilot, then private pilot, then qualified aviation technician, then certified aircraft maintenance personnel. During all those years, RC flying was always somewhere in the background; mostly in form of "playing with my friend's toys".
Much later, when I became a father of two wonderful kids, I circled back to RC flight in hope that this will be (in many terms) the best way to introduce them to the aviation world. I needed to learn myself a lot; so I've choosen the designs that suits my level of skills and knowledge. I started from Baby Blender, then had a short romance with Knuckle H-Quad; then tried out FT 3D, which prooved to be the sweet spot in terms of improving my piloting skills. But still, I needed something much different to be able to (safely) hand the transmitter over to my kids; and the FT Simple Storch came to the rescue.
Living in central Europe, I have virtually no access to Adams Readi-Board. All my previous models were built using a wide variety of materials, including depron, balsa, plywood and many others; sometimes not being usually associated with RC hobby. Some of my constructions were flying exceptionally well, like Baby Blender capable of flying at any angle of attack up to the hovering; some had other advantages like 3D suited with removable wings, that was strong enough to survive mid-air wing detachment and subsequent nose-dive into the ground. But they were always - in terms of flight characteristics - far from what I could see on the internet about FT planes made from the material they were designed for. For this and few other reasons, I decided to build the Storch using SpeedBuild kit. Here's where the story begins.
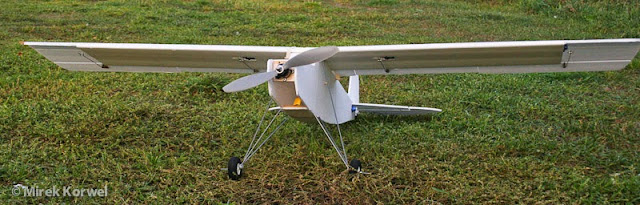
The building process went really quick and smooth, mostly because I did not need to do many things that are always needed when moving away from the original plans in any way. For the sake of "overall comparison", I decided to not introduce any changes to the original design; even though it was almost obvious (for me) that this project could benefit a lot from few small tweaks here and there. Having the option to choose the layout of control surfaces on the wing, and the rough idea of how this plane should look and perform; I went for separate flaps and ailerons. I do not have many pictures of the building process - I didn't know that I will be writing this article at that stage - but it would not add anything more than what is already shown on the exceptional build video made by Josh and the whole FT crew anyway. The only exception I've made was the power setup - I didn't want to make this plane as much "aerobatic" as shown on the "Breakfast Bombers" video (solely to improve training experience), so originally I used a motor with roughly 2/3 of the recommended power. Below you can see the video of my plane's maiden flight:
As you can see, it flew great on the first try; without even the need of trimming more than few clicks. This one experience - flying the plane made from the kit and 100% to the plans - was completely different from all maiden flights of all of my previous planes. All of them were pretty involving - to say the least - and did not always end well. This time it was so uneventful that I could not resist to laugh at myself for all my fears.
After this and several following flights it was apparent that the plane meets the general expectations - it flies very stable and shows very docile response to the most relevant aileron input. It (obviously) meets all the criteria outlined in "Beginner Series: Choose a Plane" episode:
- 3 chanels: although designed as full 4/5-channel plane, it flies perfectly well when using just three of them: ailerons, elevator and throttle. It does not want to make turns with rudder only; but this can be easily improved by increased dihedral.
- high wing/dihedral: that's obvious - a plane like FT Simple Storch have the wing way above the CG and enough dihedral to fly stable, with the latter one easily increased during the building process, if desired.
- speed: even with the designed weight (~800g), the plane flies relatively slow. It could be better (more on that below); but it's still easily manageable for anyone just after few flights.
- durable and easy to repair: no comments required. Being made from Adams Readi-Board using FliteTest's techniques, the plane is much more durable than anyone could expect from foam and paper alone; being a scratchbuild, repairing or even rebuilding the whole damaged parts could not be easier.
- replacement parts available: what replacement parts? This plane doesn't need parts because it does not break anything; and even if it does, rebuilding it is just a matter of hours.
- electric: sooo obvious...
- proper size: the Storch may seem a bit large for some flying areas (parks with trees) or unsuitable for others (indoors?); but it flies slow and stable enough to use less area than you would expect; definetely less than many other "trainer-like" planes.
However, some of the qualities were not exactly there (in terms of I was hoping for). One of them was cruising speed - even though I've managed to build a plane that weights 100g less than described on the plans, and the plane was everything but "too fast", the speed was not significantly lower from what I've experienced form most of my previous planes (Baby Blender is the best example). The other one was available power - it was definitely too much to provide precise control on the final approach an landing. As David would say: there was not enough resolution because of too large range available. This could easily be counteracted by greater flap deflection, making them create more drag than lift; but here comes another issue: flap control horn is located at the same position as the aileron control horn, both on the plans and on the SpeedBuild kit. This position allows upward deflection, greatly desired for ailerons; but it limits the downward deflection and thus useful flap travel range. The last issue was discovered after several "training-like" landings. The landing gear proved to be very stiff, causing the whole stress from impact being transfered to the fuselage without any dampening. Because of that, the fuselage of my Storch is already showing some dents and cracks near landing gear mouting points, even though it was not flown much and did not experience real training at all. There are no significant damage signs anywhere else on the plane.
All of those issues are actually very easy to correct at the building/assembly stage. In fact, the first two - speed and excessive power - can be resolved by one solution - installing less powerful motor/ESC, and make it swing smaller prop. This will have an extra benefit of being cheaper; what I use now is:
- 12A Plush ESC
- hexTronik 24g 1300kv outrunner
- GWS 8x4 SF prop
I know this may seem not enough - sure enough I've heard such comments when I first showed up with my improved Storch on the field. But before jumping to conclusions, please watch the movie below.
I did not see any Storch on YouTube that could fly that slow without any effort. I have to agree, the plane is no longer capable of very steep climbs, but it will not struggle to gain altitude as well. Also, it will not do aerobatics very much - definitely not without loosing a lot of altitude. But doing aerobatics is not the main purpose of the "first plane I've flown in my life"; it's main purpose is to avoid crashing in the first 30 seconds of flight. Perfect trainer plane should allow precise control over all inputs (including power settings), and give a lot of time for a pilot to see the result and correct the input, if needed. The combination of electronics I'm using made the plane another 60g lighter, and the minimal power consumption allows using even smaller battery. I'm using 1600mAh most of the time, which gives me more than 20 minutes of flight - much more than you would need when learning how to fly the plane before taking a break. To check the statement Alex made on the FT Podcast (half an hour flight without landing), I've tried flying with 2200mAh battery and stayed airborne for very long 34 minutes. The Storch with total weight in 700-750g range (incl. battery) is capable of flying remarkably slow even without flaps deployed; using flaps make it fly so slow that if it would fly any slower, it would fly backwards. At this point I can't imagine any way to do any damage to the plane when "crash-landed", even when applying full power - with the speed range, the plane will probably survive nose-dive into the concrete floor pretty intact.
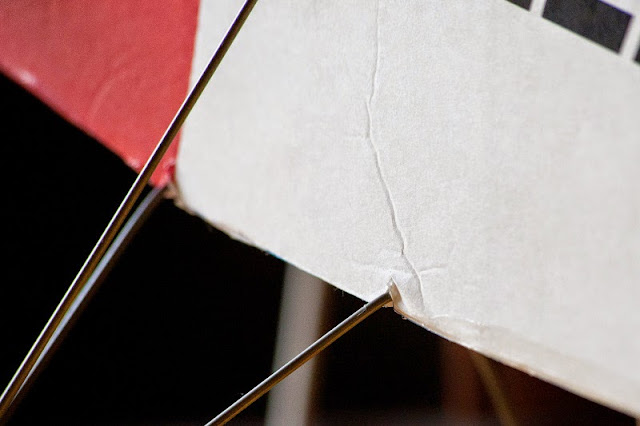
The next thing to discuss is flaps control horn position. As clearly visible on the image below, this position limits the max flap travel to roughly 40 degrees down. In my opinion, this limit is not much of a problem; but if someone wants to perform very steep approaches and very short landings, he or she would not be able to use the full advantage of having separate flaps set up for extreme deflections.
I would suggest moving the control horn backwards a bit, roughly half of it's height. If the flap control horn would be moved towards trailing edge, it will make it almost impossible to move upwards (at least significantly) while allowing huge downward deflection - up to 90 degrees, if desired. This solution is similar to what Josh is suggesting for the aileron control arms (on the servos) to achieve differential deflection. Such "geometry trick" works in both directions, and regardless of the control surface it's applied to.
The last change I would like to propose is about the landing gear construction. This plane have a very strong and stiff landing gear; especially when made in ultralight variant (like mine), this landing gear does not even have a chance to flex and dampen the load. As a reasult, all the load is transfered to the fuselage, causing premature damage. I do agree that trainer plane should have strong and sturdy landing gear; but also the one that protects the rest of the plane in terms of minor mishaps. It should survive most of the "trainig stress", but it should also make it easier for the rest of the plane to survive it as well. Current landing gear design fails to fulfill the second expectation. But there is a solution, that is very simple and cheap; a solution that does not require any change in the fuselage area at all and barely any change on the wheel end.
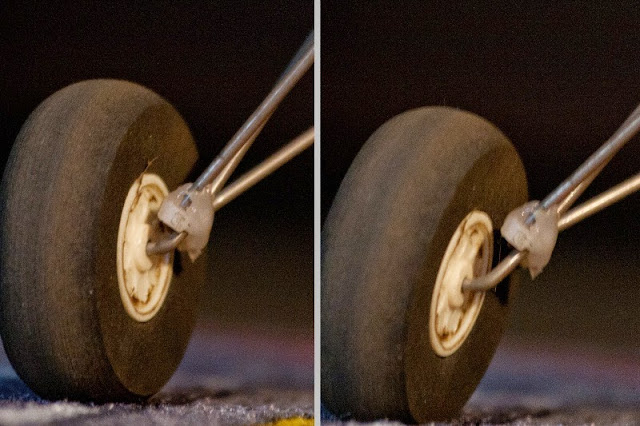
All you need to do to achieve the result visible above is to put a sleeve on the upper lading gear arm to prevent the zip-ties/glue from gripping on the central arm. This will allow slight movement of the forementioned arm without having it separate from the rest of landing gear construction. On my plane, it actually happened by itself - the glue detached from the central arm (without breaking) after several moderately hard landings. But next time I'll be building the Storch (and I will, using depron), I'll use oversized shrink tube on the central arm (to allow free movement) and tight fitting shring tubes on the other two arms (to improve glue grip), without zip-ties at all.
All the improvements listed above make the plane fly exceptionally well. But the plane itself, even if designed and built in the best way possible, can't show it's full qualities without proper control setup. What I've found working best towards my desired outcome is to use moderate control surfaces deflection mixed with some interesting capabilities and proper setting of my RC transmitter. I am using Turnigy 9x system, with the detailed settings as described below:
- dual rate/expo: I have all my control channels set to 60% low rate, 40% expo; I've never used high rates except for testing aerobatic capabilities.
- aileron differential: I did NOT apply the "hardware solution" proposed by Josh. Rather than that, I'm using transmitter's dedicated aileron differential program, with downward deflection set to 50%. For some reason, my Tgy 9x requires all settings in this program to be negative; but this needs to be checked for any pliot/transmitter/plane combination before the first flight anyway, so it should not be a problem for anyone.
- flap deflection: there are plenty of "how-to" instructions on the web, for any possible flap configuration you can imagine. But I personally use another built-in program option: airbrake. This program allows only two flap settings (retracted/deployed) with the ability to control the deflection in deployed mode only. This limitation can be considered - especially by intermediate/advanced pilots - to be a downside; but let's face the truth: is any first-time pilot going to use more? With reduced weight and engine power, extreme flap deflection is not required; while using dedicated program allows to avoid confusion associated with setting up programmable mixes. The details of my airbrake settings are as follows:
- state: ACT
- aileron 1: -35
- aileron 2: 35
- flap: 100
- elevator: -7
- elevator delay: 50
When the airbrake program is activated my flaps move down about 40 degrees, followed by aileron (in fact: flaperon) deflection of roughly 1/4 of it (10 degrees). The elevator is deflected downwards just a tiny bit, less than a thickness of the foam board; but this additional input makes the transition very smooth and allows the plane fly level both before and after flap deployment without touching the throttle or elevator at all.

As a result, the plane can fly even slower; and the speed/altitude adjustments can be even more precise during final approach and flare. This alone is the greatest benefit for first-time pilots; but it's not the only one. As a "happy accident", the plane can take off with flaps deployed only by applying full throttle, no additional input is required to make nice, smooth and gentle lift-off. Also, it seems that deploying flaps make it handle wind gusts much better; especially over longitudinal axis ("aileron channel"). I did not notice decreased aileron effectiveness at all.
FT Simple Storch is a wonderful machine. Build 100% to the plans, it's a great plane for beginners who can learn from already flying friends; allowing quick progression from buddy-box to flying solo. With all the improvements listed above this plane becomes almost perfect training platform for truly first-time pilots; with the qualities that allow to learn "all-by-themselves" in great calm and confidence. Right now, I would not hesitate to hand the transmitter over to anyone, no matter who it would be. This plane fly so much "by itself", giving a lot of time to try out, learn and refine any maneuver. But there is still more: as shown in the "Breakfast Bombers" episode, this airplane can become a real beast in the air capable of many advanced aerobatics just by changing the power setup. Being swappable, it can't be any easier. This allows the plane to "grow" with the pilot, giving him or her more potential and freedom with the progress of his/her skills and knowledge. It can truly be a plane for years. As an extra, the plane's speed and handling makes it look very "real", very "full scale" in the air. I've already met few people - RC/full scale pilots and aviation photographers - who were amazed by this quality. I'm still going to explore the possible improvements in that direction, but this is a topic for another article.


Log In to reply
Log In to reply
Log In to reply
Log In to reply
Log In to reply
Log In to reply
Log In to reply
http://www.hobbyking.com/hobbyking/store/uh_viewItem.asp?idProduct=2069
Log In to reply
I have had my speed build kit sitting in my garage since August. I have been trying to figure out which motor and esc to get since it is a bigger plane, but I have also been reluctant since this will be my first 4 channel plane.
Now I see I can use my existing power pod with the 24g motor setup on this one and it be slow an docile enough for me to learn to fly 4 channel.
Log In to reply
Log In to reply
Log In to reply
https://www.hobbyking.com/hobbyking/store/uh_viewItem.asp?idproduct=10883
Log In to reply
Log In to reply
Log In to reply
Thanks
Log In to reply
Log In to reply
Log In to reply
Log In to reply
Log In to reply
Log In to reply
Awesome article.
As i am a total beginner to scratch building and the rc hobby itself. I wonder if you can help me with the connection and setting of the electronics on this plane. I have the model built and all the parts ready. But i dont exactly know how to connect them. I saw the video on the FT youtube channel on connecting the electronics but i am stuck at connecting and configuring the servos for the different parts. Please help.
Thanks in advance.
Cheers...!!! ✌✌✌
Log In to reply
The "Connecting Electronics" video covers all the basics in great detail, from binding the reciever, to connecting motor to ESC, to centering and connecting servos. The details about servo positioning, rigging the control linkages and the travel/deflection setup are usually covered by build instructions. FliteTest's build videos tell you (and show) exactly how to do that in case of FT designs; if you are not building the FT plane, you will need to refer to your plane's build manual.
I don't believe I could ever provide more informations about that. If you still have some difficulties, the only way to get more help is to find a local RC pilot (RC shops and RC fields are the best places to start looking for one) that will provide 1 to 1 guidance. You can also ask your questions on RC forum - it's much better place for such questions than the article's comment section.
Good luck and have fun!
Log In to reply
Log In to reply
Log In to reply
Log In to reply
Log In to reply
Log In to reply
Log In to reply
It's nice to hear you like the article. As to the dihedral angle: I believe you should stick to the original plans. You should be able to find the dihedral gauge on the plans, and an easy to follow explanation how to use it in the original build video. It certainly worked ok for me.
Good luck, and have fun!
Log In to reply
Log In to reply