
We are in the middle of winter. The common problem is: most of our planes - just like us - are not ready to fly at this time of year. And there are several reasons for that. In this article I'll focus on the most common one: wheels and snow don't mix very well. Of course we can still try to find a piece of asphalt or concrete that is clean of snow, or - in more extreme cases - take off from the ice (if you can find one big enough). Some of you may be lucky enough to get the kind of snow with very hard surface; but this case is quite rare and may be dangerous (to the airplane) sometimes. Some of us are trying to use floats to take off from the soft snow; but it's still a compromise, and even more the one not available for everyone.
We all know the right answer to the problem described above: SKIS.
That's the only right way to go; then why we don't do it this way? The answer is simple: there are not many ski kits or plans out there to use. That's why we are going to build our own set of skis in this article. The skis that not only work, but also look reasonably nice and are truly swappable - that means can be mounted on the existing landing gear instead of wheels, and can work with almost any swappable airplane (limited to tail wheel configuration only).

One "ski assembly" have two basic elements: the ski itself and the suspension sping. As seen on the video above, it's possible to fly without the spring; but - besides generating tons of drag - it just looks awkward. I did that because I needed to try out the skis on the actual snow, and the only day with the snow and the weather good enough for flight happened before the first set of springs was completed. Here's the comparison of the suspended ski (in the front) vs "free-falling" one (in the back).

The complete "ski kit" contains two ski&spring assemblies; where the skis are identical left to right, while each spring is the mirror image of the other.
the SKI
The ski itself is very simple. It's build out of two foam elements and two "reinforcement plates". For dimensions, please refer to the images below.


I used 6mm depron for foam parts; but they can easily be made of DTFB as long as the paper is removed from both sides. My reinforcement plates are made of 0.8mm plywood, but I believe credit cards or other similar materials will do it as well. The build process is really straightforward; it will not be described in detail. The only thing not obvious is how to make the forward part rise up at an angle.

There are two easy ways: heat and glue. I used custom made heating rig (a subject of future article); but any reasonable heat source will do (hair dryer, boiling water, iron). Just heat up the ski where it should bend (preferably before two parts are glued together, but it is doable after that as well), bend it to the desired angle and hold it there until the foam cools down.
If you are not comfortable with using direct heat, you can use the (hot) glue method. To properly make the bend, you need to do that before the paper covering is removed; if the ski is build using non-covered foam, cover it on both sides with the tape around the desired bend location. Then, cut the foam half way on the upper side of the ski (inside the bend), open the cavity, put some glue inside and close it, bending it over to the desired angle. The ski should hold it's shape after the glue sets / cools down; at that point you can remove the covering and proceed with the build.
the SPRING
Building the spring is more demanding. Due to it's nature and "swappability", it can't be described by plans or templates (or I just don't see the way to do that). I hope that the detailed build description, supported by a bunch of photos, will let you repeat the process. I made the spring using 0.8mm wire - exactly the same wire that I use for push rods/control links.
To start making the spring you need a securely mounted "core" - a stiff piece of wire, roughly the diameter of your landing gear wire. Wind up a spring wire over the core at an angle of approx 45 degrees to make a spiral, just like on the pictures below (before and after). This spiral will allow mounting the spring on the existing landing gear, and removing it without using any tools. I started with 1 1/4 turns; it's a good starting point that can be adjusted later if needed.


Remove the spring wire from a core and install it on the landing gear leg. The upper end should go on the inner side of the leg, facing forward. The lower end should go outward, over the wheel axle. Cut off the upper end, leaving 6mm / 1/4" (all dimensions are approximate and can be slightly changed) of straight wire. Make the first bend on the lower part, leaving 10mm / 3/8" of straight wire between the spiral and the bend. It should be at 45 degrees down, resulting in the spring wire going perpendicular to the axle. Make sure the wire goes on the front side of the axle.
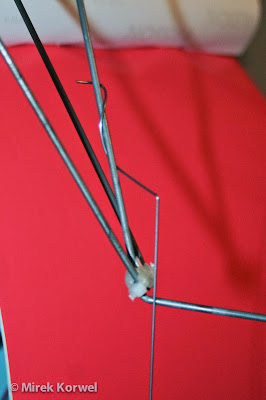
Adjust the position of the spiral to leave 20mm / 3/4" of a straight wire from the bend to the axle. Holding the spring wire with one hand just above the axle, wind the other end around for approx 1 1/4 turn. Try to keep the winds tight; but don't go crazy about that. You should end up with the wire going towards the back of a plane (that's what we want) and slightly outward; like on the pictures below:


If the outward angle is greater, you may try to adjust it a little; but don't try to make it exatcly parallel to the fuselage. You will need that angle later to pre-load to the spring when the ski is installed. Now, leaving 10mm / 3/8" of straignt wire, bend it at 90 degrees towards the axle. When looking from the front of a plane, the wire end should completely disappear behind the axle. When looking from the top side down, it should look like this:

Cut off the excess of a spring wire (if you have any). One spring is officially done; make the other one, keeping in mind to start with the spiral winded up in the opposite direction.
The only thing left to do is to prepare a ski for attaching a spring. To do that, drill a tiny hole in the reinforcement plates approx 10mm / 3/8" behind the main axle hole. And that's it.
INSTALLATION / REMOVAL
Assuming that you start with both elements removed from the landing gear (somehow), to install the assembly on the plane you need to follow these simple steps:
1. slide the spring over the axle
2. wind the "spiral" around the landing gear leg
3. slide the ski on the axle, feed the spring end trough the prepared hole
4. put a wheel collar on the axle (if you use one, which I recommend if you are planning to switch back to wheels at some point)
5. push the whole set towards the fuselage (pre-load the spring) until the spring reaches the place where the axle bends up; and tighten the collar (or secure it in any other way).
To remove the assembly, follow the steps in the opposite direction. After adjusting some angles, you should end up with something like this:

Here's how the skis look like on the Storch (in the air / on the ground):


and the same ski and spring installed on the FT 3D (only one for comparison with the actual wheel):


This ski assembly was tested on the Storch only; with and without the suspension springs installed (only the latter one documented on the video above). It worked perfectly fine on both thin layer of soft snow and approx 3 inches of hard snow. Those skis are made to - among others - preserve the scale look of my Storch; it may turn out that they are a bit too small for deep, soft, fresh powder. Last year I've been testing skis of similar size mounted on the Baby Blender, and for sure that was the case; I'll repeat the test using this exact pair of skis when my new Baby Blender will be completed.
I know there are some improvements possible; among which I may suggest covering the bottom side of each ski with a tape (the foam alone may not be durable enough). I also know that there are other ways to build and mount the skis on a plane, e.g. last year my skis were mounted in the float-style way. But this way I found very cheap and quick to build, with the additional benefit of being 100% swappable (easy to install/remove on any already built airframe). Knowing that the skis made this way actually work, I do not see any easier way to keep having fun all year long. The only thing I really need to figure out is the battery cover - having the battery exposed to the airflow at below the freezing point temperatures does not keep it happy for long. But that's a topic for another article.


Log In to reply
Log In to reply
Log In to reply
no wear and tear then !!
=P
Log In to reply
Log In to reply
Log In to reply
Log In to reply
Log In to reply
Log In to reply
Thank you!
Log In to reply
But if you are stuck with bamboo, I may suggest to glue a popsicle stick to it to make it wider.
Log In to reply
I tried to click on photos and see details better but they do not allow zooming in.
Log In to reply
https://picasaweb.google.com/104827849773215118107/SamorBkiCzyliPotrzebaMatkWynalazkuANadmiarCzasuJegoOjcem?noredirect=1
Log In to reply
I like the confined area practice.
Log In to reply
Log In to reply
Log In to reply
u showed a nice way of bending plywood in the giant spitfire and cruser video
it will make better skis that dont wear out
keep up the good work
Log In to reply
Log In to reply
Log In to reply