This is the part 3 article of my 4m glider build. In this article I do the finishing touches like the covering film, electronics, and final assembly. I made a video for my YouTube channel of progress shown in this article, if you want to check it out. If you enjoy it, feel free to subscribe and leave a comment :). Here's a link to the build thread if you want to check it out, and here are the part 1 and part 2 articles if you missed them.
Let's get started!
The hatch is made of 1/16th balsa sheet, with 1/8 x 3/8 curved balsa sides to match the curve of the upper forward fuselage.
I glued a small tab at the front of the hatch to keep the front end down securely. Here's what it looks like at this point.
For the rear of the hatch, I scavenged some magnets from a broken brushless motor.
The magnets are glued in flush with the hatch side pieces.
The magnets in the fuselage are glued to a small piece of 1/8 x 1/8 balsa, which itself is glued to the wall of the inner fuselage.
The rudder /elevator servos will be mounted under the wing area. The little cut-outs are for the servo wires. I tried to reverse the motor shaft to mount it on the inside of the fuselage, but it didn't work. I couldn't have the motor just hanging out the front by itself, so I decided to make a sweet nose cone! It start's at the rear as a square, and gradually turns into a hexagon at the spinner end. Then I sanded it round at the front to match the spinner. I'm pretty happy with how it turned out!

Time to break out the covering film! I tackled the tail surfaces first.


Next up was the wing. Covering tends to be pretty time consuming - the first panel took me almost 5 hours! Luckily, I got in the groove a bit and the others didn't take as long.

The fuselage was easier because there was only one colour to worry about.
I put some red covering on the nose cone, then I installed the motor and propeller.
The "cockpit" sticker is cut out of some book contact. I really liked how it turned out!

The rudder keys into the elevator much like the FT planes, then both tail feathers glue onto the fuse.
Servos installed! I used a continuous piece of thin plastic tube to guide the pushrods to the fuselage sides, then short segments of tube on every vertical piece of balsa from there down to the tail.

The piano wire I get from Hobbyking isn't long enough to get from the servos near the wing all the way to the tail, so I had to join two pieces together. To do this, I overlapped the pushrods by about 30-40mm, wrapped them with sewing thread, and soaked it in CA glue. Then, I shrunk some heat shrink tubing over it for a bit of extra strength and protection. 
The control horns are made out of paddle pop stick ends.

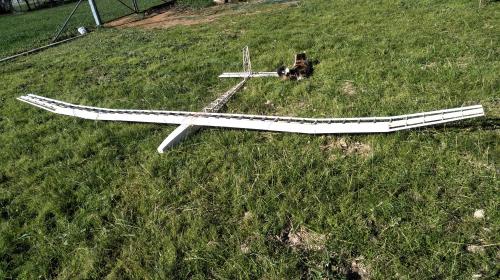
Whew, that was A LOT of work! Overall, this project took about 7 months from the start of construction to the maiden flight. That doesn't include the time it took me to design it, which would have been about a month or so of CAD drawing, calculations, and brain-storming. Stay tuned for the flight report!


No Comments Yet
Be the first to leave one!