FT Simple Storch - Build

by FliteTest | August 27, 2014 | (62) Posted in How To

FTScratchBuild-Advanced

As always we also have complete build plans available for free linked at the bottom of this article.   

When you purchase your speed build kit, we encourage you to save the cut outs and make yourself a template!The FT Simple Storch offers some of the usual build techniques along with a few new design elements. Center your servos and get your servo extensions. You'll want to also build your Power Pod before first!A full list of electronics is available below. Pre-dialed in differential will give your aileron more upward deflection.
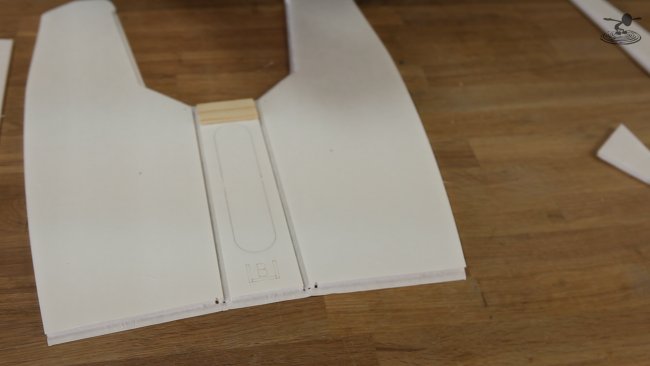
Be sure to clear out all of the channels so your plane will fold together tightly.Keep an eye out for the 'new' cloudy white glue sticks which don't work as well as the original clearer sticks.The landing gear is the most recognizable feature of the Fieseler fi 156 Storch.  We replicate this unique landing gear easily with just a few bends of wire. These components come with your speed built swappable kit!

We are also introducing FT Elements Reinforcement Discs with this build!We designed the FT Elements Reinforcement Discs based on viewer feedback and with these discs you'll be able to have a more secure connection to your power pod and fuselage.The tubing can be cut to secure your bbq skewer into your fuselage.The FT Simple Storch features a very clean design with how the canopy glues together.We're excited to see how everyone will customize their FT Simple Storches!The speed build kit come with wheel cutouts and control horns and other accessories, available here.Complete power packs are available for your power pod.If you want to pick up a speed-build kit head on over to the web store! Otherwise, you can download the free plans at the link below.  

FREE Build Plans:
FT Simple Storch [FULL]
FT Simple Storch [TILED]

Recommended electronics:

MOTOR  -  Suppo 2217/7 1200kv Brushless Motor (Park 425 equivelant)
4 Servos (Option 1) - Hextronic 9 Gram Servo
4 Servos (Option 2) - Suppo SP-90 9g Micro Servo
ESC (Option 1) - TURNIGY Plush 25amp Speed Controller
ESC (Option 2) - Suppo 18A Brushless ESC
Battery (Option 1) - Turnigy 1800mAh 3s 20C Lipo Pack
Battery (Option 2) - Turnigy 2200mAh 3s 20C Lipo Pack
Prop (Option 1) - Slow Fly 10x4.7 prop
2 - 12" servo lead extensions 
2 - 24" servo lead extensions
Y servo leads for ailerons (and flaps)  
Linkage stoppers 


Complete Electronic Power Packs (Power Pod Components) are available from these resellers:

Altitude Hobbies
LaserToyz
 

Thank you to the entire community for making projects like this possible.

Let us know how your build went or if you have any tips or comments, chat it up in the forums!

COMMENTS

ringo42 on August 28, 2014
I turned the big PDF into 4 separate 20x30 plans. If the share folder thing worked correctly you can get them here
https://www.dropbox.com/sh/mi52qx4g2rskjs8/AABhAfiRf0gjR-q-wNsW33Oha?dl=0

Log In to reply
ESS075 on September 2, 2014
These printed perfectly! Thank you. You have not done the same for any of the other plans have you? Or put an article up on how you are modifying the plans?


Log In to reply
Old Cobra Pilot on August 28, 2014
Another Home Run!!!!!!! Will it ever end??? I certainly hope not!!! I've been looking for this plane ever since Flite Fest. Great Job!!!
Log In to reply
Bridgeman on August 28, 2014
Need to add the required servo extensions to the electronics list.
2 @ 12" servo lead extensions
2 @ 24" servo lead extensions
Y servo leads for ailerons (and flaps)

and linkage stoppers
Log In to reply
FliteTest on August 28, 2014
Thanks!
Log In to reply
Jahanzaib on August 10, 2020
Sir can i use emax xt2216 1290kv please tell me
Log In to reply
Franz on September 14, 2014
Hi,

unfortunately I could never learn anything about the extent of the stork.

Could someone possibly the actual span of the
Stork, and call the take-off weight?

regards Franz
Log In to reply
Franz on September 14, 2014
could not be controlled with a blender the flaps and ailerons?
This could save servos and weight.

regards
Franz
Log In to reply
Crazy68 on September 19, 2014
Can I get the dimensions of this plane, At least the wingspan? It is almost impossible to tell from the plans on a computer screen. Or since the wing comes up to your chest tell me how tall you are Josh! lol !!!
Thanks.
Log In to reply
Crazy68 on September 19, 2014
Never mind. I just ordered one. I can't wait to assemble and fly it!
Thanks for everything you guys do!

Log In to reply
jrbemis on August 28, 2014
Awesome plane. I like the wooden reinforcement blocks. I have been using cut up gift cards for the reinforcement points. Great job on the build video when are they coming out on DVD?
Log In to reply
Ron B on August 28, 2014
on your recomendations for the esc for the suppo motor it is 18 amp but the specs for the motor call for a minimum of 25 amps. You may want to update your recomendations
Log In to reply
busterhp on September 11, 2014
What size wire is used for the landing gear and what is the overall length of the wires?
Log In to reply
riverstix on October 9, 2014
15.5 inch length of each of the 4 rods needed to build the landing gear
Log In to reply
seansgrandad on October 15, 2014
A previous reply says 1.9mm dia. But I don't know if that's correct.
Could do with the sizes listed on the specifications though, and a dimension drawing.
Not complaining, only suggesting.
Great job otherwise.
Log In to reply
bpjacobsen on September 20, 2014
Question regarding the landing gear. How long should I be cutting each piece before I start bending them? That was not mentioned in the video. Thanks!
Log In to reply
RickPeck on October 5, 2014
The "score the paint stick" and crack it, bad idea. Mine followed the grain and split. Also, only one stick in the kit which doesn't leave enough. Just cut it with a saw.
Log In to reply
thenated0g on August 28, 2014
I have An extra 1050kv motor and 1047 prop. Would this work?
Log In to reply
Rainy Day RC on August 28, 2014
The "cloudy" hot glue is the Low Temp version. The more transparent one is the high temp.
Log In to reply
Flying Fox on September 3, 2014
Does anyone know where you can get Foamboard in Australia.
Log In to reply
hellcat on September 24, 2014
you can get Depron via www.rcfoamfly.com Alex Smith [info@rcfoamfly.com]
better and lighter than standard foam board works out cheaper as well
Log In to reply
ewlie on September 4, 2014
I got mine from my local picture framers. red20Rc.org has more details of who you can order it from and have it sent.
Log In to reply
Flying Fox on September 4, 2014
thanks
Log In to reply
Fani on September 16, 2014
which sheet should i take printout....plz help me with the dimensions.
Log In to reply
Hell2Go on September 18, 2014
Josh, l'd like to know more about that bloodywonderish plane behind your right side... wing resemblles a shortend big stick wing. With a modded FtFlyer tailfeathers. I always wanted a rudderwonder... are there plans available, or will there be, thanks


Log In to reply
pastrychefin on September 8, 2014
reworked the plans to fit the cheaper printer at fed ex 36"x80 something
https://drive.google.com/file/d/0B3UfME0smOk5T01oYzJ3ejBWSGc/edit?usp=sharing

Log In to reply
danger41263 on September 16, 2014
thanks for the reworke plans
i downnload your copy
i can have it print on 36``wide almost anywere at cheap price
thank you

Log In to reply
serv@ on January 13, 2015
ohhh, thank mr. you saved my life :) but can you tell me, how did you fixed this plan ???
Log In to reply
coolbananas on August 28, 2014
Awesome! I know what I'll be doing tonight.
Log In to reply
mudman1959 on September 14, 2014
Any chance that you can break the full size PDF up into two equal parts as it does not print out on a 44 inch sheet. I get the wings and part of the tail surfaces but the rest does not print... Mudman1959
Log In to reply
giorgosmessa on September 18, 2014
hi i boyght 3 sheets of depron today but mine is differnet than yours.yours look like they have some paper outside but mine dont.where i can find ilke yours with paper i searced internet but i foynd nothing
Log In to reply
Franz on September 29, 2014
Where are you from?

In Germany it is hard to get depron with paper coating, but not impossible.

Here you can get it "www.isopor.de"
unfortunately only in larger quantities.

regards Franz
Log In to reply
pintokitkat on October 3, 2014
A great plane and another great video, Josh, but why do the FliteTest guys not contribute to these postings? A couple of people have mentioned the glaring omission from the video is the starting length of the undercarriage wires and some helpful souls have given their thoughts. But we really need Josh to give the definitive answer either in these comments or by adding a bit of text over the video, but preferably both.
Log In to reply
Nose Dive on October 7, 2014
My build is almost finished but I have come to the point that I really need that 'landing gear part'. Where can I find those dimensions?
Log In to reply
pintokitkat on October 8, 2014
I used 15.5 inches and it seemed to work out OK.
Log In to reply
riverstix on October 9, 2014
The rods that come in the kit are 15.5 inches
Log In to reply
lee250 on August 28, 2014
Which motor works best?
Log In to reply
PropSpinner on August 28, 2014
Good job Peter!! You to Josh. 😉😉😉😁

Great design. I learn new building techniques with every video.
Log In to reply
Flying Fox on September 9, 2014
Hey Josh
Could this plane fly without ailerons.
Log In to reply
Cruqer on September 25, 2014
Hello, I use this aircraft engine hextonic 1300kv ??
Log In to reply
FoamFlyinFool on August 28, 2014
Finally :)
Log In to reply
steelman on August 28, 2014
I probably do not understand this detail. I would expect the wooden sticks fit into the spars would push against each other when flying (wing tips go up, the middle goes down). The way the spars are assembled helps keep the dihedral when the plane is is on the ground but it definitely(*) does not improve wing rigidity when flying. Personally, I would consider flipping those spars upside down.

(*) This actually is somewhat conditional statement as I am rather noob still.
Log In to reply
TexasFPV on August 30, 2014
the NTM series 28-26A1200 Kv/286w is probably a little undersized. I've been using that motor on most of my builds, and I find that if I prop it much higher than an 8x4.7 it generally draws too many amps (according to my telemetry). I've switched over to the NTM 28-30 1100 kv motors.
Log In to reply
DanKnow on March 21, 2015
I got a Turnigy 2830-1130kv ... what size prop are you using?
Log In to reply
shermanhartman on August 28, 2014
I cant wait to put it together! 1 thing though, the full plans dont look quite right. I dont think they will come out on a plotter correctly, but i havent tried yet.
Log In to reply
hack-o-holic on August 28, 2014
+1200kv on this. I'm pretty new to flight test and have been downloading and plotting plans like crazy. It irritates the heck out of me that the full size plans aren't on a standard D+ size (24x26) or even E+ size (36x48) drawing! Or better yet... why not set the plans to exactly 20"x30" so that each page plots out and can be taped exactly to a sheet of Dollar Tree foam board?! Other than this complaint I can't tell you how much I dig Flite Test and all they do.
Log In to reply
ESS075 on August 28, 2014
I have a 24in hp designjet t120 plotter I bought for my school. The main purpose of this plotter is to print flite test plans for my rc airplanes course that I teach. I have major problems getting plans printed actual size. If anyone can help with settings or custom page sizes please help. I would love to print the plans for the storch- build it this weekend and have an example plane ready for my next class, but I can not get close to printing these and am tired of printing the tiled plans and taping them together! Thanks for your help.
Log In to reply
Mostly Harmless on August 29, 2014
The Storch plans were something different from the others I've built. First off, I like the 1" grid -- as mentioned earlier, really helps lining up each tile. But I was less than enthusiastic about the extremely large single sheet. So, I'm going to try something different. Rather than stitching together every tile to make the super-sized sheet (btw, I can't find any company to print on a single sheet of that size), I picked certain ones to assemble into smaller sections.

Pages 3-6 get tiled together in a 1x4 page strip, and includes the vertical and horizontal stabilizers, gauges, and a wheel.

Pages 9-11, 17-19, and 25-27 get tiled together in a 3x3 page array, and includes one wing panel and box spar. Because the 2 wings are symmetrical, I just need to flip the pattern over for the second wing and spar.

Pages 14--16, 22-24, and 30-32 get tiled together for another 3x3 page array, and includes the fuselage components (and throw gauge).

I don't need the pattern for the power pod (I've got plenty of those), and the long strips for spacers can just be cut to size -- easy enough to measure the right size without a pattern. As an aside, I'm guessing that the longer set of strips and those small squares are for slats, but I'm not sure... (does anyone else have a guess?).

One other nit.... when printing, note that the Adobe page numbers do not always match the plan page numbers -- many of the tiles are printed out of order, so make sure the page numbers mentioned to print above are for the plan pages and NOT the Adobe page numbers.

I plan to trace these on to either foam board or poster board to make reusable patterns. Once I have these, I will arrange them on a 20x30" sheet to optimize the use of material.

One other hint: because I probably wasn't 100% accurate in aligning/assembling tiles, I can't be sure the aircraft pieces that have symmetrical sides (horizontal stabilizer, fuselage sides) will be truly symmetrical when I get done tracing them (I noticed this problem on the Old Fogey wingtips when I scratch built it). Thus, I plan to trace just over half of those parts, flip the pattern, then trace the rest. This way I will be sure both sides will be the same. Be sure not to use the same markings for things like servo holes and control horn mounting slots, however -- those are definitely not symmetrically arranged.

Anyway, that's going to be my approach for this plane. I'll let you know how it works out.

(Also posted in the forums)
Log In to reply
pastrychefin on September 8, 2014
i use fed ex to print all my large format jobs from flitetest i have a link to my g drive where i have reworked the plans to print on there 36 wide printer

https://drive.google.com/file/d/0B3UfME0smOk5T01oYzJ3ejBWSGc/edit?usp=sharing
Log In to reply
gowen on October 27, 2014
Thanks for the link, It's on the printer now. You only need to print page 1.
Log In to reply
shermanhartman on August 28, 2014
Ive been working on a version that prints on 24 inch paper. These plans are way to large to fit on 24 inch paper. Ill upload them somewhere when im done. (Im basicly just importing them to cad, moving stuff around, and exporting as a PDF)

Log In to reply
aeroncalover on October 13, 2014
I always print the titles plans out and have them enlarged 280 percent to get them full size.
Log In to reply
ArchieMcM234 on February 23, 2015
do you know what type of wire I should use for the landing gear and control rods

Log In to reply
shermanhartman on August 28, 2014
I dont plot the plans myself, my dad plots them at work for me. We dont have a plotter where i work sadly. Maybe you should call into the podcast and suggest that. If not, i will. haha
Log In to reply
JDill on September 2, 2014
Agree on the problem of the huge single sheet page size. At the 'office' store I go to they are able to print up to 36" wide and that has worked for other FT plans just fine. Any chance the layout on these can be changed to work for us Josh?
Log In to reply
shermanhartman on September 2, 2014
I have made a 36" x48" version if you would like it. Although i messed up when fixing the lines and colors. Its an easy fix. If you want a copy, shoot me an email. Thesherm4[at]gmail[dot]com
Log In to reply
shermanhartman on September 2, 2014
By that, i mean i will fix it if anyone want a copy of the 36" plans.
Log In to reply
Edge-of-Tommarrow on February 11, 2015
Is this a good beginners plane?
Log In to reply
shermanhartman on February 11, 2015
As a first plane, no. If you're looking for a first plane, go with the scout or the FT flyer. Something with 3 channels. The storch needs rudder to fly well. As a second or third plane when you want to start learning rudder, its great.
Log In to reply
Edge-of-Tommarrow on February 12, 2015
i have stuff to make a swappable and ive already made the power pod
Log In to reply
shermanhartman on February 13, 2015
Have you flown any other airplanes before?
Log In to reply
tjmartin on August 28, 2014
Nice clean looking build. This will definitely be my next build. Looking at all the pieces to the fuse, I think the speed build kit will be the way to go for accuracy.
Log In to reply
MADJRFL on August 28, 2014
altitudehobbies lists: @$58.99
What's included with each combo pack:
Motor: 1x Suppo 2217/7 1250kv Brushless Outrunner
ESC: 1x Suppo 30A Brushless ESC
Servos: 4x Suppo SP-90 9g micro servo
Props: 2x APC 9x4.7SF Slow-Fly propeller
1x 12" Y-Harness
4pcs D1.8mm Linkage Stoppers
MIssing the 2 @ 12" servo lead extensions 2 @ 24" servo lead extensions

http://upliftinghobbies.com Lists$62.99
Contents of the electronics combo pack:
MOTOR: 1x Suppo 2217/7 1250kv Brushless Outrunner
ESC: 1x Suppo 30A Brushless ESC
SERVOS: 4x Suppo SP-90 9g micro servo
OPTIONAL: 2x Suppo Servos (Flaps)
PROP: 1x APC 9x4.7 Propellor
WIRING: 2x 12" Y Harness
WIRING: 2x 12" Wire Extension
HARDWARE: 4x Linkage Stopper
Including a second Y harness for flaps, but selling a second set of flap servos separately... sigh.
But Flite Test lists 2 - 24" servo lead extensions and neither sells those. Just asking for some consistency, accuracy, or one stop shopping to save on shipping.
Log In to reply
JohnRambozo on August 28, 2014
I'd email Altitude to let them know about the missing servo extensions. I did that when I ordered my combo pack for the Spitfire and they added them.
Log In to reply
Mustang14 on September 2, 2014
Landing Gear: Sorry if i overlooked it but what length is the wire used for the landing gear from the video it looks like 16" but want to make sure. Thanks
Log In to reply
Mustang14 on September 2, 2014
I went with 15.5" and seemed to work out ok but 16" would give the back of the gear more holding surface.

Log In to reply
danger41263 on September 16, 2014
keep the good work
i download the copy from pastrychefin it is on 36 in wide way easier to have it print
great hobby did not have it yet as a kit
thanks
have a nice day

Log In to reply
Gantorin on August 28, 2014
I think you need to go to Mt Dew anonymous meetings after seeing that stack of sodas at the edge of the table. But, great video guys!
Log In to reply
bpjacobsen on September 20, 2014
This is shaping up to be a favorite. I brush the polyurethane on and spray paint. works great! much better than using colored packing tape.
Log In to reply
jpleaner on August 28, 2014
Melt the end of the glue stick to stick it to the next one.... best tip ever!

Log In to reply
shermanhartman on September 2, 2014
I love it. I never thought of it, and now i use it constantly! its great.
Log In to reply
Mustang14 on September 2, 2014
I test flew mine today and it fly's ok but keep up your speed or it will fall out of the sky in a turn. Fly in a place where you have lots of room to turn and you should be fine.
Log In to reply
Pitts Driver on October 9, 2014
Is anyone successfully building the wing. I'm working on the wing and I've done the creases as described in the video. I've even angle cut ALL the creases. There is no way in this bleep'n world my wing will actually fold into a wing. I am so frustrated in ticked.

I'm using the same dollar tree foam so it's got to be the same thickness. I've gone over the plans double and triple checking everything. I've measured everything.

I better get off before I say something I shouldn't. I'll leave you with one word; balsa.
Log In to reply
riverstix on October 9, 2014
The most important thing is to cut that double bevel on the inside of the leading edge. The foam won't fold the correct direction if this is skipped. It's the same fold technique used on the versa wing, watching that video might help.
Log In to reply
darksharkman on October 23, 2014
Yes, 2 second riverstix, your wing will not fold without a good bevel at the leading edge. They suggest 45 degrees on each side but you can go a little more for an easier fold, if you are careful. Also once you do have the bevels cut, you should *carefully* fold the wing halves together. The front edge does have to crush the foam to achieve the fold, so you want to take your time. Before I fold the wing edge to its final shape, I use a long piece of Scott's Extreme Packing tape to reinforce it so when it folds it does not split the paper.

Best of luck, I am sure we can help you get it straightened out (though I see this may not be relevant since your comment is a couple weeks old).
Log In to reply
riverstix on August 28, 2014
Anyone know what the plane weighs with no electronics? I am surprised it's not listed on the plans like some of the other ft planes.
Log In to reply
dmberry on September 22, 2014
I am interested in the video you mention about the flaps and leading edge slats. When will that video be out? I just got my kit and have started it. I built the FT FoamCub this summer and it is a blast. Lots of folks at the flying field were surprised at how strong and stable the plane is. Looking forward to flying the Storch.

Log In to reply
Franz on September 29, 2014
Well, since I'm German as enormous advantage.
I do not need to translate.

Because once you see how I feel at your side!

regards Franz
Log In to reply
JohnRambozo on August 28, 2014
Thanks for mentioning the problem with the glue. nerdnic started a discussion on that exact problem 2 months ago on the forums. Some good info was found and continues to be shared. http://forum.flitetest.com/showthread.php?10229-Issue-with-hot-glue-from-Walmart-Ad-Tech-Multi-Temp
Log In to reply
rcflightuser on August 28, 2014
I generally take the plan into MS Publisher, size a custom sheet to 30 x 20 and drop the 100% PDF plan onto it. Then I add diagonal lines over the whole sheet to help me line up the tiled sheets they print out as. It really helps the line up process.
Log In to reply
vrabac on August 29, 2014
Will NTM series 28-26A1200 Kv/286w work? What would be recommended prop size'
Log In to reply
PeteParise on September 26, 2014
I found a link to a German magazine article about the Storch that helps me fill the time between flying, crashing, repairing and flying my first four-channel plane. If you have the time, you can copy and paste the German article into Google Translate and read it. The magazine is Der Spiegel, and they have a link to to pdf that has some pictures. Here are the links:
http://www.spiegel.de/spiegel/print/d-40617184.html (Article in German)
http://magazin.spiegel.de/EpubDelivery/spiegel/pdf/40617184 (PDF of article)

Enjoy!

Log In to reply
pity_the_fool on August 28, 2014
Another awesome plane guys, I can't wait to build it. Would.it be possible to add the windows to the plans so you could either make your own decal, or use the plan as a stencil? Also, it we would be a nice help if you just drew some reference outlines of the landing gear. Thanks again.
Log In to reply
Cortes Gary on August 28, 2014
I have to agree with you. It would be a nice "add on" to have the windows and the landing gear reference outlines!
Log In to reply
4n6days on August 28, 2014
Josh, I don't know what kind of sorcery you use to make those bevel cuts so nice!!!
Log In to reply
shermanhartman on August 28, 2014
Sharp blades. I actually keep a sharp blade while im building just to use on bevel cuts.
Log In to reply
pakelika1 on August 17, 2015
Sharp blades help a lot but its not hard to make nice bevel cuts when your using a laser to cut the foam board. It melts so much of the foam he is really just cutting the paper. Bought a speed build kit and learned my lesson fast. These are just to EZ to make at home with heavier FB or I use DEPRON on almost all there planes VERY STRONG!
Log In to reply
Pbmax331 on December 22, 2022
I strip back the paper 1/2 to 3/4 inch, using that edge as a top guid, then I hold it up to a 3/16 metal flange that prevents me from cutting through the hinge paper.
I have also used this technique with a clothes iron to melt in the bevel in. The width of the iron and repeat works better than sliding it along the whole length .
When I was a boy I could cut, carve, create anything but now my hands are crippled @nd I must resort to “ hacks”.
Log In to reply
abieex on August 28, 2014
I'm wondering if a Park 480 would be too much. Got one of those still in the box! Just took mine out of its wrapper and the glue gun is warming up!
Log In to reply
91shadowrider on August 29, 2014
What thickness of landing gear wire did Josh use in the video?
Log In to reply
pastrychefin on September 8, 2014
i believe its the same as the others 1.95mm
Log In to reply
MadMitch178 on August 29, 2014
Could I use the Ntm prop drive series 28-26 1200kv/286w with a bigger prop because I've been using the same set up for many different scratch builds
Log In to reply
maue on October 1, 2014
I like the A fold B fold explanation.
Thought I'd add my thought on the "C" fold
Actually it's Ben eating me up so I had to comment lol

"A" above bottom
"B" beside bottom
"C" compleatly over
"D" double bevel (leading edge or extream angle folds)
"F" free (control surfaces)
"G" gentle (wing and fuselage shaping)

Just had some fun coming up with this. Keep it up guys I enjoy watching.
Log In to reply
Shinku No Sora on August 30, 2014
I learned a while back that a plastic gift card cut into pieces and drilled serves the same purpose as the plywood discs, I haven't built a powerpod or reinforced model without them since. Of course then I end up completely destroying the plane in other more creative ways. Who says I fly irresponsibly? :P
Log In to reply
Bmoodz on October 28, 2014
All this scratch build stuff is really awesome, but don't get me wrong it can be expensive. Especially for someone like me, who is a high school student. I was wondering if maybe any of you guys know of a educational grant for students, that they can apply if they are involved in a educational activity such as this one?
Thanks, Ben.
Log In to reply
MD_Lawn_Dart on December 26, 2014
Check AMA's website?
Log In to reply
hrishikesh on October 13, 2014
Thanks Flitetest for your wonderful work like always ..
This plane is good sensitive and easy to fly .
Keep it up...
Log In to reply
rynomum on October 24, 2014
Where is a good place to get wire for push rods and the landing gear?
Log In to reply
Pitts Driver on October 15, 2014
Any tips on aligning the power pod. You're free to rotate it quite a bit.
Log In to reply
Niko0D on November 2, 2014
Hi
Thank you for great model.
After i finished model i got 1,147 grams weight with battery and electronic parts. Im using Turnigy D2836/8 1100KV with Slow Fly 10x4.7 prop. But I'm not sure about is will fly with that motor?
Log In to reply
JohnnyAloha on January 19, 2015
any feedback on how your plane flew on that setup? I have the same motor and I'm wondering which prop to go with. Thanks!
Log In to reply
Ilias.GR on February 12, 2015
so, it fyies?
Log In to reply
oldflyer on March 3, 2015
I am using the same motor with my Storch--with an APC 10/6 electric prop. It has more than enough power.
Log In to reply
darksharkman on October 23, 2014
I have found many useful tips from the community and had one I wanted to share myself.

Once you glue pieces together or make a fold, if you screw it up, then you have to rebuild the part or destroy the old part to fix it, right? Well, I have 2 methods that I use all of the time if I need to make after the glue has dried.

My first and preferred method is to use a propane torch or some other heating element, and use it to heat up a curved exacto knife and use the knife to part the glued surfaces. By being careful with the hotblade you can neatly undo something that was already glued.

Another technique you can use, is use a hair dryer or heat gun to carefully and slowly heat up the surface or fold that you need to unglue. After a minute or so, the glue should get hot enough again to either rework the surface or simply pull your 2 glued surfaces apart.

These techniques have saved me many times, and they are pretty handy to have in your arsenal. Hope it helps someone =)
Log In to reply
darksharkman on October 23, 2014
Use the front 2 skewers that "plug in" to the firewall, tilt the back end up into the fuselage, and you can see through the top so you can run your skewers through the sides. You could add another skewer closer to the front of the fuselage if you really feel you need to secure the power pod.
Log In to reply
Pitts Driver on October 30, 2014
Thanks, the skewer locations on the fuse. and pod plans were what I needed. I'm not using the 2 forward pointing spikes as my motor is too big, but the side skewer holes give me my alignment; completely forgot about those.

Once again, thanks.
Log In to reply
netfryman on November 10, 2014
Hi
What wheels are you using Josh in the video?
I put them to which I build.

Greetings all.
Log In to reply
donald.sayers on November 29, 2014
I have just started building from plans, I know you post overseas, but you really need a UK agent. Spent the afternoon sticking A4 printouts together, with a metre rule as a guide to make sure the lines stayed straight. As an electric noob I find electric motors very confusing, way too many parameters to get right, the specified motor is not readily available in the UK, but I found a suspiciously close copy on Amazon of all places. http://www.amazon.co.uk/dp/B00O7JKMVM/ref=pe_385721_37986871_TE_item.

Are there dimensions for the control horns?
Log In to reply
Beetlebeetle on December 17, 2014
Hi Donald,

In general, you want the control horn to stick up, from the fuselage, about the same amount as the length of the servo arm. That way they both pivot through around the same angle. If your servo arm is 2cm, make the control horn about 2.4cm and stick the 0.4 part into the foam.
It's a rough rule which works a treat.

Have Fun!
Log In to reply
vishal on November 21, 2014
Where can I get that paint stick? what is it called? all I can find are smooth strips, nothing of the kind Josh used.

Thanks,
Vishal
Log In to reply
mkush on November 28, 2014
For proper cooling of the ESC and battery you have to add an exit for the cooling air. Without "flow-through", air will stagnate in the fuselage, preventing proper cooling. Exit holes are used by other "foamies". I cut out a rectangular hole in the bottom rear of the fuselage. Strength is not compromised, but if it is a concern cover the hole area with packing tape and cut out the hole.
Log In to reply
MD_Lawn_Dart on December 10, 2014
What are the lengths of the 4 metal rods for the landing gear? I would guess 14.5" but I don't want to. My Stork is almost ready to fly after my near-disaster with the Duster. Teach me to try and fly after 30 years and never on a 4-channel under-wing sports plane. :) Live and learn.

Log In to reply
MD_Lawn_Dart on December 10, 2014
Never mind...found it: 15.5 inches it is.
Log In to reply
mkush on December 13, 2014
Hot glue is not the best choice for assembly as it does not allow enough time for proper alignment before setting. I'll bet every modeller has run into this problem with hot glue. A better choice is a slower setting glue. For most of my gluing on all types of models I use Weldbond, non toxic, "welds most anything" glue. It is foam compatible, strong, and dries clear. It takes longer to set but saves a lot of trouble and time in the long run. As well, it has time to soak into the glued materials unlike hot glue, which only sets on the surface.
Log In to reply
Beetlebeetle on December 17, 2014
Hi

Hot glue works brilliantly. Try using a high-temp glue gun and practice a bit on some scrap foam. Also, test fit your parts a couple of times so you know exactly how they're going to go together before you apply glue.

Slower-setting glue can actually be a big problem because you run into the problem (like when gluing spars or wing trailing edges) of needing to clamp things in place. Hot glue sets fast enough (and with high temp glue, slowly enough) to allow you to just hold things, with your hands, for a minute or so and you're done.

Last thing: if you let your glue gun get up to temp, the hot glue will run well and not just set on the surface, it will grab onto every little nook and cranny it can :)

Cheers.
Log In to reply
MD_Lawn_Dart on December 22, 2014
I use an 80 watt glue gun. The glue is literally boiling as it leaves the nozzle! Works like a charm. I just tried to fly mine yesterday but forgot to check my CG. BAD IDEA. One full flip and it landed on its back. Only a broken prop and dented pride. By the time I checked everything out it was too dark to go again.....maybe by Friday.😂
Log In to reply
rolyatatak on January 7, 2015
I'm a beginner and just built a ft simple storch and don't know what dual rates and expo percentages are needed with the flaperons on a dx9. Any help is appreciated thanks

Log In to reply
dynam on February 13, 2015
If I wanted to use a different motor instead of the 2217/7 motor, is there another motor like turnigy that I can use, what size motor would that be that is in the same class with the 2217/7?
Log In to reply
sr71madmax on January 25, 2015
I could not find the wire to fab the landing gear I found that metal coat hangers worked extremly well. Just wanted to pass this on.
Log In to reply
SimFlite on May 13, 2015
I plan on flying (hopefully) and crashing the S#%t out of at least 6 different 1's!!!!

Log In to reply
LarryJ1 on May 7, 2015
I bought the kit and built one from plans, The kit is awesome. I had no trouble at all building the fuse, tail and wing either way, however, the landing gear is almost impossible to get built. I built three sets in order to get enough pieces to make two even following the video very carefully. There's got to be a better way to do these. I'm concerned that they'll be the first thing to go on a hard landing.
Log In to reply
rcphillis1 on September 30, 2022
I too cannot seem to figure out how to bend this correctly without ruining the wire
Log In to reply
pankaj on April 1, 2015
hiii i want to know
the thickness of foam board that you are using
and what size of foam board will be required
Log In to reply
Ricket on April 13, 2015
FliteTest uses Readi-Board foamboard which you can find at Dollar Tree stores in the USA. It is 3/16" polystyrene foam core, laminated on both sides with heavy Kraft paper, and comes in 20"x30" size boards.
Log In to reply
Damig on September 25, 2015
Will the full size plans fit on the 20x30" Sheet? The print shop thinks it is some huge plan to print..
Sri, plan inlarge/ scale change looks alot like MATH. Its my Krypotnite..

Many thanks for the help!
Damig
Log In to reply
manashraja on February 27, 2015
This is my first question.. I hope it gets answered.
How would this plane perform with a SunnySky X2212 KV980 motor and 10X4.7 prop? This setup provides a maximum of 870gm thrust.. Is it sufficient? What minimum thrust is required for good performance of this plane? Please help.
Log In to reply
SimFlite on May 13, 2015
Love You Guys!!!!!
Log In to reply
Edge-of-Tommarrow on February 8, 2015
Is this a good beginner plane I have never built one and i'm wonder if this would be a good start for me
Log In to reply
jess_gordon on April 7, 2015
Hi all: My storch is built and ready for a maiden flight. What I cannot find on the plans is the CG point. I vaguely recall hearing Josh mention 2" back from the leading edge somewhere in the build video but I cant find that again and it doesn't seem quite right. Can anyone pin it down for me?
Log In to reply
SimFlite on May 13, 2015
Ordered one got it! saving it for the history books! YOU! need too change the size on your print outs so that the print shop (I finally found) can print them out!!!!! Same as the Spite Fire,Speed Racer and Mustang!!
Log In to reply
dynam on February 13, 2015
I would like to know for this plane what direction should the motor be turning when and what prop to use? In other words should the motor be wire to turn CW or CCW, same thing for the motor?
Log In to reply
oldflyer on March 3, 2015
I decided to make tougher and larger wheels for my Storch after flying with the stock wheels.
Here is how to it:

1. Cut 8- 4" disks from foam board (FB)--4 for each wheel. I used black Dollar Tree FB to give the wheels a " real " look.

2. Cut 4-1.5" 1/16" plywood disks - 2 per wheel. These will be used on the outer sides of the wheels to reinforce the wheel.

3. I used a 5/32" od aluminum tube for the axle bearing. MAKE SURE THAT THE LANDING GEAR WILL FIT THROUGH THE TUBE! Drill a 5/32" hole in the center of each FB and plywood disk.

4. Dry fit one wheel--4 FB disks and two outer plywood disks with the aluminum tube. Cut the tube so that 1/8" of it protrudes from each side of the wheel.

5. To assemble the first wheel--slide a plywood disk onto the aluminum tube axle bearing. Make sure that 1/8" of the bearing is protruding from the plywood disk. Then hot melt glue a FB disk to the plywood disk--followed by three more FB disks hot melted to each other. Finish the wheel with a plywood disk. If done properly 1/8" of the axle bearing should be protruding from each side of the wheel.

6. To make a "tread"--wrap the tread of the wheel with black duct tape. Any tape that hangs over the side of the wheel can be cut and secured to the wheel side.

7. Make the second wheel as you did the first and you will have a matched set.

8. I used wheel collars to secured the wheels to the landing gear.

What you have is an inexpensive lightweight wheel that will be tough enough to last many flights. You can make any size wheel using this technique for the Storch or any other plane.
Log In to reply
kostas545 on February 7, 2015
Hi everyone,
Could you tell me the thickness of the foam to use? Is 5mm or 3mm?
Thanks in advance.

Kostas.
Log In to reply
Ilias.GR on February 12, 2015
I used ..http://www.plaisio.gr/zwgrafiki-hobby/maketa/xartoni/Neofoam-Card-Board-50x70cm-3mm-3MM-50%CE%A770.htm
its heavy and I haven't test it yet. over 1200 grams also its a few cm shorter.
Log In to reply
kostas545 on February 13, 2015
Thanks Ilias.GR
I was about to use three of them
http://www.plaisio.gr/zwgrafiki-hobby/maketa/xartoni/Neofoam-Card-Board-70x100cm-5mm-5MM-70%CE%A7100.htm which is too expensive.
So 3mm is thick enough to hold the structure of the plane and this http://www.plaisio.gr/zwgrafiki-hobby/maketa/xartoni/Neofoam-Card-Board-70x100cm-3mm-3MM-70%CE%A7100.htm will be ok, wouldn't be?

Kostas

Log In to reply
HelderCosta on June 23, 2015
A Big Hello From Portugal.!!!!
My name is Costa and I Love your show Guys, Wishing all the best and hope it will goes on for many..many Years to come...Start with the Hobby recently and im very excited. The FT stroch is gona be my first build...I will post some pictures of it very soon...Take Care....
Log In to reply
Bsilver on July 23, 2015
Hi, I was wondering if this would perform well with a Turnigy Park300 Outrunner 1380kv?
Log In to reply
Charlie1969 on November 12, 2015
I purchased the FT Simple Storch not too long ago and it was a breeze to build along with the build video with Josh B. I'd be more than happy to post some progress pics if anyone is interested.
Log In to reply
lionheart5898 on January 12, 2016
Hey there I'm I process of making my storch plane myself almost built what motor are u using for ur plane please.
Log In to reply
Rats on January 12, 2016
Would love to see an "all-in" materials list. Not just the electronics, but the building materials (boards, skewers, craft sticks, wire, etc.).

Going to attempt the Storch as my first scratch built plane... :)

Log In to reply
Charlie1969 on November 12, 2015
Also, quick question, I currently have a Spektrum DX6i transmitter. I don't know which receiver to get. I do want to upgrade to maybe the DX8 eventually and thinking of getting an 8 channel receiver. Any input would help a lot!!
Log In to reply
Pilotdude on October 26, 2015
Hi Guys

My CG is sitting 3 inches from the leading edge. Any ideas how I can get it further forward? i already have a 2200 right up in the nose.
Log In to reply
Charmac63 on August 19, 2015
flitetest i have been watching your videos for sometime now and you have renewed my interest in flight. You guys put on a great show with great enthusiasm that is infectious. I am spreading the word, i just completed the the speed build kit for the FT Simple Storch and plan to maiden it this weekend with friends and family to try and draw them in as well, i also just completed the scratch build FT Wonder to entice them even more in some combat, looking forward to more flitetest and i hope to make it out to flitefest next year. Thanks and happy flyin'

charmac
Log In to reply
Jerryf on November 5, 2015
I have just built the FT Storch and somehow I can't find the CG location. Can you let me know the location or perhaps a link to where it is found?

Thanks
Log In to reply
miguelsemp on July 17, 2016
Hi guys,
This is a awesome plane. I build this as my first plane and have been enjoying the experience a lot.
I'd suggest that you also offer a core kit for replacement as you have with other kits, or maybe even make a replaceable nose (and landing gear section) since this is the part that takes most of the hits when crashing.

Miguel

Log In to reply
magic_marty on August 7, 2016
I'm guessing it is normal for the leading edge on the bottom of the wing to curve up when folding/gluing the wing ? Giving it a semi-symmetrical airfoil ?
Log In to reply
ralphsarc on August 17, 2016
Joining the bottom fuselage to the fuselage halves!!

As a RC building newby I'm thrilled with my Storch or at least up until yesterday!

If I was able to do it over I would have added small support strips along the interior of the fuselage walls to support or allow the bottom to rest on making gluing and aligning much simpler and eliminate the 19 degree hot glue burns I received!!

Again being a newby I expected a learning curve but not these painful burns!!

Ralph.

Log In to reply
mikeporterinmd on October 31, 2016
It seems best to just feel the burn and get used to it. After a while, you develop a sense for what is really going to hurt and get rid of quickly and what won't. Also, your skin gets tougher. Just watch out... not all fingers get toughened at the same time. I got burned on my ring finger last night. But, it's not even a second degree burn.
Log In to reply
vishal on July 20, 2016
I got the speed build kit, looks like it has 4 round carbon fiber rods, any clue what is that for?

Log In to reply
magic_marty on August 25, 2016
One thing i would do different is when folding and gluing the wing i would leave the leading edge till last and glue the creases fold and let dry then open back up and then do the spares and leading edge, i think it's such a long wing that putting that much glue on so many places it allows the glue to start to cool and it affects when folding cause the glue is thickening up before you get it all on and folded...I believe that is why my wing ended up with the bottom front leading edge curving up cause the glue cooled a bit before i got it folded but it still flies fine I just had to add some foam wing saddle tape to the fuselage to fill the gap when it rest on the fuselage as well as some foam blocks to raise the rear of the wing sitting on the fuselage to change the angle of attack of the wing...It was to much tilted up and the plane constantly wanted to climb ..
Log In to reply
mikeporterinmd on October 31, 2016
I had the same problem when folding the wing, too. My first kit wing was really bad so I made a new one from plans and I got less of a curve, but still some. The only problem I see with your idea is that if you glue the creases first, some might leak on to the spar and you will have to pull the wing off in order to glue the leading edge. Perhaps glue the leading edge first and get a nice clean fold-over, then do the creases and spar?
Log In to reply
Brian Brookes on September 14, 2016
Hi Josh,
Can you tell me if there are plans for UK expansion?
I am scratch building a Storch and would love to source quick build
Pre cut parts and electronic kits
Log In to reply
Mybad on August 17, 2016
NO THRUST ANGLE???

It looks like the power pod is square. The mini power pod has a down and right thrust angle as do all of my other planes. Won't absence of a dual thrust angle adversely affect the flight performance of this plane, or any other plane that uses it?
Log In to reply
surdumil on December 16, 2016
I suggest adding the Storch Tips video to the collection of related videos.
http://flitetest.com/articles/ft-simple-storch-build-quick-tips

I thought the Storch Tips video added some very valuable information that really enhances the main build video. It highlights some key features of the Storch design that I've been particularly intrigued with.
Log In to reply
adiadidu@gmail.com on October 22, 2016
Hi Josh, at the top of the page right under View in Store you specifies that '' As always we also have complete build plans available for free linked at the bottom of this article. '' , and I do not find them. Are still prividing free plans ??
Thanks for answering !!
Log In to reply
mikeporterinmd on October 31, 2016
If you read this article, right below the last photo, there are lines that say "FT Simple Storch [FULL]" and TILED. Those are links, even though they do not appear differently from normal text as links generally do. The links work for me.
Log In to reply
Charlie1230 on January 20, 2017
Hi, plans are a bit confusing, I am confused about the box spar, where are the lines for removing foam, is this one spar or we have to make 2?
Log In to reply
DMC RC on January 23, 2017
There are two spars, each is connected to the wing if you look at josh's in the video you can figure out where to separate each spar from each wing
Log In to reply
Mushroomglue on March 12, 2017
How hard would it be to scale it down to 1/2 scale, and build it using 3mm foam? I like the style, but need something a bit easier to transport.
Log In to reply
Soufiani on April 12, 2017
Here's my little review of my FT Storch:https://youtu.be/34yp0lcxtIo
Please like and subscribe if you enjoyed it :-)
Log In to reply
Armand Fourie on November 25, 2017
What is the thickness of the foam board? I can find that info anywhere. Thanks
Log In to reply
stephen.guest@hotmail.co.uk on June 30, 2018

Log In to reply
Shortcircuit on January 18, 2018
Started to cut out two parts of fuz to join together and said why. Cut from a single piece now and far stronger. Using 6mm depron so modifications being made as butt joints
Log In to reply
stephen.guest@hotmail.co.uk on June 30, 2018

Log In to reply
old timer on June 9, 2018

Log In to reply
clinton.harris on October 24, 2018

Log In to reply
saddahyousif on September 2, 2020
My first attempt to build the ft simple storch using A2212 3t 1000kv motor and a 1045 propeller with a 2200mah 3S battery ended in failure
Log In to reply
Low altitude record on March 23, 2022
10 mins into this guide and I'm having a lot of trouble with the wing. The 90 degree double bevel does not remove nearly enough foam to easily fold the wing over. In fact when I tried to fold the wing over it split my leading edge wide open. I unfolded the wing and put a strip of packing tape to fix it, then went back and sanded the bevel way, way down so the wing can actually fold without tearing anything. I tried gluing it all down (13 minute mark) and the hot glue won't hold it down no matter how long I let it cure. I'm using adtech clear glue sticks. I also have the 'water resistant' brown foam board kit and I notice that the laser cut foam board is slightly melted near all the edges making all the edges slightly concave instead of a 90 degree flush edge. When the wing popped open after attempting to glue it, the brown paper edges of the box spar was all folded over and smushed. I've never used brown foam board or hot glue before for any parkflyer ever and now I can see why. I wish I started the build using exclusively foam safe CA. I was really excited for this build but so far it's been a big headache and then some.
Log In to reply
Elbertsm on May 2, 2022
gostaria de saber qual a real envergadura deste modelo:


Log In to reply

You need to log-in to comment on articles.


FT Simple Storch - Build